Guides for SE student projects »
JavaFX tutorial part 1 – Getting started
This tutorial takes you through the steps of building a typical Java FX application, using a chatbot application called Duke as a running example. Given below is what the end result can look like if you follow this tutorial until the end:
Let's get started!
Setting up the project
Ensure you are using JDK 25. Mac users need to use this precise distribution of the JDK 25 which comes bundled with JavaFX support.
Fork this starter repo, and clone it onto your computer.
Open the project in your favorite code editor. If you are using an IDE, configure it to use the JDK 25 (how to configure JDK in Intellij IDEA).
If you are following this tutorial to learn how to add a GUI to an existing app, we suggest that you follow this tutorial using the above repo first, without mixing tutorial code with your existing project code. Once you are happy with the GUI you've built following this tutorial, you can copy over the GUI code to your existing project, and adapt it to fit that project.
Continue to the section below to configure the project to use JavaFX
Setting up Java FX
Note: this tutorial assumes you will be using Gradle to manage dependencies of your project.
Update your build.gradle to include the following lines:
repositories {
mavenCentral()
}
dependencies {
String javaFxVersion = '17.0.7'
implementation group: 'org.openjfx', name: 'javafx-base', version: javaFxVersion, classifier: 'win'
implementation group: 'org.openjfx', name: 'javafx-base', version: javaFxVersion, classifier: 'mac'
implementation group: 'org.openjfx', name: 'javafx-base', version: javaFxVersion, classifier: 'linux'
implementation group: 'org.openjfx', name: 'javafx-controls', version: javaFxVersion, classifier: 'win'
implementation group: 'org.openjfx', name: 'javafx-controls', version: javaFxVersion, classifier: 'mac'
implementation group: 'org.openjfx', name: 'javafx-controls', version: javaFxVersion, classifier: 'linux'
implementation group: 'org.openjfx', name: 'javafx-fxml', version: javaFxVersion, classifier: 'win'
implementation group: 'org.openjfx', name: 'javafx-fxml', version: javaFxVersion, classifier: 'mac'
implementation group: 'org.openjfx', name: 'javafx-fxml', version: javaFxVersion, classifier: 'linux'
implementation group: 'org.openjfx', name: 'javafx-graphics', version: javaFxVersion, classifier: 'win'
implementation group: 'org.openjfx', name: 'javafx-graphics', version: javaFxVersion, classifier: 'mac'
implementation group: 'org.openjfx', name: 'javafx-graphics', version: javaFxVersion, classifier: 'linux'
}
Your build.gradle needs to include all JavaFX dependencies given above (not just the lines matching your OS), for your app to work on all three OSes.
Also note the following:
Writing your first Java FX program
A JavaFX application is like a play you are directing. Instead of creating props, you create Nodes (Nodes are the fundamental building blocks of a JavaFX application), and place them onto a Scene (a scene is a graph of Nodes). Then, you set your Scene on a Stage provided by JavaFX. When you call Stage#show() method, JavaFX renders a window with your Stage on it.
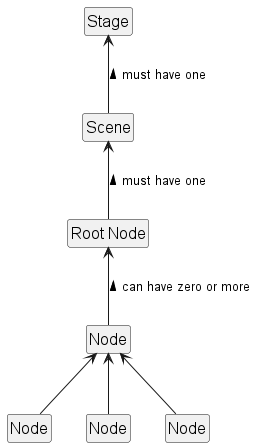
More specifically,
- the
Stageis like a window in a desktop application. It is the top-level container for a JavaFX application. - a
Sceneis a container forNodes. A stage contains multiple scenes, and shows different scenes at different times based on programme state, user actions, etc. - a
Nodeis a component that can be added to aScene.Nodes can be simple controls likeLabel,Button, etc., or complex controls likeTableView,TreeView, etc. ANodecan contain otherNodes too. - a
Root Nodeis the topmostNodein aScene, the parent of all otherNodes. It is usually a pane likeStackPane,BorderPane, etc.
Well, that's a very high-level view of how JavaFX works. The actual implementation of a Java FX is a bit more (ahem...) "involved". Not to worry; we'll tackle that one step at a time.
As is customary, let’s start off with a simple “Hello World” program. Let's say you have a class named Duke that you want to make a GUI for. Let's call this GUI class Main. When using Java FX, this GUI class needs to extend javafx.application.Application which in turn requires you to override the abstract Application#start(Stage) method and provide a concrete implementation. The parameter Stage is the primary stage that JavaFX provides.
import javafx.application.Application;
import javafx.scene.Scene;
import javafx.scene.control.Label;
import javafx.stage.Stage;
public class Main extends Application {
@Override
public void start(Stage stage) {
Label helloWorld = new Label("Hello World!"); // Creating a new Label control
Scene scene = new Scene(helloWorld); // Setting the scene to be our Label
stage.setScene(scene); // Setting the stage to show our scene
stage.show(); // Render the stage.
}
}
Note how we have created a Label to contain the text that we want to show. We then create the Scene and set its content. Finally, we set the stage and show it.
Next, we create another Java class, Launcher, as an entry point to our application (this class is needed to work around a classpath issue -- we can ignore the reason for now, but if you want to know more, you can refer to this commit from another project).
The Launcher class is reproduced below in its entirety.
import javafx.application.Application;
/**
* A launcher class to workaround classpath issues.
*/
public class Launcher {
public static void main(String[] args) {
Application.launch(Main.class, args);
}
}
Now that we have changed the entry point to our application, we need to update the mainClassattribute in build.gradle accordingly to point at the Launcher class.
// ...
application {
mainClass.set("Launcher")
}
// ...
JavaFX creates the Application instance by calling the no-argument constructor. If there is no other constructor in the class (such as the Main we created above), there is no need to provide such a constructor because Java automatically provides a no-argument constructor when there are no other constructors.
But if you already have an existing constructor which takes arguments in that class (in which case Java will not provide a no-argument constructor automatically), you need to create an overloaded constructor with no arguments yourself. An example given below:
public class Main extends Application {
private static final String DEFAULT_FILE_PATH = "duke/example.txt";
// ...
// Existing constructor
public Main(String filePath) {
// ...
}
// Overloaded constructor
public Main() {
this(DEFAULT_FILE_PATH);
}
// ...
}
This approach enables JavaFX to create the Application instance using the newly defined no-argument constructor, while preserving the functionality of the existing constructor.
Now, run the application (e.g., run ./gradlew run command in the terminal) and you should see something like this:

The following warning issued by Java runtime can be ignored. This warning appears when you use a later JavaFX version (e.g., 17) with a JDK version that doesn't support the modules feature yet (e.g., Java 11).
WARNING: Unsupported JavaFX configuration: classes were loaded from 'unnamed module @...
Similarly, the warning about the different versions (if any) can be ignored as well.
WARNING: Loading FXML document with JavaFX API of version ___ by JavaFX runtime of version ___
Congratulations! You have created your first GUI application!
ToC | What's next? JavaFX tutorial part 2 - Creating a GUI for Duke
Authors:
- Initial Version: Jeffry Lum