About
Now that you know what Collate is about, you can follow this guide to learn how to use Collate effectively.
Table of Contents
Quick Start
-
Install JDK 8u40 or later: Earlier Java version will not work. You can get it [here] (http://www.oracle.com/technetwork/java/javase/downloads/index.html).
-
Download Collate: You can then download
Collate-GUI.jarfrom the latest release here: https://github.com/collate/collate/releases - Mark your code with
@@authortags: Here are some examples.For
.fxmlfiles, ensure that thexmltag comes before your author tags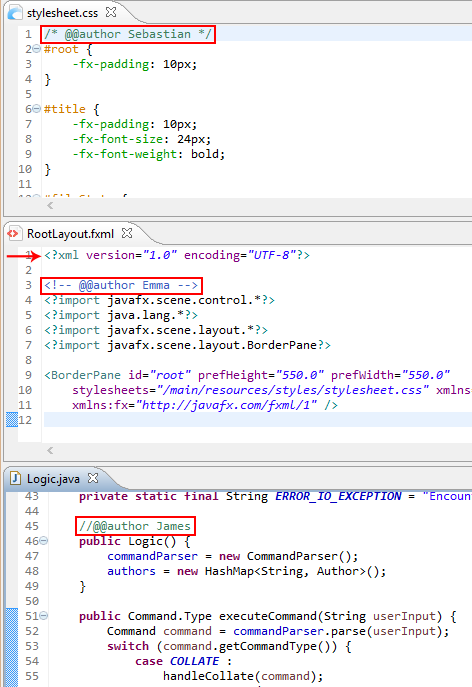
-
Launch Collate Simply double-click on the
Collate-GUI.jarfile to start Collate. You will be greeted with a simple interface that has a command bar. This command bar is where you enter short commands to tell Collate what to do.
-
Ask Collate to collate your code. As shown in the above animation, you can type
collate from <INPUT_FOLDER>to collate all files within<INPUT_FOLDER>including subfolders. -
View reports: The reports can be found in the same folder as the jar file. You’ll find one
.mdfor each author, containing the code written by that author. Here is an example.
To specify a different output folder, user the commandcollate from <INPUT_FOLDER> to <OUTPUT_FOLDER> - Try more commands:
view <AUTHOR'S NAME>- See author’s individual statistics e.g.view Sebastiansummary- See the default statistics summary tableexit- Exit Collate using the command bar
To learn more details of Collate features, refer to the ‘Feature Details’ section below.
Feature Details
Marking code
Using the @@author tag, you can specify the lines of code that you have written.
Lines between your author tag and the next author tag will be marked as yours.
Your name can include alphanumeric characters and dashes -.
Tip: Make sure to use the same name so that the code you wrote will be saved correctly in a single file.
You can include any type of file, as long as the @@author tag is present.
You can also use an empty author tag (i.e. an author tag without an author name) to mark end of your code segment. Empty author tags are helpful to avoid claiming code written by another author who has yet to enter his/her author tags.

Collating
To collate files in a folder and all its sub folders, use this command.
collate from <INPUT_FOLDER> to <OUTPUT_FOLDER> (the to <OUTPUT_FOLDER> part is optional)
Tip: If your folder includes whitespaces, you will need to surround the folder with double inverted commas.
Examples:
collate from src to collatedcollate from .collate from C:/myProject/component1/src to collated/srccollate from "C:/source files"
Omitting sub folders
If you would like to collate files only from the specified folder, and not files from sub folders,
you can add the only option.
collate from <INPUT_FOLDER> only or collate only from <INPUT_FOLDER>
Tip: option order of the
collatecommand is flexible. You need not worry about the position of these options, just remember to start each command with thecollatekeyword.
Examples:
collate from C:/myProject/component1/src onlycollate only from C:/myProject/component1/src
Collating only certain types of files
Collate scans the folder you specified for all types of file. What if you want to collate only java files?
Well, you can use the include option.
collate from <INPUT_FOLDER> include java
You can include multiple filetypes by separating them with commas.
collate from <INPUT_FOLDER> include java, css, fxml
Examples:
collate from C:/src include javacollate from C:/src to ./collated include java,md,css,txt
Viewing an author’s statistics
Viewing an author’s contribution statistics can be done by entering the following command.
view <AUTHOR's NAME>
Tip: To make using Collate easier, the author’s name is not case-sensitive.
This view allows you to see the proportion and number of lines of code the author wrote for files he/she contributed to.
Viewing the summary
The summary view is the default screen that shows you the contributions of all authors. To access it, simply enter the following.
summary
Exiting
Simply close the window or type the following command in the command bar.
exit
Using the Text UI
Collate also provide a version that uses a Text UI instead of a GUI.
To use it, first download the Collate-TUI.jar from the same location.
Then, open a command window in the same folder as Collate-TUI.jar and enter java -jar Collate-TUI.jar.
You can then enter commands described earlier this this document within the command window.
Here are some examples:
Using the batch mode
Collate Text UI can be run in ‘batch mode’ (i.e. non-interactive CLI) to execute a command in one shot.
Here’s an example.
java -jar Collate-TUI.jar collate from src to collated
Cheatsheet
| Command | Description |
|---|---|
collate from <INPUT_FOLDER> |
Collates all files within <INPUT_FOLDER> including subfolders and puts the collated files in the same folder |
collate from <INPUT_FOLDER> to <OUTPUT_FOLDER> |
Collates all files within <INPUT_FOLDER> including subfolders and puts the collated files in the <OUTPUT_FOLDER> |
collate from <INPUT_FOLDER> only |
Collates files in <INPUT_FOLDER> only |
collate from <INPUT_FOLDER> include <FILETYPE1>, <FILETYPE2> |
Collates <FILETYPE1> and <FILETYPE2> files in <INPUT_FOLDER> and its subfolders |
collate from <INPUT_FOLDER> only include <FILETYPE1> |
Collates <FILETYPE1> files in <INPUT_FOLDER> only |
view <AUTHOR'S NAME> |
Shows author’s individual statistics |
summary |
Shows default statistics summary table |
exit |
Exits Collate |