Guides for SE student projects »
This is a WIP community resource, containing contributions from community members.
- If you notice any bugs or have suggestions for improvements, please report at https://github.com/se-edu/guides/issues
- You are welcome to contribute by sending a PR to https://github.com/se-edu/guides/pulls too.
Adding AI Features to a Java App Using a Local LLM
Goal: Learn how to integrate a locally-running LLM into a Java project using llama.cpp as an inference backend, understand the agentic workflow architecture, and implement AI-powered natural language input for your app.
Local vs. hosted AI: Unlike the hosted AI approach which calls an external API, this tutorial runs the model entirely on the user's machine. There is no API key to manage and the app works fully offline — at the cost of requiring llama-server to be installed on the target machine.
Prerequisites
- Gradle-based Java Project: A Java project set up with Gradle as the build tool. In this tutorial we assume you have a simple command-line Java application, but the concepts can be applied to any Java app.
- Java 25+ — verify with
java -version. - llama.cpp installed on your system — the
llama-serverbinary must be on your PATH or in a standard Homebrew location:
- Download the latest release zip from the llama.cpp releases page. Look for a filename like
llama-b<version>-bin-win-avx2-x64.zip. - Extract the zip to a permanent folder, e.g.
C:\llama.cpp. - Add that folder to your
PATH:- Click the search bar at the bottom of the screen and type "Control Panel", then open it.
- Click System and Security, then System.
- Click Advanced System Settings (under "Related links").
- Click Environment Variables… at the bottom of the dialog.
- Under User variables, select Path and click Edit….
- Click New and enter the folder path, e.g.
C:\llama.cpp. - Click OK on all three dialogs to save.
- Open a new Command Prompt or terminal window (existing ones won't see the updated
PATH).
Verify the installation:
llama-server --version
You should see a version string. If this command is not found, check that the binary is on your PATH.
brew install llama.cpp
sudo apt update && sudo apt install llama-cpp
- A GGUF model file — download a small, quantised model and place it in
src/main/resources/models/. A good starting point isQwen3.5-0.8B-Q4_K_M.gguf, which is fast on CPU:pip install huggingface_hub huggingface-cli download Qwen/Qwen3.5-0.8B --local-dir ./src/main/resources/models
No Ollama, no API key. llama-server is a standalone binary and Java's java.net.http.HttpClient (available since Java 11) handles the HTTP calls. The model file can be bundled into your fat JAR as a classpath resource so end-users do not need to download it separately.
Workflow
The intended high-level workflow for the application is follows:
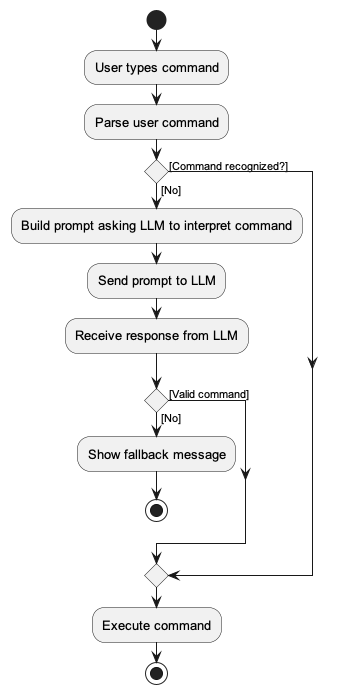
The key idea is that the LLM is only invoked as a fallback when the traditional parser cannot understand the user command. This keeps exact commands fast and predictable, while natural language input is handled by the LLM.
Step 1: Make Your First Call to the Local LLM
Before implementing the full workflow, let us first verify that your code can communicate with the server: start the server manually from the terminal, then call it from Java.
Start llama-server from your terminal:
llama-server --model src/main/resources/models/Qwen3.5-0.8B-Q4_K_M.gguf \
--port 8080 --ctx-size 2048 --no-webui --log-disable
Wait a few seconds until the server prints that it is listening (a line containing llama server listening).
Add a complete() method that builds a JSON request body and POSTs it to the /completion endpoint, and a parseContent() helper that extracts the generated text from the response:
Jackson is the same library used in AB3. If your project already includes it, no new dependency is needed. Otherwise, add jackson-databind to your build.gradle:
dependencies {
implementation 'com.fasterxml.jackson.core:jackson-databind:2.7.0'
// ... other dependencies
}
Jackson handles all JSON escaping and serialization automatically, so both methods become much simpler:
import com.fasterxml.jackson.databind.ObjectMapper;
import java.util.List;
import java.util.Map;
private static final int SERVER_PORT = 8080;
private static final int REQUEST_TIMEOUT_SECONDS = 30;
private final HttpClient httpClient = HttpClient.newHttpClient();
private static final ObjectMapper MAPPER = new ObjectMapper();
public String complete(String prompt, int maxTokens) throws Exception {
// Jackson serializes the Map to JSON, handling all escaping automatically.
String body = MAPPER.writeValueAsString(Map.of(
"prompt", prompt,
"n_predict", maxTokens,
"temperature", 0.0,
"stop", List.of("\n", "<|im_end|>", "User:"),
"stream", false));
HttpRequest request = HttpRequest.newBuilder()
.uri(new URI("http://127.0.0.1:" + SERVER_PORT + "/completion"))
.header("Content-Type", "application/json")
.timeout(Duration.ofSeconds(REQUEST_TIMEOUT_SECONDS))
.POST(HttpRequest.BodyPublishers.ofString(body))
.build();
HttpResponse<String> response = httpClient.send(request, HttpResponse.BodyHandlers.ofString());
return parseContent(response.body());
}
private String parseContent(String json) throws Exception {
return MAPPER.readTree(json).get("content").asText();
}
readTree fully parses the JSON tree, so asText() correctly handles escaped characters in the content string — no manual escaping or quote-scanning needed.
No extra dependencies needed — uses only Java's standard library.
private static final int SERVER_PORT = 8080;
private static final int REQUEST_TIMEOUT_SECONDS = 30;
private final HttpClient httpClient = HttpClient.newHttpClient();
public String complete(String prompt, int maxTokens) throws Exception {
// Escape special characters so the prompt is safe to embed in a JSON string.
// For example, a double-quote in the prompt would break the JSON syntax without this.
String escapedPrompt = prompt.replace("\\", "\\\\").replace("\"", "\\\"")
.replace("\n", "\\n").replace("\r", "\\r");
// Build the JSON request body. String.format substitutes %s and %d with
// the actual values, keeping the template readable.
String body = String.format(
"{\"prompt\":\"%s\",\"n_predict\":%d,\"temperature\":0.0," +
"\"stop\":[\"\\n\",\"<|im_end|>\",\"User:\"],\"stream\":false}",
escapedPrompt, maxTokens);
// Send the request using Java's built-in HTTP client (available since Java 11).
HttpRequest request = HttpRequest.newBuilder()
.uri(new URI("http://127.0.0.1:" + SERVER_PORT + "/completion"))
.header("Content-Type", "application/json")
.timeout(Duration.ofSeconds(REQUEST_TIMEOUT_SECONDS))
.POST(HttpRequest.BodyPublishers.ofString(body))
.build();
HttpResponse<String> response = httpClient.send(request, HttpResponse.BodyHandlers.ofString());
return parseContent(response.body());
}}
private String parseContent(String json) {
// Locate the "content" key and find the opening quote of its value.
String key = "\"content\":\"";
int valueStart = json.indexOf(key);
if (valueStart == -1) return "";
valueStart += key.length(); // advance past the key to the value itself
int valueEnd = json.indexOf("\"", valueStart); // find the closing quote
return json.substring(valueStart, valueEnd);
}
Test it with a quick main method or scratch class — call complete("hello", 50) with the server still running and verify you get a response back.
Why temperature=0.0 and stop tokens? We want deterministic, single-line output. Setting temperature to 0.0 makes the model always pick the most likely token. The stop tokens (\n, <|im_end|>) cut off generation immediately after the first line, preventing the model from adding unwanted explanation.
Step 2: Automate Server Lifecycle
Now that the call works, create an LlmServer class that manages the entire lifecycle of the llama-server process so the app no longer needs it started manually. Move the complete() method from Step 1 into this class.
Finding the binary
Probe a list of candidate paths in priority order so the app works across platforms without manual configuration:
private static final String[] CANDIDATE_PATHS = {
"llama-server", // on PATH
"/opt/homebrew/bin/llama-server", // Homebrew Apple Silicon
"/usr/local/bin/llama-server", // Homebrew Intel
"/usr/bin/llama-server"
};
Resolving the model file
When running from an exploded build the model is used directly from the classpath. Inside a fat JAR it is extracted to a local cache directory on first run:
private File resolveModelFile() throws IOException {
URL resourceUrl = LlmServer.class.getResource(MODEL_RESOURCE);
if ("file".equals(resourceUrl.getProtocol())) {
return new File(resourceUrl.toURI()); // dev mode: use directly
}
// Fat-JAR: extract to local cache on first run
File dest = new File(CACHE_DIR, CACHED_MODEL_NAME);
if (!dest.exists()) {
try (InputStream in = LlmServer.class.getResourceAsStream(MODEL_RESOURCE)) {
Files.copy(in, dest.toPath(), StandardCopyOption.REPLACE_EXISTING);
}
}
return dest;
}
Launching the process
ProcessBuilder pb = new ProcessBuilder(
binary,
"--model", modelFile.getAbsolutePath(),
"--port", String.valueOf(SERVER_PORT),
"--ctx-size", "2048",
"--n-gpu-layers", "0", // set > 0 to use GPU
"--threads", String.valueOf(Runtime.getRuntime().availableProcessors() / 2),
"--no-webui",
"--log-disable"
);
pb.redirectErrorStream(true);
pb.redirectOutput(ProcessBuilder.Redirect.DISCARD);
serverProcess = pb.start();
After starting, poll GET /health every 500 ms (up to 60 s) until the server responds with HTTP 200 before marking it ready.
Step 3: Build the Interpreter Layer
With the server managed automatically, add an LlmInterpreter class that converts natural language input into app commands.
Define the system prompt in a template file
Rather than hardcoding the prompt in Java, store it in a resource file (e.g. src/main/resources/nlp/prompt_template.txt) and load it once at class-init time:
private static final String PROMPT_TEMPLATE = loadPromptTemplate();
private static String loadPromptTemplate() {
try (InputStream is = LlmInterpreter.class.getResourceAsStream("/nlp/prompt_template.txt")) {
return new String(is.readAllBytes(), StandardCharsets.UTF_8);
}
}
The template uses ChatML format (required by Qwen and many other open models) and instructs the model to output only a valid command string. Suppose your app is a CLI-centric task management app — the template would look like:
<|im_start|>system
You are a task manager assistant. Convert user input into ONE valid app command string.
COMMANDS:
- todo <description>
- deadline <description> /by <date>
- event <description> /from <date> /to <date>
- list
- done <task_number>
- delete <task_number>
- help
RULES:
1. Output ONLY the command string, no explanation.
2. For greetings or chitchat, output: CHAT: <short friendly reply>
3. If no command fits, output: UNKNOWN
EXAMPLES:
remind me to buy groceries -> todo buy groceries
remove task 3 -> delete 3
what tasks do I have? -> list
hello -> CHAT: Hey there! Ready to tackle your to-do list?
<|im_end|>
<|im_start|>user
{USER_INPUT}
<|im_end|>
<|im_start|>assistant
At runtime, replace {USER_INPUT} with the actual user input before sending the prompt. Keeping the prompt in a text file (rather than Java source) makes it easy to iterate on without recompiling.
Validate and normalise the output
Small local models sometimes prepend preamble text (e.g., "Sure! Here is the command: todo buy milk"). Add a validateAndNormalise() method to handle this with a two-phase check:
String validateAndNormalise(String raw) {
String cleaned = raw.replaceAll("^['\"`]+|['\"`]+$", "").trim();
// Pass-through for chat responses
if (cleaned.regionMatches(true, 0, "CHAT:", 0, 5)) {
return cleaned;
}
// Phase 1: first word is a known command — accept directly
String firstWord = cleaned.split("\\s+")[0].toLowerCase();
if (KNOWN_COMMANDS.contains(firstWord)) {
return cleaned;
}
// Phase 2: scan for a command word after preamble
Matcher matcher = COMMAND_SCAN_PATTERN.matcher(cleaned);
if (matcher.find()) {
return cleaned.substring(matcher.start(1)).trim();
}
return null; // unrecognized — caller shows fallback message
}
KNOWN_COMMANDS should mirror every command keyword your parser recognizes (plus any short aliases), so the whitelist stays in sync with the rest of the app.
Step 4: Wire It into Your App
Initialize on a background thread
Starting llama-server can take a few seconds. Initialize it on a background thread so your app remains responsive:
Thread llmInit = new Thread(() -> {
LlmInterpreter.getInstance().init(); // starts llama-server, blocks until ready
boolean ready = LlmInterpreter.getInstance().isReady();
// notify the UI or log the status
System.out.println(ready
? "Natural language mode ready."
: "LLM unavailable — exact commands still work.");
}, "llm-init");
llmInit.setDaemon(true);
llmInit.start();
For JavaFX apps, wrap the call in a Task<Void> and update the UI in setOnSucceeded to stay on the JavaFX thread.
The fallback flow
When the user submits input, try the traditional parser first. Only fall back to the LLM if the command is not recognized:
// Try exact command parsing first — no LLM involvement
try {
String response = app.handleCommand(input);
display(response);
return;
} catch (UnknownCommandException ignored) {
// fall through to LLM
}
// LLM fallback — run off the main thread to avoid blocking
new Thread(() -> {
String interpreted = LlmInterpreter.getInstance().interpret(input);
handleLlmResult(interpreted);
}, "llm-interpret").start();
Destructive command confirmation
For commands that modify or delete data (e.g. delete, clear), consider asking the user to confirm before executing the AI-generated command:
if (isDestructive(candidate)) {
pendingCommand = candidate;
display("I interpreted that as: \"" + candidate + "\"\n"
+ "Type yes to confirm, or anything else to cancel.");
}
Step 5: Package Everything into a Fat JAR
Place the model file in src/main/resources/models/ so Gradle includes it in the fat JAR automatically. Use the Shadow plugin:
plugins {
id 'application'
id 'com.github.johnrengelman.shadow' version '7.1.2'
}
shadowJar {
archiveBaseName = "myapp"
archiveClassifier = null
mergeServiceFiles()
}
Build it:
./gradlew shadowJar
The resulting JAR is self-contained. On first run, LlmServer extracts the model to a local cache directory automatically — no manual setup required by the user beyond having llama-server installed.
llama-server itself must still be installed on the target machine. Only the model weights are bundled in the JAR; the inference binary is a system dependency.
Step 6: Next Steps
With the basic local AI integration in place, you can expand the capabilities further along the following directions:
- Graceful degradation: Check
LlmInterpreter.isReady()at startup. Ifllama-serveris missing or the model fails to load, the app should still work with exact commands — consider showing a visible status indicator in the UI. - Inform users about the dependency: Document the
llama-serverrequirement clearly, and detect and report it gracefully in-app if it is missing. - Timeout tuning: Adjust the inference timeout based on your target hardware. Slower machines (e.g., no GPU) may need a longer timeout.
- Swap models: Change the model resource path and update the prompt template's format and examples to match a different GGUF model. Larger models give better accuracy at the cost of startup time and memory usage.
- Prompt tuning: Test with varied inputs and expand the
EXAMPLESsection of your template to cover edge cases specific to your command set. - GPU acceleration: Set
--n-gpu-layersto a positive number when launchingllama-serverto offload layers to the GPU for faster inference on supported hardware.
Contributors:
- Initial version: Chen Yizhong (@yizhong187), Aditya Misra (@MadLamprey)