Guides for SE student projects »
Java 17 Installation Guide for Linux Users
This guide explains how to install the (specifically, OpenJDK Java 17) on Linux using the command line. This guide was created using Ubuntu 22.04 but the steps for other Debian based Linux distros should be similar. This guide assumes you have superuser access.
Installation
- Update APT repositories
- First we need to ensure our apt repositories are updated. Enter the following command in your terminal:
Enter your password if prompted.sudo apt update && sudo apt upgrade
- First we need to ensure our apt repositories are updated. Enter the following command in your terminal:
- Install JDK
- Install the Java 17 OpenJDK version by running:
Note that the default installation location is usuallysudo apt install openjdk-17-jdk/usr/lib/jvm/.
- Install the Java 17 OpenJDK version by running:
- Verify Installation
- To verify the installation, run:
java -version
- To verify the installation, run:
Switching between Java versions
If you have multiple versions of Java installed, you can switch between them using update-alternatives.
To see the currently active Java version run,
java -versionTo switch to a different installed version, run the following command.
sudo update-alternatives --config javaYou should see terminal output like this:
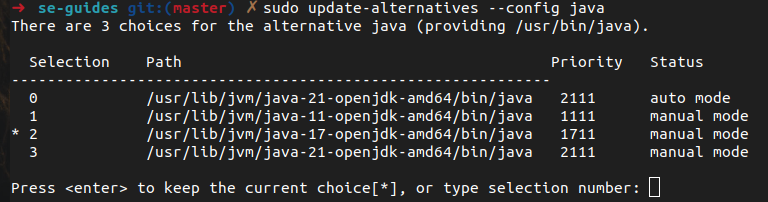
Follow the instructions to change to your desired version. For example, to use Java 11 in the image above, type
1into the terminal.If you don't have the desired version installed, you can search for it by running the following command:
sudo apt-cache search openjdk | grep "\-jdk"You should see the available OpenJDK Java versions listed like so:
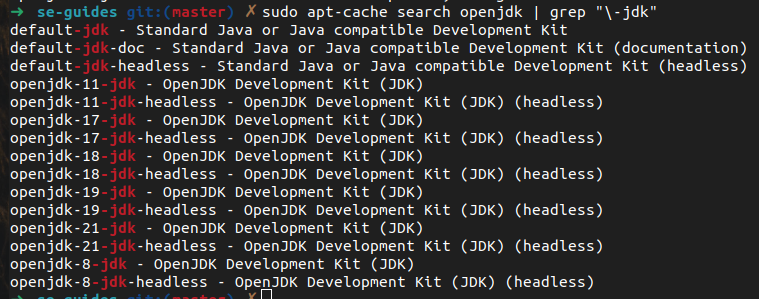
Decide on one of the available versions and follow the same steps as above to install your desired Java version.
Authors:
- Initial Version: Drustan Yeo (@drustanyjt)