Guides for SE student projects »
This is a WIP community resource, containing contribution from community members.
- If you notice any bugs or suggestions for improvements, please report at https://github.com/se-edu/guides/issues
- You are welcome to contribute by sending a PRs to https://github.com/se-edu/guides/pulls too.
VS Code - Using GitHub Copilot
GitHub Copilot is an AI Tool that is well-integrated with VS Code, because both tools are from the same parent company (Microsoft).
Pre-requisites
If you have not enabled Copilot in your GitHub account, follow the guide in the panel below:
Installing GitHub Copilot in Visual Studio Code
- Updating Visual Studio Code
- Open Visual Studio Code.
- Go to
Help→Check for Updates. - If updates are available, it should now say "Installing update…".
- Once it finishes installing, go to
Help→Restart to Update.
- Install the Extension Pack for GitHub Copilot and the Extension Pack for GitHub Copilot Chat extension, to enable support for AI autocompletion.
- Click on both of the extension links above.
- Click on the
Installbutton on the page that opens. - It should prompt you with
Open Visual Studio Code?and clickOpen Visual Studio Code. - You will be redirected to the extension page in Visual Studio Code.
- Click on
Installto install the extension. - Make sure to install the Extension Pack for GitHub Copilot Chat as well with the same steps above.
Signing in to GitHub Copilot
- Verify Prerequisites
- Ensure you followed the section Installing GitHub Copilot in Visual Studio Code above.
- Sign in to GitHub Copilot
- Open Visual Studio Code.
- Click on the GitHub Copilot icon at the top.

- Click on
Sign inin the pop up. - You will be redirected to GitHub login page, where you can login or select the account linked to GitHub Education.
- It should prompt you with
Open Visual Studio Code?and clickOpen Visual Studio Code. - Once signed in, the GitHub Copilot icon will now say "Toggle Chat" when hovered over.
- Clicking on the GitHub Copilot icon will open the Copilot chat window.
- Verifying the installation of GitHub Copilot
- Open a new text file using
File→New Fileor /Ctrl+N|Cmd+N. - You should see an automatic suggestion appear in the empty text file.

- Open a new text file using
Using GitHub Copilot in Visual Studio Code
Basic Code Completion
To get Copilot to complete code based on a comment:
- In a Java file, type a comment like
// print Hello Worldinside the main method.public class Main { public static void main(String[] args) { // print Hello World } } - GitHub Copilot will automatically suggest code to complete or implement the comment.

- Press
Tabto accept the suggestion, or continue typing to refine it.
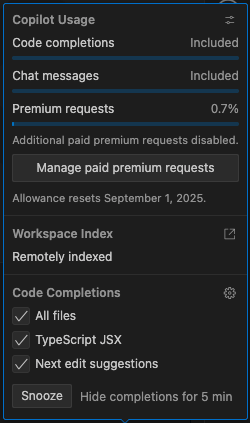
To disable automatic code completion,
- Look for the Copilot icon in the bottom right of vscode:

- Uncheck the necessary boxes (
All filesdisables code completion for all files, while the checkbox below it disables code completion for the currently open file type.)
If you have access to Copilot Pro, you can also monitor your Copilot Premium Requests usage here.
Copilot Chat
Open the Copilot Chat using /
Ctrl+Alt+I|Cmd+Alt+Ior using the Copilot icon.Ask something like: "Write a main method that calculates the factorial of N".
Copilot will generate a response in the chat window.
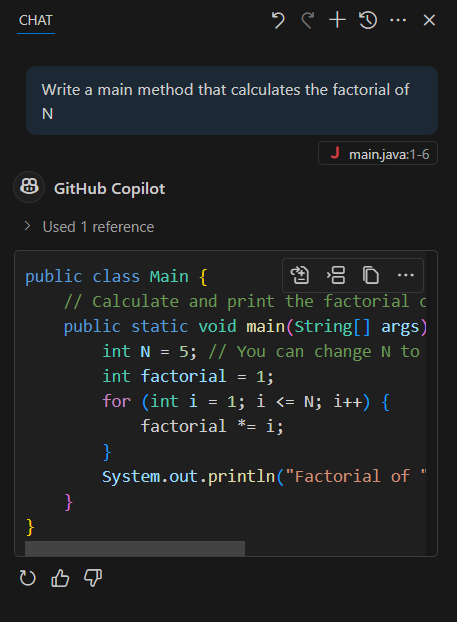
You can directly insert or copy code chunks using the buttons in the top right corner.
From left to right: Insert automatically into the current file, Insert at cursor, Copy to clipboard.

The Copilot Chat interface also contains a variety of useful features.

- You can toggle between 3 different modes, ask (ask a question and copilot generates an answer), edit (ask copilot to edit a select number of files) and agent (ask copilot to execute autonomously with a high level prompt). Find out more about the different modes here.
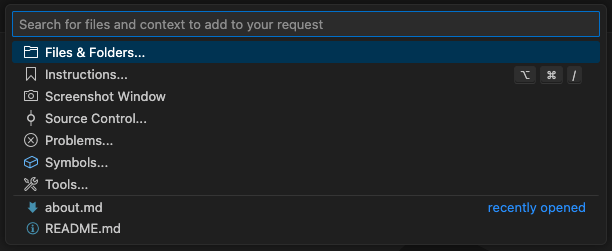
- By default, only the currently opened file will be included in the chat context (i.e. "visible" to Copilot). Include additional context by pressing the Add Context button, which will open up a window at the top that allows you to select files to add to Copilot Chat's context.
- You can choose between different AI models to use. If you have access to Copilot Pro (which comes with Github Education), you can select premium models.
- You can use mentions, by typing
@followed by the participant's name, or clicking on the@icon. This allows you to invoke certain chat participants that are optimized to answer questions about their respective domains. One useful mention is@workspace, which answers questions about your entire repository.
Copilot Inline Chat
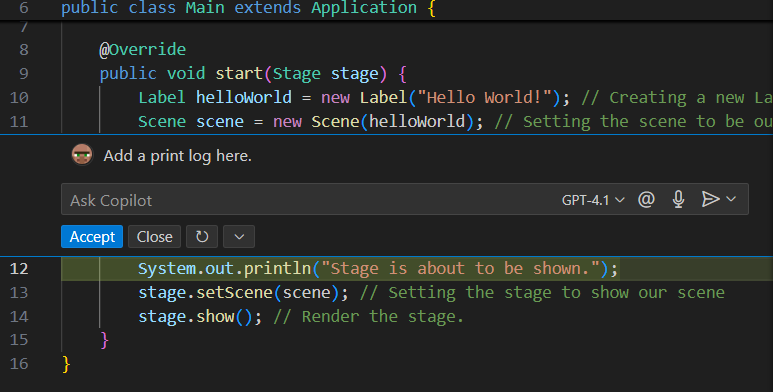
- Go to the line or section where you want to ask Copilot for assistance.
- Use the inline chat feature using the shortcut /
Ctrl+I|Cmd+I. - Type your request such as "Add a print log here" and press
Enter. - The generated lines of code will be highlighted in yellow, and you can insert them by clicking on
accept.
Prompting Copilot in the Terminal
- Open a terminal in Visual Studio Code.
- Press
Ctrl+Ito bring up Copilot’s terminal prompt input.

Some common project-related prompts you might find useful:
- Run the checkstyle
- Compile and run the Java program
- Run JUnit tests
Perform Git operations(possible but not recommended; if you are new to Git, we discourage using Git inside the IDE -- it is better for beginners to learn Git independent of other tools)
Contributors: Norbert Loh (@NorbertLoh ), Luoqi Xu (@Luoq1-Xu)
