Guides for SE student projects »
JavaFX tutorial part 4 – Using FXML
While we have produced a fully functional prototype in part 3, there are some problems with the way we implemented it, using Java code alone:
Problem 1: The Main class attempts to do it all. Code for visual tweaks, listeners and even utility methods are all in one file. This makes it difficult to find and make changes to existing code.
A possible solution: An alternative approach (to hand-coding everything) is to use FXML -- an XML-based language that allows us to define UIs. Properties of JavaFX objects can be defined in the FXML file. For example, consider the following FXML snippet that defines a TextField similar to the one that we programmatically defined previously in part 2:
<TextField fx:id="userInput"
layoutY="558.0"
onAction="#handleUserInput"
prefHeight="41.0"
prefWidth="324.0"
AnchorPane.bottomAnchor="1.0" />
Notice how concise FXML is compared to the plain Java version.
Problem 2: The process of visually enhancing the GUI is long and painful. Every small change requires us to rebuild and run the application, just to see if the change gave the result we wanted.
A possible solution: Once we switch over to using FXML, we can use a tool such as Scene Builder (a tool developed by Oracle and currently maintained by Gluon) to inspect and tweak the GUI design in a fashion.
Let's return to Duke and convert it to use FXML instead, and give Scene Builder a try as well.
Refactor Duke to use FXML
FXML allows you to separate the GUI design (the so-called view), from the code that controls the GUI (the so-called controllers). First, lets extract out a MainWindow class to contain the controller aspect of the main GUI:
import javafx.fxml.FXML;
import javafx.scene.control.Button;
import javafx.scene.control.ScrollPane;
import javafx.scene.control.TextField;
import javafx.scene.image.Image;
import javafx.scene.layout.AnchorPane;
import javafx.scene.layout.VBox;
/**
* Controller for the main GUI.
*/
public class MainWindow extends AnchorPane {
@FXML
private ScrollPane scrollPane;
@FXML
private VBox dialogContainer;
@FXML
private TextField userInput;
@FXML
private Button sendButton;
private Duke duke;
private Image userImage = new Image(this.getClass().getResourceAsStream("/images/DaUser.png"));
private Image dukeImage = new Image(this.getClass().getResourceAsStream("/images/DaDuke.png"));
@FXML
public void initialize() {
scrollPane.vvalueProperty().bind(dialogContainer.heightProperty());
}
/** Injects the Duke instance */
public void setDuke(Duke d) {
duke = d;
}
/**
* Creates two dialog boxes, one echoing user input and the other containing Duke's reply and then appends them to
* the dialog container. Clears the user input after processing.
*/
@FXML
private void handleUserInput() {
String input = userInput.getText();
String response = duke.getResponse(input);
dialogContainer.getChildren().addAll(
DialogBox.getUserDialog(input, userImage),
DialogBox.getDukeDialog(response, dukeImage)
);
userInput.clear();
}
}
To go with the above, let's extract out the view aspect into an FXML file MainWindow.fxml, to be placed in src/main/resources/view/:
<?xml version="1.0" encoding="UTF-8"?>
<?import javafx.scene.control.Button?>
<?import javafx.scene.control.ScrollPane?>
<?import javafx.scene.control.TextField?>
<?import javafx.scene.layout.AnchorPane?>
<?import javafx.scene.layout.VBox?>
<AnchorPane maxHeight="-Infinity" maxWidth="-Infinity"
minHeight="-Infinity" minWidth="-Infinity"
prefHeight="600.0" prefWidth="400.0"
xmlns="http://javafx.com/javafx/17"
xmlns:fx="http://javafx.com/fxml/1"
fx:controller="MainWindow">
<children>
<TextField fx:id="userInput"
layoutY="558.0"
onAction="#handleUserInput"
prefHeight="41.0"
prefWidth="324.0"
AnchorPane.bottomAnchor="1.0" />
<Button fx:id="sendButton"
layoutX="324.0"
layoutY="558.0"
mnemonicParsing="false"
onAction="#handleUserInput"
prefHeight="41.0"
prefWidth="76.0"
text="Send" />
<ScrollPane fx:id="scrollPane"
hbarPolicy="NEVER"
hvalue="1.0"
prefHeight="557.0"
prefWidth="400.0"
vvalue="1.0">
<content>
<VBox fx:id="dialogContainer"
prefHeight="552.0"
prefWidth="388.0" />
</content>
</ScrollPane>
</children>
</AnchorPane>
Note that if you are using packages, fx:controller="MainWindow" needs to be updated accordingly e.g., fx:controller="seedu.duke.MainWindow"
The @FXML annotation (seen in MainWindow.java) marks a private or protected member and makes it accessible to FXML despite its modifier.
Without the annotation, we will have to make everything public and expose our UI to unwanted changes.
Even private methods like handleUserInput can be referenced from an FXML file when annotated by @FXML.
The FXML runtime will map a control with a fx:id defined in FXML to a variable with the same name in its controller.
Notice how in MainWindow, we can invoke userInput.clear() just as we did in the previous non-FXML version of Duke (this is enabled by the <TextField fx:id="userInput" ... /> in the MainWindow.fxml).
Similarly, let's create an FXML file for the DialogBox (to be placed in src/main/resources/view/):
<?xml version="1.0" encoding="UTF-8"?>
<?import javafx.geometry.Insets?>
<?import javafx.scene.control.Label?>
<?import javafx.scene.image.ImageView?>
<?import javafx.scene.layout.HBox?>
<fx:root alignment="TOP_RIGHT"
maxHeight="1.7976931348623157E308"
maxWidth="1.7976931348623157E308"
prefWidth="400.0"
type="javafx.scene.layout.HBox"
xmlns="http://javafx.com/javafx/17"
xmlns:fx="http://javafx.com/fxml/1">
<children>
<Label fx:id="dialog" text="Label" wrapText="true" minHeight="-Infinity"/>
<ImageView fx:id="displayPicture" fitHeight="99.0" fitWidth="99.0" pickOnBounds="true" preserveRatio="true" />
</children>
<padding>
<Insets bottom="15.0" left="5.0" right="5.0" top="15.0" />
</padding>
</fx:root>
Note that for Label, we set wrapText to true and minHeight to -Infinity. This configuration wraps the text within the label, removes the minimum height constraint, and allows the label to grow vertically as needed:

Without setting minHeight to -Infinity, text overrun may occur when the text to be displayed exceeds the size of the label, causing the text to not be fully displayed and ends with ... instead:

With that, we can trim down the DialogBox.java to contain only the controller aspect:
import java.io.IOException;
import java.util.Collections;
import javafx.collections.FXCollections;
import javafx.collections.ObservableList;
import javafx.fxml.FXML;
import javafx.fxml.FXMLLoader;
import javafx.geometry.Pos;
import javafx.scene.Node;
import javafx.scene.control.Label;
import javafx.scene.image.Image;
import javafx.scene.image.ImageView;
import javafx.scene.layout.HBox;
/**
* Represents a dialog box consisting of an ImageView to represent the speaker's face
* and a label containing text from the speaker.
*/
public class DialogBox extends HBox {
@FXML
private Label dialog;
@FXML
private ImageView displayPicture;
private DialogBox(String text, Image img) {
try {
FXMLLoader fxmlLoader = new FXMLLoader(MainWindow.class.getResource("/view/DialogBox.fxml"));
fxmlLoader.setController(this);
fxmlLoader.setRoot(this);
fxmlLoader.load();
} catch (IOException e) {
e.printStackTrace();
}
dialog.setText(text);
displayPicture.setImage(img);
}
/**
* Flips the dialog box such that the ImageView is on the left and text on the right.
*/
private void flip() {
ObservableList<Node> tmp = FXCollections.observableArrayList(this.getChildren());
Collections.reverse(tmp);
getChildren().setAll(tmp);
setAlignment(Pos.TOP_LEFT);
}
public static DialogBox getUserDialog(String text, Image img) {
return new DialogBox(text, img);
}
public static DialogBox getDukeDialog(String text, Image img) {
var db = new DialogBox(text, img);
db.flip();
return db;
}
}
When we create a new instance of DialogBox (i.e., in the DialogBox constructor), we set both the controller and root Node to DialogBox. From this point onwards we can interact with DialogBox as we did in the non-FXML verison of Duke. Note that this is another way of connecting up the fxml view file with the Java controller file (different from the fx:controller technique we used to link up the MainWindow.fxml with the MainWindow.java).
All that remains to do now is to trim the Main class, as follows:
import java.io.IOException;
import javafx.application.Application;
import javafx.fxml.FXMLLoader;
import javafx.scene.Scene;
import javafx.scene.layout.AnchorPane;
import javafx.stage.Stage;
/**
* A GUI for Duke using FXML.
*/
public class Main extends Application {
private Duke duke = new Duke();
@Override
public void start(Stage stage) {
try {
FXMLLoader fxmlLoader = new FXMLLoader(Main.class.getResource("/view/MainWindow.fxml"));
AnchorPane ap = fxmlLoader.load();
Scene scene = new Scene(ap);
stage.setScene(scene);
fxmlLoader.<MainWindow>getController().setDuke(duke); // inject the Duke instance
stage.show();
} catch (IOException e) {
e.printStackTrace();
}
}
}
Again, we can interact with the AnchorPane defined in the FXML as we would have if we created the AnchorPane ourselves inside the Main class.
Run the application to verify it works as before.
From the above refactoring, you can see how we can use FXML to separate view and controller aspects into separate files, and how FXML files and matching Java files can still refer each other's elements.
Using Scene Builder to tweak the GUI
Next, let us explore how we can use the Scene Builder tool to tweak the GUI visually. Download the appropriate version for your OS and install it.
Let’s use Scene Builder to explore FXML files we created earlier.
Running Scene Builder brings up the main screen. SelectOpen Project>src/main/resources/view/MainWindow.fxml. Inspect each control and its properties.

On the right accordion pane, you can modify the properties of the control that you have selected. Try changing the various settings and see what they do!
Note that when you change something in Scene Builder and saves it, Scene Builder will change the JavaFX version in the
.fxmlfile to the latest JavaFX. Example:MainWindow.fxml- <fx:root ... xmlns="http://javafx.com/javafx/17" ... "> + <fx:root ... xmlns="http://javafx.com/javafx/22" ... ">This will cause a version incompatibility warning when you run the application. As a workaround, you can manually change back the version to the original value after you are done tweaking the UI. Alternatively, you can do to following (more permanent) fix:
- Locate the
SceneBuilder.cfgfile (where is that file?). - Add/update the JavaFX version specified in it (found under the
[JavaOptions]section), as follows:java-options=-Djavafx.version=17 - Restart the SceneBuilder.
- Locate the
On the left accordion, when you expand the
Controllerpanel at the bottom, you can see that we have set the controller class toMainWindow.

Let’s now open
DialogBox.fxmlin Scene Builder (open it the same way you opened the previous file), and expand theControllerpanel on the left-side accordion.
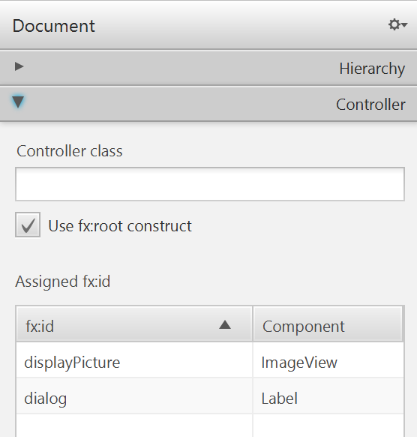
The main difference you can see here is that DialogBox ticksUse fx:root constructand does not define a controller class. Ticking this enables the use of thefx:rootelement, allowing you to reference a root element, which can be set by calling thesetRoot()method. The controller (which is shown as empty) can be programmatically set using thesetController()method. This is exactly what we did in the constructor of theDialogBox.javaearlier.DialogBox.javaprivate DialogBox(String text, Image img) { try { FXMLLoader fxmlLoader = new FXMLLoader(MainWindow.class.getResource("/view/DialogBox.fxml")); fxmlLoader.setController(this); fxmlLoader.setRoot(this); fxmlLoader.load(); } catch (IOException e) { e.printStackTrace(); } dialog.setText(text); displayPicture.setImage(img); }More about
fx:rooton the documentation Introduction to FXML | JavaFX 2.2.
Previous | ToC | What's next? JavaFX tutorial part 5 - Tweaking the GUI
Authors:
- Initial Version: Jeffry Lum
- Contributions: Samuel Neo (@samuelneo)