Guides for SE student projects »
This is a WIP community resource, containing contributions from community members.
- If you notice any bugs or have suggestions for improvements, please report at https://github.com/se-edu/guides/issues
- You are welcome to contribute by sending a PR to https://github.com/se-edu/guides/pulls too.
VS Code - Creating a New Java Project
This guide will walk you through creating a new Java project in VS Code from scratch.
Prerequisites
Ensure you have followed our guide on Preparing VS Code for Java.
Creating a new project
There are two methods you can use to create a new Java project:
- Method 1: Use VS Code's project wizard
- Method 2: Create project manually
Method 1: Use VS Code's project wizard
The easiest way to create a new Java project is using VS Code's built-in project wizard.
VS Code may prompt you to install the Java Development Kit during project creation. You can skip this if you have already installed the JDK.
- Open the Command Palette: /
Ctrl+Shift+P|Cmd+Shift+P - Type
Java: Create Java Projectand select it
- Select the desired build tool:
- No build tool - For simple projects
- Gradle - For projects that will use Gradle build system
- Maven - For projects that will use Maven build system
- Choose the location and enter the project name as prompted
- VS Code will create the basic project structure for you
Method 2: Create project manually
If you prefer more control over the project setup, you can create a project manually.
Step 1: Create a workspace folder
Create a project folder on your computer (e.g.,
MyJavaProject)Open VS Code and select
File→Open Folder...Navigate to and select your project folder
Click "Select Folder" to open it as a workspace
After opening the project folder, VS Code may ask if you want to open it as a workspace. If prompted, click ‘Yes’ when asked to open the folder as a workspace.
Step 2: Set up the project structure
Create the following simple folder structure:
MyJavaProject/ └── src/ └── (your Java source files will go here)Open the Explorer panel: /
Ctrl+Shift+E|Cmd+Shift+ERight-click in the Explorer panel (Right-click in the empty area, not on an existing file)
Select
New FolderName it
srcVS Code automatically handles compilation, so you do not need separate folders for compiled
.classfiles.
Step 3: Create your first Java class
Right-click on the
srcfolderSelect
New FileName it
HelloWorld.javaAdd the following code:
public class HelloWorld { public static void main(String[] args) { System.out.println("Hello, World!"); } }Save the file: /
Ctrl+S|Cmd+STo compile and run your Java program, click the
Run() button or use theRunmenu. You may not see a.classfile appear in your workspace, as VS Code may compile your code in the background or store the output in a hidden folder. If you seeHello, World!(or your program's expected output), your environment is set up correctly!
Configuring your JDK
If you already have Java installed, VS Code should automatically detect and configure it when you create your project.
After creating your project, you may need to verify and configure VS Code to use the correct JDK version.
- Open the Command Palette: /
Ctrl+Shift+P|Cmd+Shift+P - Type
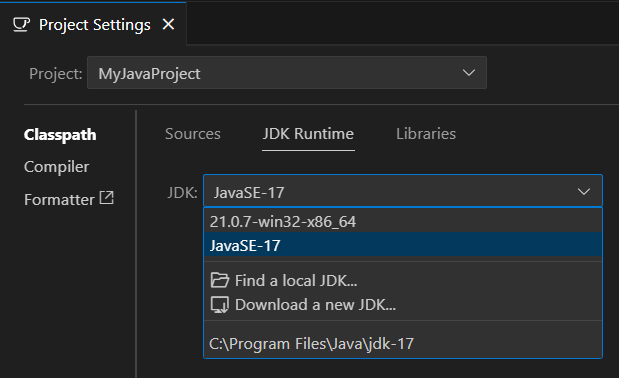
Java: Configure Java Runtimeand select it - Verify your JDK appears in the dropdown list and is selected
- Select the appropriate JDK if you have multiple versions installed
If no JDK options appear, try reloading VS Code (Open the Command Palette: / Ctrl+Shift+P | Cmd+Shift+P, then type and select Developer: Reload Window) and ensure your JDK is properly installed and added to your system’s PATH or select "Find a local JDK" to locate the installed JDK in your file system.
Configuring project settings
Manual Configuration
To view and modify project settings:
- Open the Command Palette: /
Ctrl+Shift+P|Cmd+Shift+P - Type
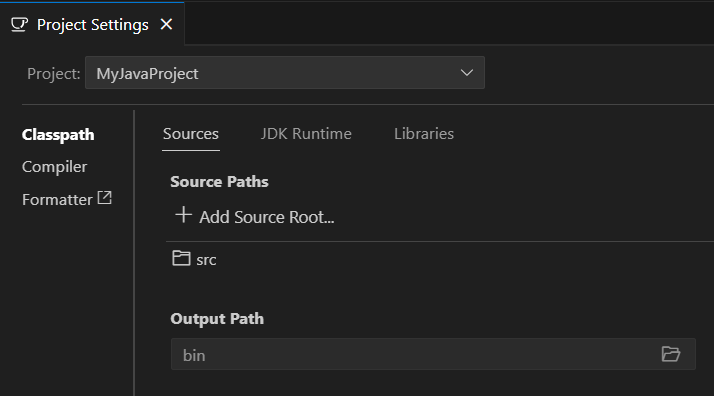
Java: Open Project Settingsand select it - Configure as needed:
- Source paths - Directories where your Java source files are located
- Output path - Directory where compiled
.classfiles will be stored - Libraries - External JAR files or libraries your project depends on
- JDK version - The JDK version to use for compilation and runtime
Using .vscode/settings.json
You can also configure project settings by creating a .vscode/settings.json file in the root directory if one does not already exist:
In the project root directory, create a folder named
.vscode.Inside the
.vscodefolder, create a file namedsettings.json. This file will store the project's VS Code configuration settings.Add these configuration settings to the
settings.jsonfile. Update the values to match your project's source folders, output directory, and library paths as needed.{ "java.project.sourcePaths": [ "src" ], "java.project.outputPath": "bin", "java.project.referencedLibraries": [ "lib/**/*.jar" ] }
Configuring Git
If you are using Git to version control the project, you may want to add the following to your .gitignore file:
# Compiled class files
*.class
# VS Code workspace settings
.vscode/
Running your project
- Open your Java file with a
mainmethod - To run the code, click the "Run" button that appears above the
mainmethod or in the top right corner of the editor - Check the terminal output to see your program's output
If the ‘Run’ button does not appear, try reloading VS Code (Open the Command Palette: / Ctrl+Shift+P | Cmd+Shift+P, then type and select Developer: Reload Window) or right-click inside the main method of your Java file and select ‘Run Java’ from the context menu.
Contributors: John Wong (@Johnwz123)