Guides for SE student projects »
This is a WIP community resource, containing contribution from community members.
- If you notice any bugs or suggestions for improvements, please report at https://github.com/se-edu/guides/issues
- You are welcome to contribute by sending a PRs to https://github.com/se-edu/guides/pulls too.
VS Code - Importing Existing Java Projects
This guide will help you import and work with existing Java projects in VS Code.
Prerequisites
Ensure you have followed our guide on Preparing VS Code for Java.
Importing an existing Java project
Step 1: Open the project folder
- Open VS Code
- Select
File→Open Folder... - Navigate to your existing Java project folder
- Click "Select Folder" to open it as a workspace
Step 2: Let VS Code detect the project
- VS Code will automatically detect the Java files and set up the workspace
- Wait for the Java Language Server to initialize (progress shown in status bar)
- Check the status bar at the bottom for any initialization messages
Step 3: Verify project configuration
After the project loads:
- Check syntax highlighting - Java files should have proper syntax highlighting
- Test IntelliSense - Try typing in a Java file to see if code completion works
- Look for error indicators - VS Code will underline syntax errors in red
If Java features like syntax highlighting or IntelliSense are not working, ensure the Java Extension Pack is installed and VS Code has fully initialized.
Configure your JDK
If you already have Java installed, VS Code should automatically detect and configure it when you create your project.
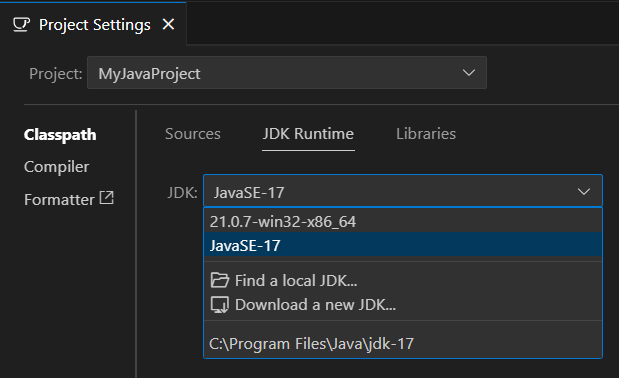
After creating your project, you may need to verify and configure VS Code to use the correct JDK version.
- Open the Command Palette: /
Ctrl+Shift+P|Cmd+Shift+P - Type
Java: Configure Java Runtimeand select it - Verify your JDK appears in the dropdown list and is selected
- Select the appropriate JDK if you have multiple versions installed
If no JDK options appear, try reloading VS Code (Open the Command Palette: / Ctrl+Shift+P | Cmd+Shift+P, then type and select Developer: Reload Window) and ensure your JDK is properly installed and added to your system’s PATH or select "Find a local JDK" to locate the installed JDK in your file system.
Configure project settings
Manual Configuration
To view and modify project settings:
- Open the Command Palette: /
Ctrl+Shift+P|Cmd+Shift+P - Type
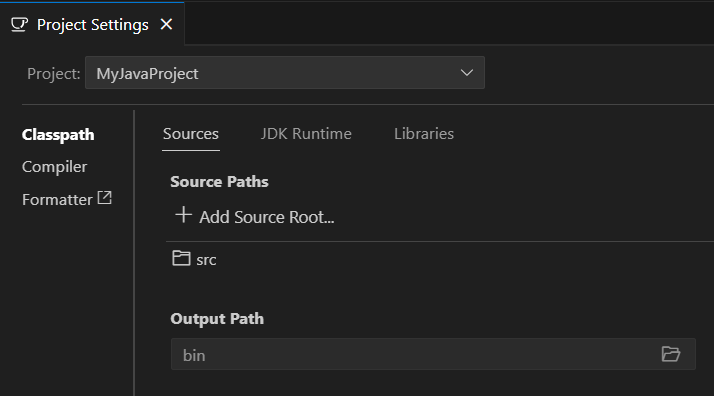
Java: Open Project Settingsand select it - Configure as needed:
- Source paths - Directories where your Java source files are located
- Output path - Directory where compiled
.classfiles will be stored - Libraries - External JAR files or libraries your project depends on
- JDK version - The JDK version to use for compilation and runtime
Using .vscode/settings.json
You can also configure project settings by creating a .vscode/settings.json file in the root directory, if it does not exist:
In the project root directory, create a folder named
.vscode.Inside the
.vscodefolder, create a file namedsettings.json. This file will store the project's VS Code configuration settings.Add these configuration settings to the
settings.jsonfile. Update the values to match your project's source folders, output directory, and library paths as needed.{ "java.project.sourcePaths": [ "src" ], "java.project.outputPath": "bin", "java.project.referencedLibraries": [ "lib/**/*.jar" ] }
Running imported projects
- Open your Java file with a
mainmethod - To run the code, click the "Run" button that appears above the
mainmethod or in the top right corner of the editor - Check the terminal output to see your program's output
If the ‘Run’ button does not appear, try reloading VS Code (Open the Command Palette: / Ctrl+Shift+P | Cmd+Shift+P, then type and select Developer: Reload Window) or right-click inside the main method of your Java file and select ‘Run Java’ from the context menu.
Best practices
Version control
Add the following to your .gitignore if not already present:
# Compiled class files
*.class
# VS Code workspace settings
.vscode/
Contributors: John Wong (@Johnwz123)

