Guides for SE student projects »
This is a WIP community resource, containing contributions from community members.
- If you notice any bugs or have suggestions for improvements, please report at https://github.com/se-edu/guides/issues
- You are welcome to contribute by sending a PR to https://github.com/se-edu/guides/pulls too.
VS Code: Configuring the code style: Advanced
While the Visual Studio Code Editor has configurable general settings for indent size, trailing whitespaces, and more, Visual Studio Code does not come with a built-in formatter for all languages. Instead, it relies on language-specific extensions to provide formatting functionality.
For this tutorial, we will use the Eclipse Java Formatter. It is included in the Red Hat Java Language Support extension, which you should already have installed if you followed the VS Code - Preparing for Java Projects tutorial.
Set up Eclipse Java Formatter
Eclipse Java Formatter requires a .xml file to define our formatting rules. Copy the following eclipse-java-formatter.xml template and place it at the root of your project.
<?xml version="1.0" encoding="UTF-8"?>
<profiles version="12">
<profile kind="CodeFormatterProfile" name="SE-EDU" version="12">
<!-- Replace this comment with actual formatter rules -->
</profile>
</profiles>
Configure settings to use our eclipse-java-formatter.xml through Settings:
Open Settings by going to
File→Preferences→Settings(Windows), orCode→Preferences→Settings(macOS).Go to
Extensions→Language Support for Java(TM) by Red Hat→Formattingtab.Check the checkbox for
Java > Format: Enabledto allow the formatter to be selected as default (see screenshot below).Enter the path to your
eclipse-java-formatter.xmlunderJava→Format→Settings: Url. Since we placed it at the root, this value would beeclipse-java-formatter.xml(see screenshot below).Enter the profile name, which we have set to
SE-EDUin oureclipse-java-formatter.xml(see screenshot below).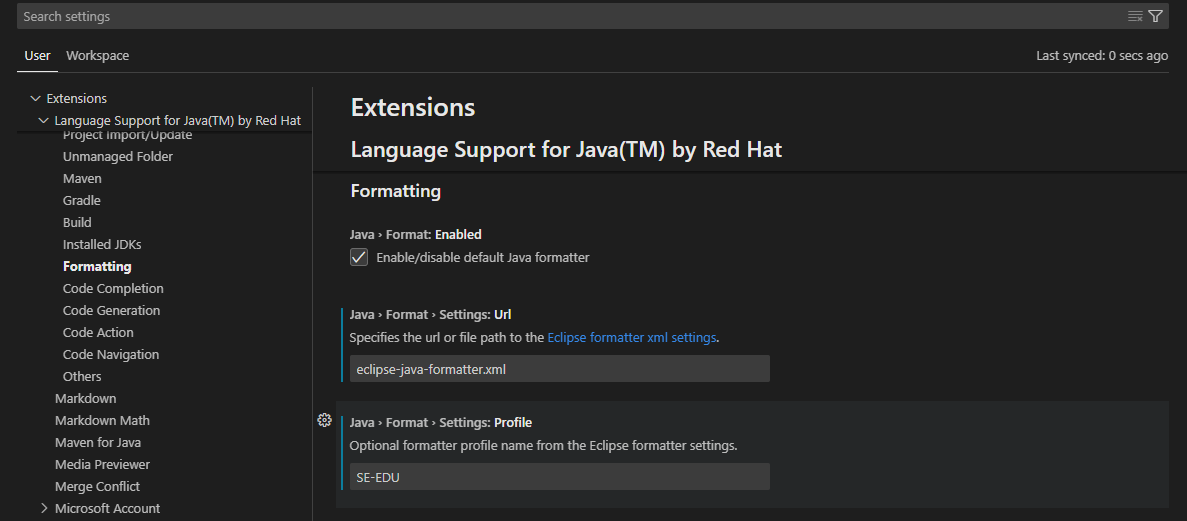
This can also be done through modifying .vscode/settings.json:
- Add the following properties to settings.json:
"java.format.settings.url": "eclipse-java-formatter.xml", "java.format.settings.profile": "SE-EDU"
If you have installed any other Java extensions, VS Code may use that extension's formatter instead. To ensure our formatting is being applied, we will set Red Hat Java Language Support extension’s formatter as the default.
Configure this through Settings:
Search for
Default Formatterwith the filter@lang:java.Ensure that
Language Support for Java(TM) by Red Hatis selected as default (see screenshot below).
This can also be done through modifying .vscode/settings.json:
Add the following properties to settings.json:
"[java]": { "editor.defaultFormatter": "redhat.java" }
Tweak: Switch-case indent
To format switch-case statements based on coding standards, add the following settings to eclipse-java-formatter.xml within the profile tag.
<!-- ... -->
<profile kind="CodeFormatterProfile" name="SE-EDU" version="12">
<!-- ... -->
<setting id="org.eclipse.jdt.core.formatter.indent_switchstatements_compare_to_switch" value="false"/>
<setting id="org.eclipse.jdt.core.formatter.indent_switchstatements_compare_to_cases" value="true"/>
<!-- ... -->
</profile>
<!-- ... -->
Tweak: Line limit
To enforce line length to be max 120 characters based on coding standards, add the following settings to eclipse-java-formatter.xml.
<!-- ... -->
<profile kind="CodeFormatterProfile" name="SE-EDU" version="12">
<!-- ... -->
<setting id="org.eclipse.jdt.core.formatter.lineSplit" value="120"/>
<!-- ... -->
</profile>
<!-- ... -->
Tweak: Indent size/Tab spaces
To format indent size based on coding standards, add the following settings to eclipse-java-formatter.xml.
<!-- ... -->
<profile kind="CodeFormatterProfile" name="SE-EDU" version="12">
<!-- ... -->
<!-- Use spaces, not tabs -->
<setting id="org.eclipse.jdt.core.formatter.tabulation.char" value="space"/>
<!-- Tab size = 4 spaces -->
<setting id="org.eclipse.jdt.core.formatter.tabulation.size" value="4"/>
<!-- One indent level = 4 spaces -->
<setting id="org.eclipse.jdt.core.formatter.indentation.size" value="4"/>
<!-- Wrapped lines indent = 8 spaces -->
<setting id="org.eclipse.jdt.core.formatter.continuation_indentation" value="8"/>
<!-- ... -->
</profile>
<!-- ... -->
Tweak: Add newline (\n) to end of file
To ensure there is a newline at the end of each file, add the following settings to eclipse-java-formatter.xml.
<!-- ... -->
<profile kind="CodeFormatterProfile" name="SE-EDU" version="12">
<!-- ... -->
<setting id="org.eclipse.jdt.core.formatter.insert_new_line_at_end_of_file_if_missing" value="true"/>
<!-- ... -->
</profile>
<!-- ... -->
Tweak: Import Order
To format the import order based on coding standards:
- Add the following settings to
eclipse-java-formatter.xml.<profile kind="CodeFormatterProfile" name="SE-EDU" version="12"> <!-- ... --> <setting id="org.eclipse.jdt.core.formatter.importOrder" value="java,javax,org,com"/> <setting id="org.eclipse.jdt.core.formatter.importOrderStatic" value="java,javax,org,com"/> <setting id="org.eclipse.jdt.core.formatter.sort_static_imports_separately" value="true"/> <setting id="org.eclipse.jdt.core.formatter.imports_static_on_top" value="true"/> <setting id="org.eclipse.jdt.core.formatter.insert_new_line_between_import_groups" value="true"/> <!-- ... --> </profile> - Add the following properties to
.vscode/settings.json{ // ... "java.saveActions.organizeImports": true, "editor.codeActionsOnSave": { "source.organizeImports": "explicit", } // ... }
Applying format
To apply the format settings made in the above sections to a file, right click within the file and click Format Document.

To make formatting more convenient, you can enable formatting every time you save the file, and also automatically format pasted code.
Open Settings by going to
File→Preferences→Settings(Windows), orCode→Preferences→Settings(macOS)Go to
Text Editor→Formattingand enableFormat On Pasteand/orFormat On Saveto automatically format code that is pasted, and to format the document every time you save respectively (see screenshot below).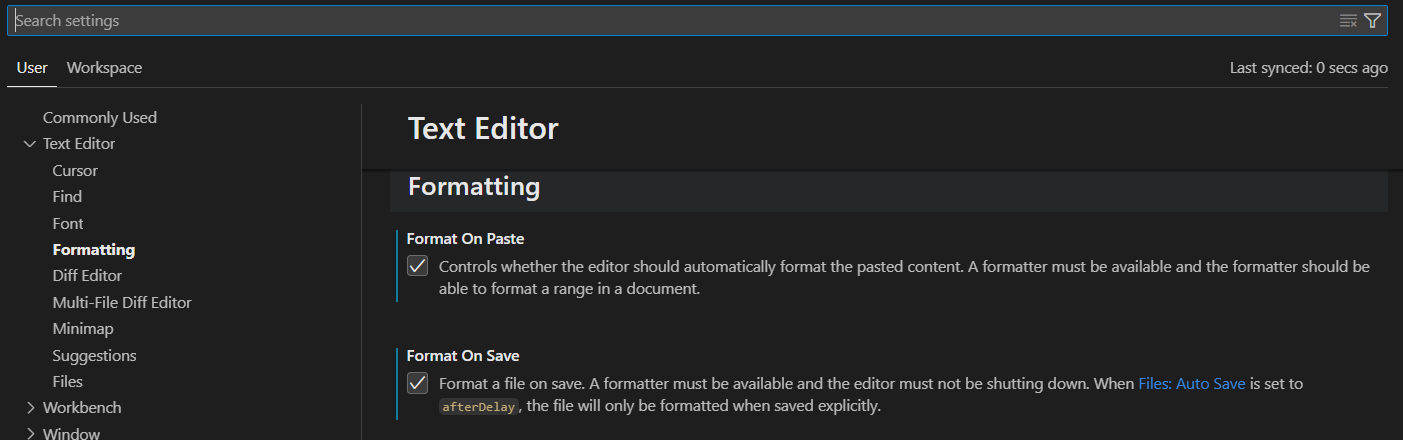
More useful settings
The tweaks given above are specific to code style. A few more useful settings (not related to the code style) can be found here.
Contributors: Tan Guan Qun (@monobeartae)