Git can tell you the net effect of changes between two points of history.
Git's diff feature can show you what changed between two points in the revision history. Given below are some use cases.
Usage 1: Examining changes in the working directory
Example use case: To verify the next commit will include exactly what you intend it to include.
Preparation For this, you can use the things repo you created earlier. If you don't have it, you can clone a copy of a similar repo given here.
1 Do some changes to the working directory. Stage some (but not all) changes. For example, you can run the following commands.
echo -e "blue\nred\ngreen" >> colours.txt
git add .  # a shortcut to stage all changes
echo "no shapes added yet" >> shapes.txt
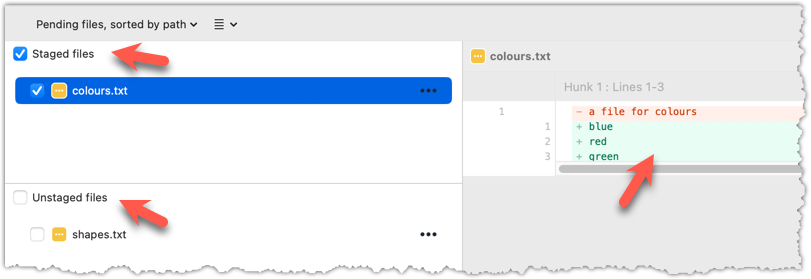
2 Examine the staged and unstaged changes.
The git diff command shows unstaged changes in the working directory (tracked files only). The output of the diff command, is a diff view (introduced in this lesson).
git diff
diff --git a/shapes.txt b/shapes.txt
index 5c2644b..949c676 100644
--- a/shapes.txt
+++ b/shapes.txt
@@ -1 +1,2 @@
a file for shapes
+no shapes added yet!
The git diff --staged command shows the staged changes (same as git diff --cached).
git diff --staged
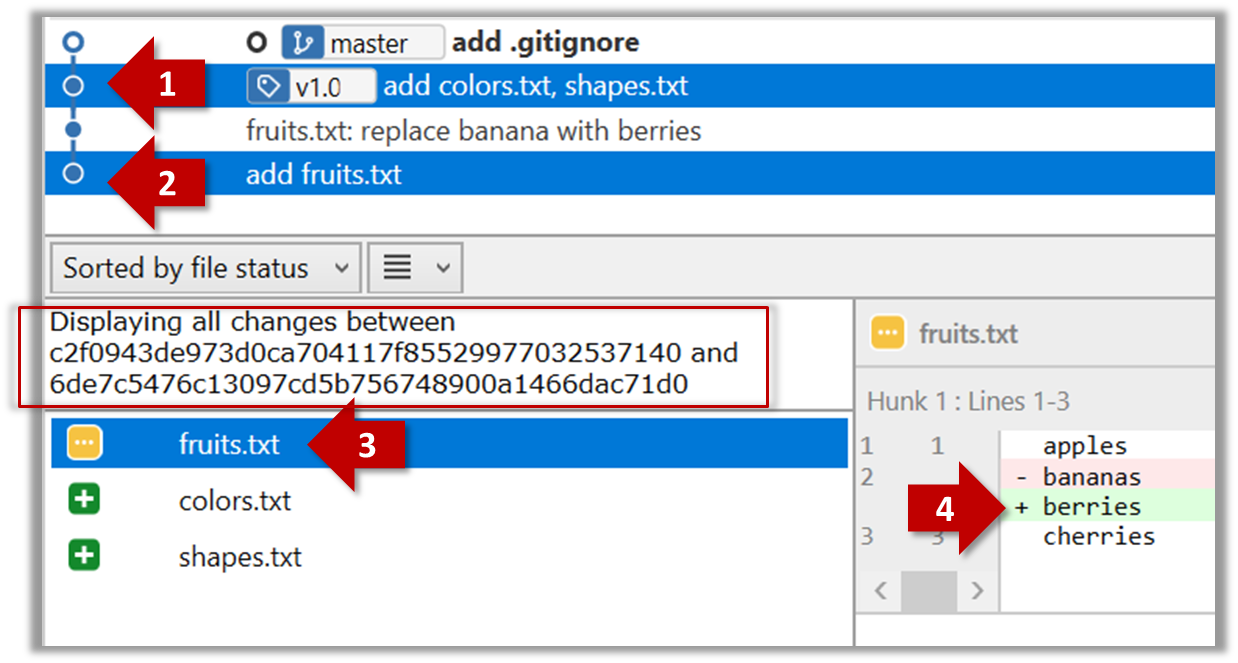
Select the two commits: Click on one commit, and Ctrl-Click (or Cmd-Click) on the second commit. The changes between the two selected commits will appear in the other panels, as shown below:
done!
Usage 2: Comparing two commits at different points of the revision graph
Example use case: Suppose you’re trying to improve the performance of a piece of software by experimenting with different code tweaks. You commit after each change (as you should). After several commits, you now want to review the overall effect of all those changes on the code.
Compare two commits in a repo (e.g., the things repo).
You can use the git diff <commit1> <commit2> command for this.
- You may use any valid way to refer to commits (e.g., SHA, tag, HEAD~n etc.).
- You may also use the
..notation to specify the commit range too e.g.,0023cdd..fcd6199,HEAD~2..HEAD
git diff v0.9 HEAD
diff --git a/colours.txt b/colours.txt
new file mode 100644
index 0000000..55c8449
--- /dev/null
+++ b/colours.txt
@@ -0,0 +1 @@
+a file for colours
# rest of the diff ...
Swap the commit order in the command and see what happens.
git diff HEAD v0.9
diff --git a/colours.txt b/colours.txt
deleted file mode 100644
index 55c8449..0000000
--- a/colours.txt
+++ /dev/null
@@ -1 +0,0 @@
-a file for colours
# rest of the diff ...
As you can see, the diff is directional i.e., dif <commit1> <commit2> shows what changes you need to do to go from the <commit1> to <commit2>. If you swap <commit1> and <commit2>, the output will change accordingly e.g., lines previously shown as 'added' will now be shown as 'deleted'.
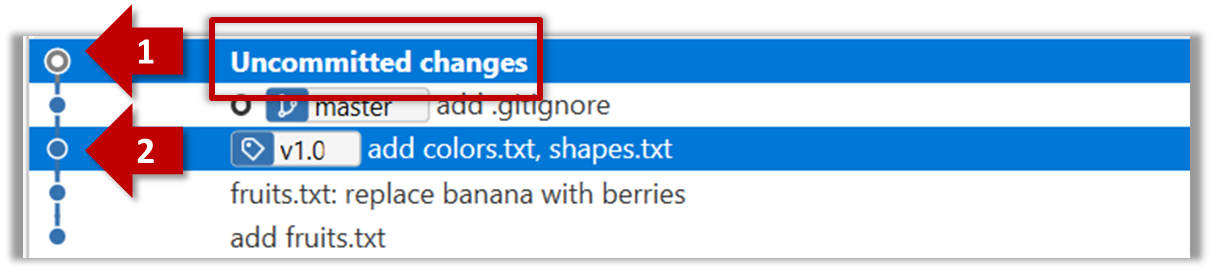
Select the two commits: Click on one commit, and Ctrl-Click (or Cmd-Click) on the second commit. The changes between the two selected commits will appear in the other panels, as shown below:
The same method can be used to compare the current state of the working directory (which might have uncommitted changes) to a point in the history.
done!
Usage 3: Examining changes to a specific file
Example use case: Similar to other use cases but when you are interested in a specific file only.
Examine the changes done to a file between two different points in the version history (including the working directory).
Add the -- path/to/file to a previous diff command to narrow the output to a specific file. Some examples:
git diff -- fruits.txt               # unstaged changes to fruits.txt
git diff --staged -- src/main.java   # staged changes to src/main.java
git diff HEAD~2..HEAD -- fruits.txt  # changes to fruits.txt between commits
Sourcetree UI shows changes to one file at a time by default; just click on the file to view changes to that file. To view changes to multiple files, Ctrl-Click (or Cmd-Click) on multiple files to select them.
done!