To be able to save snapshots of a folder using Git, you must first put the folder under Git's control by initialising a Git repository in that folder.
Normally, we use Git to manage a revision history of a specific folder, which gives us the ability to revision-control any file in that folder and its subfolders.
To put a folder under the control of Git, we initialise a repository (short name: repo) in that folder. This way, we can initialise repos in different folders, to revision-control different clusters of files independently of each other e.g., files belonging to different projects.
You can follow the hands-on practical below to learn how to initialise a repo in a folder.
What is this? HANDS-ON panels contain hands-on activities you can do as you learn Git. If you are new to Git, we strongly recommend that you do them yourself (even if they appear straightforward), as hands-on usage will help you internalise the concepts and operations better.
1 First, choose a folder. The folder may or may not have any files in it already. For this practical, let us create a folder named things for this purpose.
cd my-projects
mkdir things
2 Then cd into it.
cd things
3 Run the git status command to check the status of the folder.
git status
fatal: not a git repository (or any of the parent directories): .git
Don't panic. The error message is expected. It confirms that the folder currently does not have a Git repo.
4 Now, initialise a repository in that folder.
Use the command git init which should initialise the repo.
git init
Initialized empty Git repository in things/.git/
The output might also contain a hint about a name for an initial branch (e.g., hint: Using 'master' as the name for the initial branch ...). You can ignore that for now.
Note how the output mentions the repo being created in things/.git/ (not things/). More on that later.
Windows: Click
File→Clone/New…→ Click on+ Createbutton on the top menu bar.
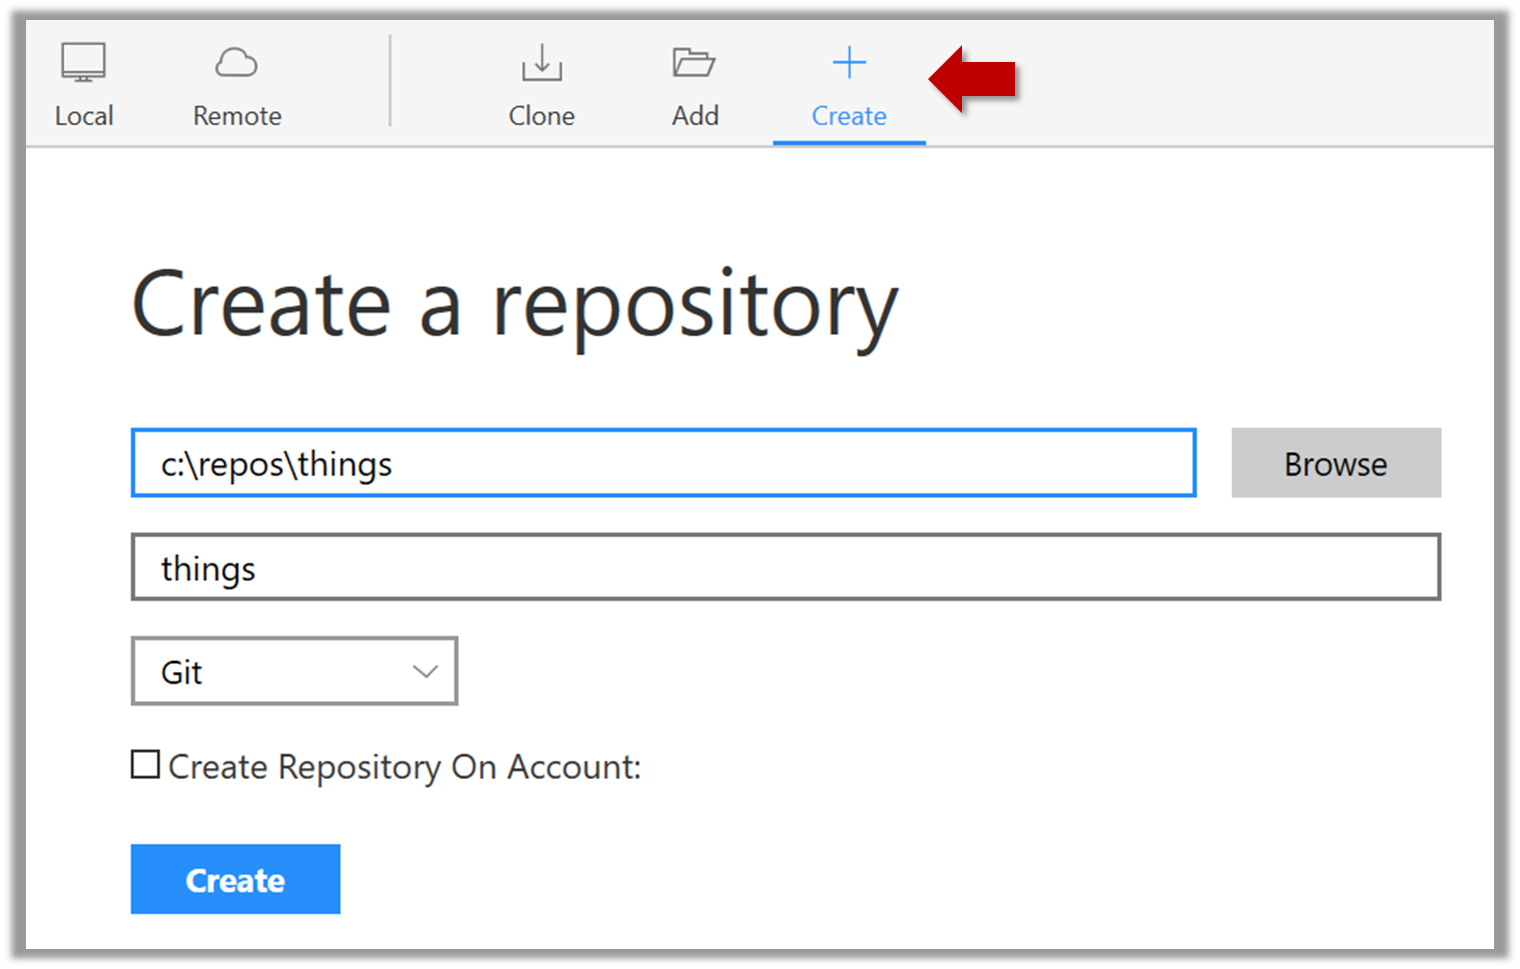
Enter the location of the directory and clickCreate.Mac:
New...→Create Local Repository(orCreate New Repository) → Click...button to select the folder location for the repository → click theCreatebutton.
done!
Initialising a repo results in two things:
- First, Git now recognises this folder as a Git repository, which means it can now help you track the version history of files inside this folder.
To confirm, you can run the git status command. It should respond with something like the following:
git status
On branch master

No commits yet

nothing to commit (create/copy files and use "git add" to track)
Don't worry if you don't understand the output (we will learn about them later); what matters is that it no longer gives an error message as it did before.
done!
- Second, Git created a hidden subfolder named
.gitinside thethingsfolder. This folder will be used by Git to store metadata about this repository.
A Git-controlled folder is divided into two main parts:
- The repository – stored in the hidden
.gitsubfolder, which contains all the metadata and history. - The working directory – everything else in that folder, where you create and edit files.
What is this? DETOUR panels contain related directions you can optionally explore. We recommend that you only skim them the first time you are going through a tour (i.e., just to know what each detour covers); you can revisit them later, to deepen your knowledge further, or when you encounter a use case related to the concepts covered by the detour.
After staging, you can now proceed to save the snapshot, aka creating a commit.
Saving a snapshot is called committing and a saved snapshot is called a commit.
A Git commit is a full snapshot of your working directory based on the files you have staged, more precisely, a record of the exact state of all files in the staging area (index) at that moment -- even the files that have not changed since the last commit. This is in contrast to other revision control software that only store the in a commit. Consequently, a Git commit has all the information it needs to recreate the snapshot of the working directory at the time the commit was created.
A commit also includes metadata such as the author, date, and an optional commit message describing the change.
A Git commit is a snapshot of all tracked files, not simply a delta of what changed since the last commit.
Assuming you have previously staged changes to the fruits.txt, go ahead and create a commit.
1 First, let us do a sanity check using the git status command.
git status
On branch master

No commits yet

Changes to be committed:
(use "git rm --cached <file>..." to unstage)
  new file:   fruits.txt
2 Now, create a commit using the commit command. The -m switch is used to specify the commit message.
git commit -m "Add fruits.txt"
[master (root-commit) d5f91de] Add fruits.txt
 1 file changed, 5 insertions(+)
 create mode 100644 fruits.txt
3 Verify the staging area is empty using the git status command again.
git status
On branch master
nothing to commit, working tree clean
Note how the output says nothing to commit which means the staging area is now empty.
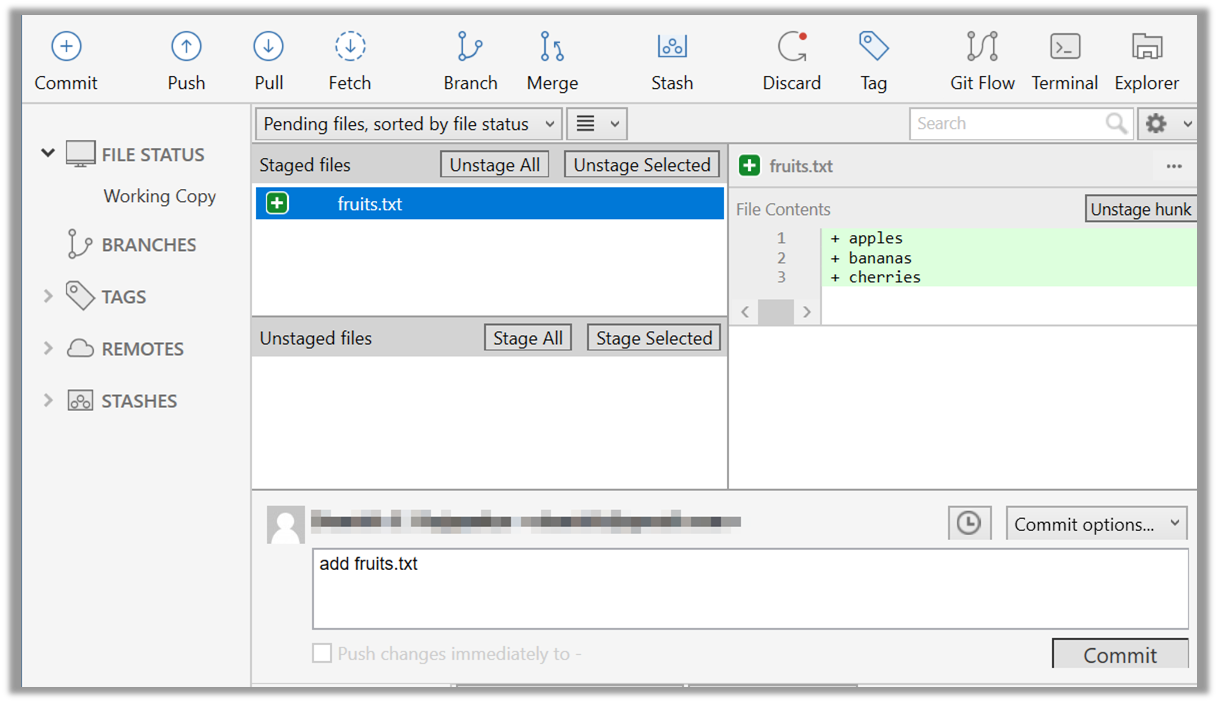
Click the Commit button, enter a commit message (e.g. add fruits.txt) into the text box, and click Commit.
done!
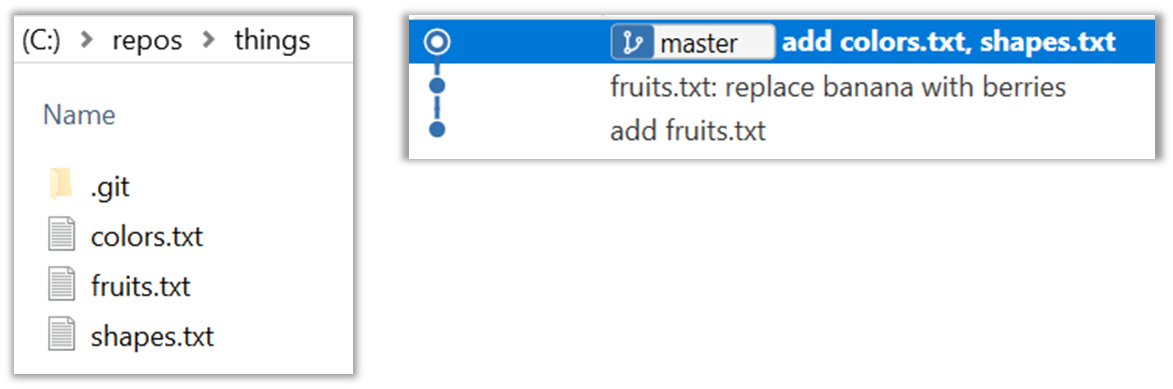
Git commits form a timeline, as each corresponds to a point in time when you asked Git to take a snapshot of your working directory. Each commit links to at least one previous commit, forming a structure that we can traverse.
A timeline of commits is called a branch. By default, Git names the initial branch master -- though many now use main instead. You'll learn more about branches in future lessons. For now, just be aware that the commits you create in a new repo will be on a branch called master (or main) by default.
gitGraph
    %%{init: { 'theme': 'default', 'gitGraph': {'mainBranchName': 'master (or main)'}} }%%
    commit id: "Add fruits.txt"
    commit id: "Update fruits.txt"
    commit id: "Add colours.txt"
    commit id: "..."
Git can show you the list of commits in the Git history.
1 View the list of commits, which should show just the one commit you created just now.
You can use the git log command to see the commit history.
git log
commit d5f91de... (HEAD -> master)
Author: ... <...@...>
Date:   ...

Add fruits.txt
Use the Q key to exit the output screen of the git log command.
Note how the output has some details about the commit you just created. You can ignore most of it for now, but notice it also shows the commit message you provided.
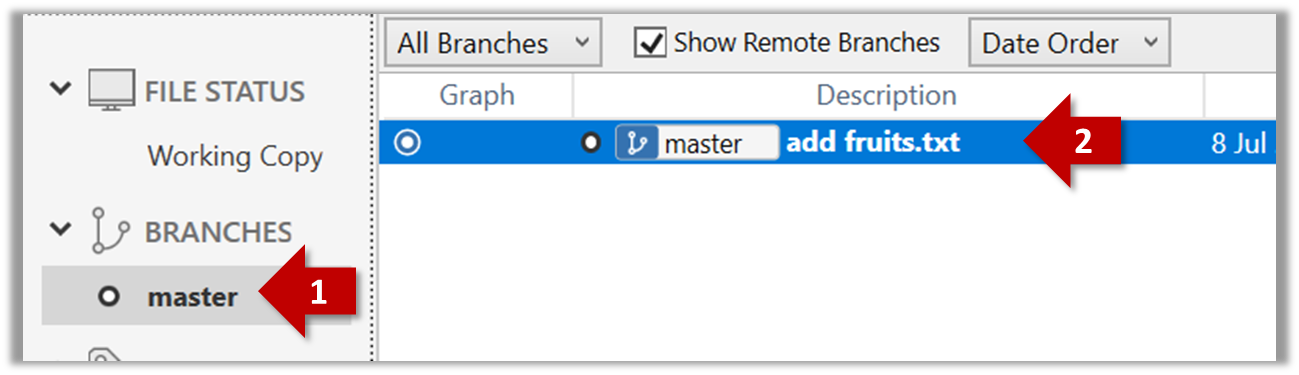
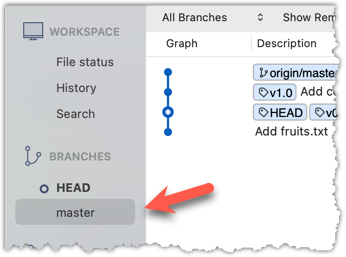
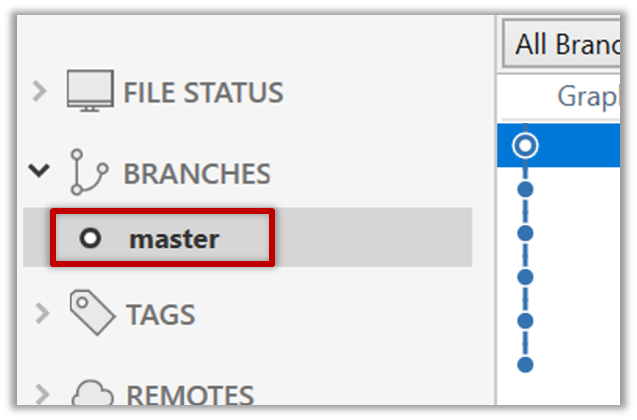
Expand the BRANCHES menu and click on the master to view the history graph, which contains only one node at the moment, representing the commit you just added. For now, ignore the label master attached to the commit.
2 Create a few more commits (i.e., a few rounds of add/edit files -> stage -> commit), and observe how the list of commits grows.
Here is an example list of bash commands to add two commits while observing the list of commits
$ echo "figs" >> fruits.txt  # add another line to fruits.txt
$ git add fruits.txt  # stage the updated file
$ git commit -m "Insert figs into fruits.txt"  # commit the changes
$ git log  # check commits list

$ echo "a file for colours" >> colours.txt  # add a colours.txt file
$ echo "a file for shapes" >> shapes.txt  # add a shapes.txt file
$ git add colours.txt shapes.txt  # stage both files in one go
$ git commit -m "Add colours.txt, shapes.txt"  # commit the changes
$ git log  # check commits list
The output of the final git log should be something like this:
commit 18300... (HEAD -> master)
Author: ... <...@...>
Date:   ...

    Add colours.txt, shapes.txt

commit 2beda...
Author: ... <...@...>
Date:   ...

    Insert figs into fruits.txt

commit d5f91...
Author: ... <...@...>
Date:   ...

    Add colours.txt, shapes.txt
To see the list of commits, click on the History item (listed under the WORKSPACE section) on the menu on the right edge of Sourcetree.
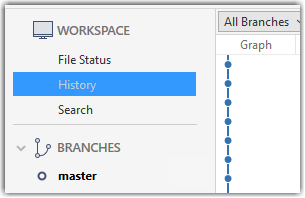
After adding two more commits, the list of commits should look something like this:
done!
Git allows you to specify which files should be omitted from revision control.
You can specify which files Git should ignore from revision control. While you can always omit files from revision control simply by not staging them, having an 'ignore-list' is more convenient, especially if there are files inside the working folder that are not suitable for revision control (e.g., temporary log files) or files you want to prevent from accidentally including in a commit (files containing confidential information).
A repo-specific ignore-list of files can be specified in a .gitignore file, stored in the root of the repo folder.
The .gitignore file itself can be either revision controlled or ignored.
- To version control it (the more common choice – which allows you to track how the
.gitignorefile changes over time), simply commit it as you would commit any other file. - To ignore it, simply add its name to the
.gitignorefile itself.
The .gitignore file supports file patterns e.g., adding temp/*.tmp to the .gitignore file prevents Git from tracking any .tmp files in the temp directory.
SIDEBAR: .gitignore File Syntax
Blank lines: Ignored and can be used for spacing.
Comments: Begin with
#(lines starting with # are ignored).# This is a commentWrite the name or pattern of files/directories to ignore.
log.txt # Ignores a file named log.txtWildcards:
*matches any number of characters, except/(i.e., for matching a string within a single directory level):abc/*.tmp # Ignores all .tmp files in abc directory**matches any number of characters (including/)**/foo.tmp # Ignores all foo.tmp files in any directory?matches a single characterconfig?.yml # Ignores config1.yml, configA.yml, etc.[abc]matches a single character (a, b, or c)file[123].txt # Ignores file1.txt, file2.txt, file3.txt
Directories:
- Add a trailing
/to match directories.logs/ # Ignores the logs directory - Patterns without
/match files/folders recursively.*.bak # Ignores all .bak files anywhere - Patterns with
/are relative to the.gitignorelocation./secret.txt # Only ignores secret.txt in the root directory
- Add a trailing
Negation: Use
!at the start of a line to not ignore something.*.log # Ignores all .log files !important.log # Except important.log
Example:
# Ignore all log files
*.log

# Ignore node_modules folder
node_modules/

# Don’t ignore main.log
!main.log
1 Add a file into your repo's working folder that you presumably do not want to revision-control e.g., a file named temp.txt. Observe how Git has detected the new file.
Add a few other files with .tmp extension.
2 Configure Git to ignore those files:
Create a file named .gitignore in the working directory root and add the following line in it.
temp.txt
Observe how temp.txt is no longer detected as 'untracked' by running the git status command (but now it will detect the .gitignore file as 'untracked'.
Update the .gitignore file as follows:
temp.txt
*.tmp
Observe how .tmp files are no longer detected as 'untracked' by running the git status command.
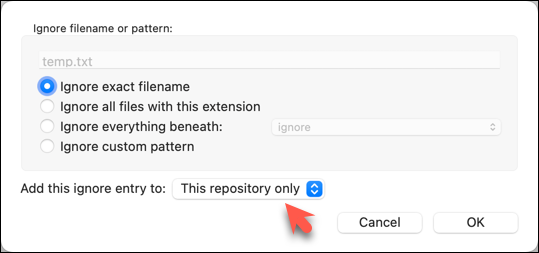
The file should be currently listed under Unstaged files. Right-click it and choose Ignore.... Choose Ignore exact filename(s) and click OK.
Also take note of other options available e.g., Ignore all files with this extension etc. They may be useful in future.
Note how the temp.text is no longer listed under Unstaged files. Observe that a file named .gitignore has been created in the working directory root and has the following line in it. This new file is now listed under Unstaged files.
temp.txt
Right-click on any of the .tmp files you added, and choose Ignore... as you did previously. This time, choose the option Ignore files with this extension.
Note how .temp files are no longer shown as unstaged files, and the .gitignore file has been updated as given below:
temp.txt
*.tmp
3 Optionally, stage and commit the .gitignore file.
done!
Files recommended to be omitted from version control
- Binary files generated when building your project e.g.,
*.class,*.jar,*.exe(reasons: 1. no need to version control these files as they can be generated again from the source code 2. Revision control systems are optimized for tracking text-based files, not binary files. - Temporary files e.g., log files generated while testing the product
- Local files i.e., files specific to your own computer e.g., local settings of your IDE
- Sensitive content i.e., files containing sensitive/personal information e.g., credential files, personal identification data (especially, if there is a possibility of those files getting leaked via the revision control system).
When working with many commits, it helps to tag specific commits with custom names so they’re easier to refer to later.
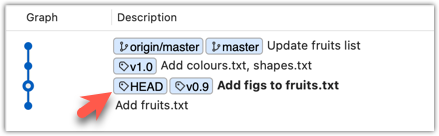
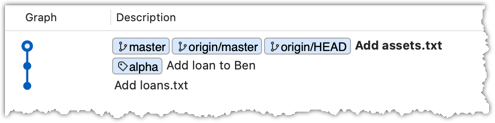
Git lets you tag commits with names, making them easy to reference later. This is useful when you want to mark specific commits -- such as releases or key milestones (e.g., v1.0 or v2.1). Using tags to refer to commits is much more convenient than using SHA hashes. In the diagram below, v1.0 and interim are tags.
A tag stays fixed to the commit. Unlike branch refs or HEAD, tags do not move automatically as new commits are made. As you see below, after adding a new commit, tags stay in the previous commits while master←HEAD have moved to the new commit.
Git supports two kinds of tags:
- A lightweight tag is just a ref that points directly to a commit, like a branch that doesn’t move.
- An annotated tag is a full Git object that stores a reference to a commit along with metadata such as the tagger’s name, date, and a message.
Annotated tags are generally preferred for versioning and public releases, while lightweight tags are often used for less formal purposes, such as marking a commit for your own reference.
0 Preparation: fork and clone the samplerepo-preferences. Use the cloned repo on your computer for the following steps.
1 Add a lightweight tag to the current commit as v1.0:
git tag v1.0
2 Verify the tag was added. To view tags:
git tag
v1.0
To view tags in the context of the revision graph:
git log --oneline --decorate
507bb74 (HEAD -> master, tag: v1.0, origin/master, origin/HEAD) Add donuts
de97f08 Add cake
5e6733a Add bananas
3398df7 Add food.txt
3 Use the tag to refer to the commit e.g., git show v1.0 should show the changes in the tagged commit.
4 Add an annotated tag to an earlier commit. The example below adds a tag v0.9 to the commit HEAD~2 with the message First beta release. The -a switch tells Git this is an annotated tag.
git tag -a v0.9 HEAD~2 -m "First beta release"
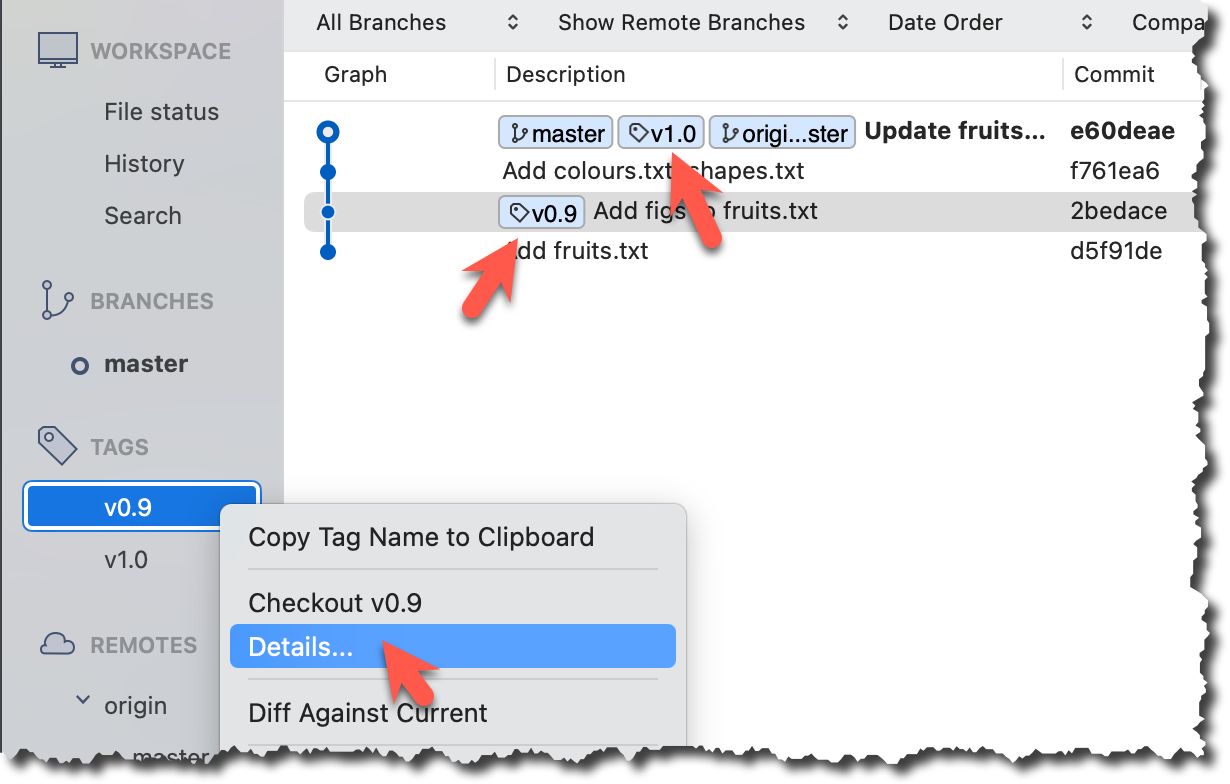
5 Check the new annotated tag. While both types of tags appear similarly in the revision graph, the show command on an annotated tag will show the details of the tag and the details of the commit it points to.
git show v0.9
tag v0.9
Tagger: ... <...@...>
Date:   Sun Jun ...

First beta release

commit ....999087124af... (tag: v0.9)
Author: ... <...@...>
Date:   Sat Jun ...

    Add figs to fruits.txt

diff --git a/fruits.txt b/fruits.txt
index a8a0a01..7d0a594 100644
# rest of the diff goes here
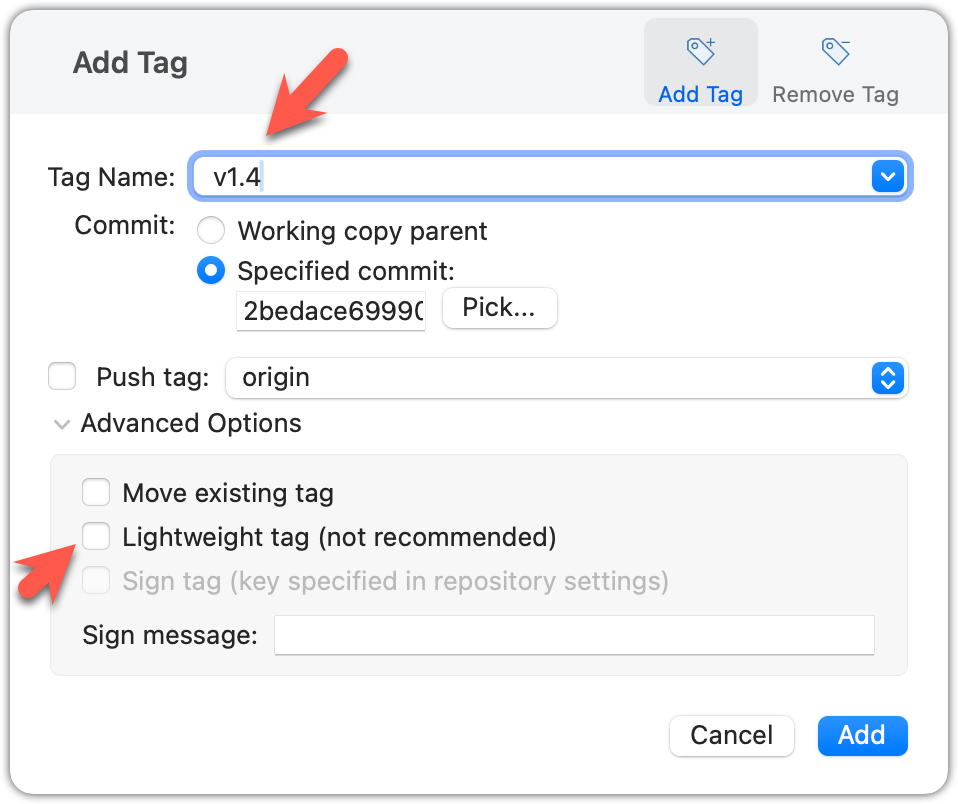
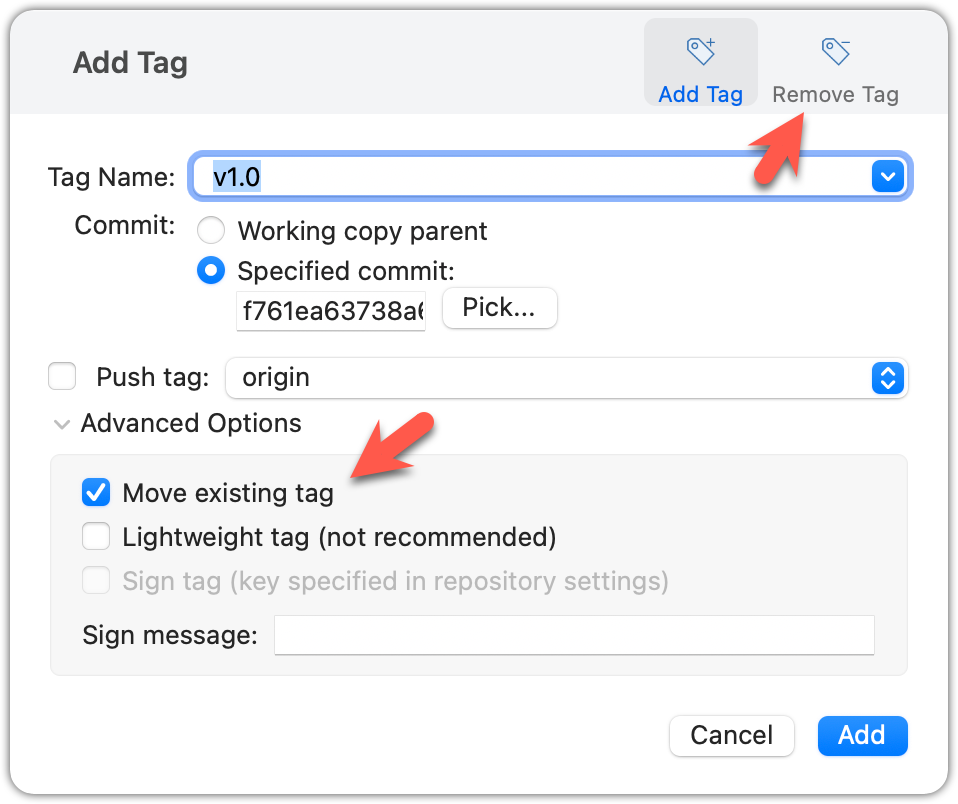
Right-click on the commit (in the graphical revision graph) you want to tag and choose Tag….
Specify the tag name e.g., v1.0 and click Add Tag.
Configure tag properties in the next dialog and press Add. For example, you can choose whether to make it a lightweight tag or an annotated tag (default).
Tags will appear as labels in the revision graph, as seen below. To see the details of an annotated tag, you need to use the menu indicated in the screenshot.
done!
If you need to change what a tag points to, you must delete the old one and create a new tag with the same name. This is because tags are designed to be fixed references to a specific commit, and there is no built-in mechanism to 'move' a tag.
Move the v1.0 tag to the commit HEAD~1, by deleting it first and creating it again at the destination commit.
Delete the previous v1.0 tag by using the -d switch. Add it again to the other commit, as before.
git tag -d v1.0
git tag v1.0 HEAD~1
The same dialog used to add a tag can be used to delete and even move a tag. Note that the 'moving' here translates to deleting and re-adding behind the scene.
done!
Tags are different from commit messages, in purpose and in form. A commit message is a description of the commit that is part of the commit itself. A tag is a short name for a commit, which you can use to address a commit.
Pushing commits to a remote does not push tags automatically. You need to push tags specifically.
Push tags you created earlier to the remote.
You can go to your remote on GitHub link https://github.com/{USER}/{REPO}/tags (e.g., https://github.com/johndoe/samplerepo-prefrences/tags) to verify the tag is present there.
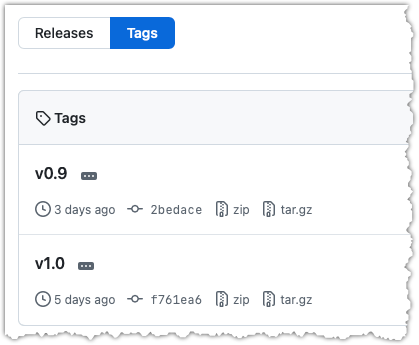
Note how GitHub assumes these tags are meant as releases, and automatically provides zip and tar.gz archives of the repo (as at that tag).
1 Push a specific tag in the local repo to the remote (e.g., v1.0) using the git push <origin> <tag-name> command.
git push origin v1.0
In addition to verifying the tag's presence via GitHub, you can also use the following command to list the tags presently in the remote.
git ls-remote --tags origin
2 Delete a tag in the remote, using the git push --delete <remote> <tag-name> command.
git push --delete origin v1.0
3 Push all tags to the remote repo, using the git push <remote> --tags command.
git push origin --tags
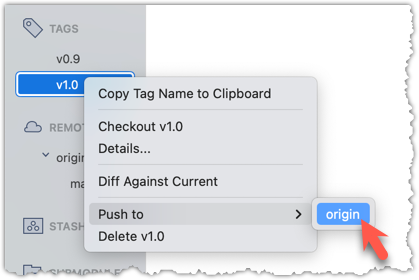
To push a specific tag, use the following menu:
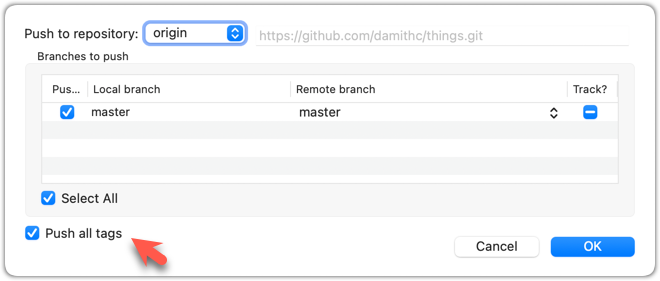
To push all tags, you can tick the Push all tags option when pushing commits:
done!
Git can tell you the net effect of changes between two points of history.
Git's diff feature can show you what changed between two points in the revision history. Given below are some use cases.
Usage 1: Examining changes in the working directory
Example use case: To verify the next commit will include exactly what you intend it to include.
Preparation For this, you can use the things repo you created earlier. If you don't have it, you can clone a copy of a similar repo given here.
1 Do some changes to the working directory. Stage some (but not all) changes. For example, you can run the following commands.
echo -e "blue\nred\ngreen" >> colours.txt
git add .  # a shortcut to stage all changes
echo "no shapes added yet" >> shapes.txt
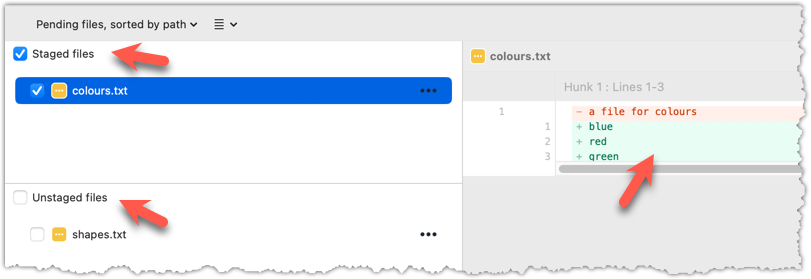
2 Examine the staged and unstaged changes.
The git diff command shows unstaged changes in the working directory (tracked files only). The output of the diff command, is a diff view (introduced in this lesson).
git diff
diff --git a/shapes.txt b/shapes.txt
index 5c2644b..949c676 100644
--- a/shapes.txt
+++ b/shapes.txt
@@ -1 +1,2 @@
a file for shapes
+no shapes added yet!
The git diff --staged command shows the staged changes (same as git diff --cached).
git diff --staged
Select the two commits: Click on one commit, and Ctrl-Click (or Cmd-Click) on the second commit. The changes between the two selected commits will appear in the other panels, as shown below:
done!
Usage 2: Comparing two commits at different points of the revision graph
Example use case: Suppose you’re trying to improve the performance of a piece of software by experimenting with different code tweaks. You commit after each change (as you should). After several commits, you now want to review the overall effect of all those changes on the code.
Compare two commits in a repo (e.g., the things repo).
You can use the git diff <commit1> <commit2> command for this.
- You may use any valid way to refer to commits (e.g., SHA, tag, HEAD~n etc.).
- You may also use the
..notation to specify the commit range too e.g.,0023cdd..fcd6199,HEAD~2..HEAD
git diff v0.9 HEAD
diff --git a/colours.txt b/colours.txt
new file mode 100644
index 0000000..55c8449
--- /dev/null
+++ b/colours.txt
@@ -0,0 +1 @@
+a file for colours
# rest of the diff ...
Swap the commit order in the command and see what happens.
git diff HEAD v0.9
diff --git a/colours.txt b/colours.txt
deleted file mode 100644
index 55c8449..0000000
--- a/colours.txt
+++ /dev/null
@@ -1 +0,0 @@
-a file for colours
# rest of the diff ...
As you can see, the diff is directional i.e., dif <commit1> <commit2> shows what changes you need to do to go from the <commit1> to <commit2>. If you swap <commit1> and <commit2>, the output will change accordingly e.g., lines previously shown as 'added' will now be shown as 'deleted'.
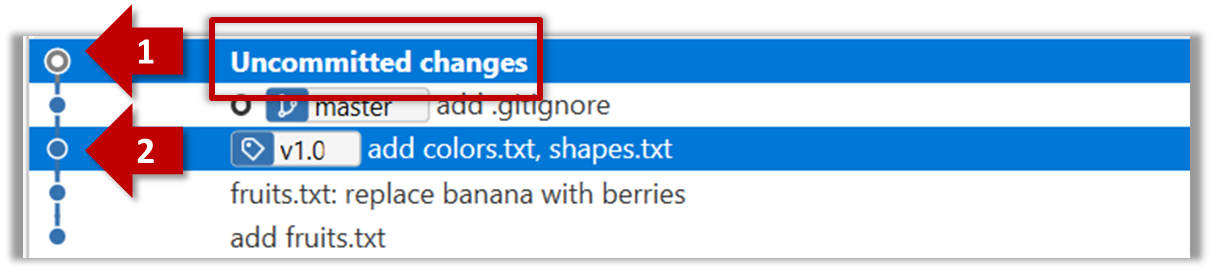
Select the two commits: Click on one commit, and Ctrl-Click (or Cmd-Click) on the second commit. The changes between the two selected commits will appear in the other panels, as shown below:
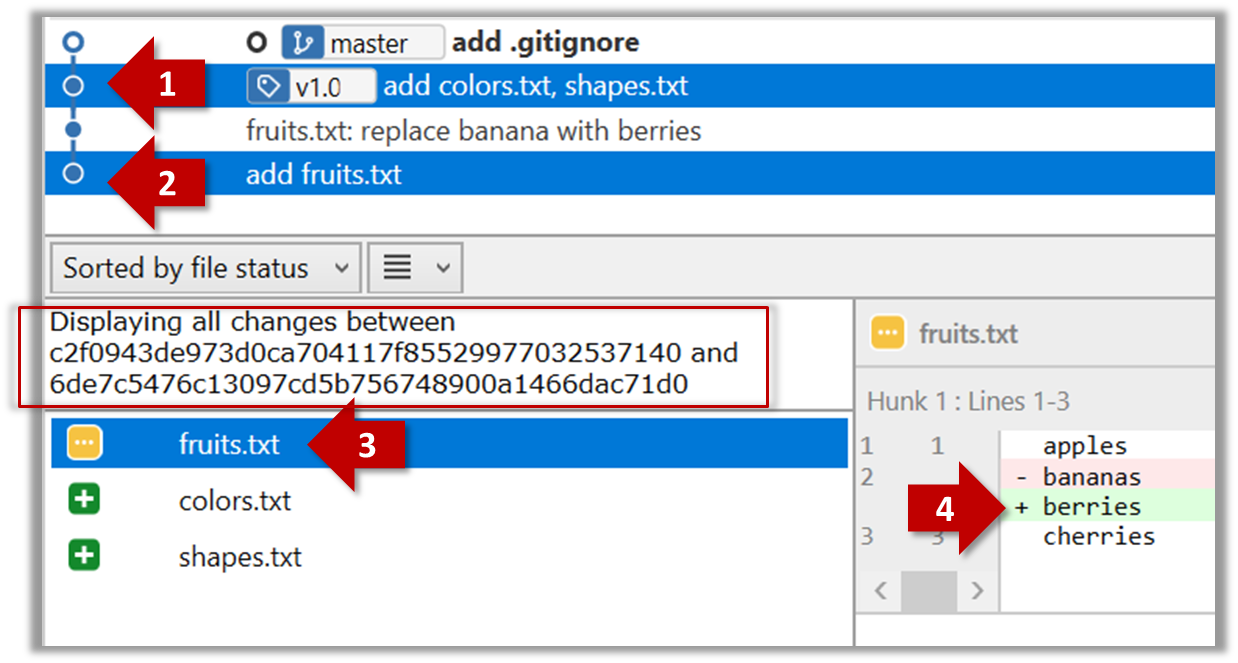
The same method can be used to compare the current state of the working directory (which might have uncommitted changes) to a point in the history.
done!
Usage 3: Examining changes to a specific file
Example use case: Similar to other use cases but when you are interested in a specific file only.
Examine the changes done to a file between two different points in the version history (including the working directory).
Add the -- path/to/file to a previous diff command to narrow the output to a specific file. Some examples:
git diff -- fruits.txt               # unstaged changes to fruits.txt
git diff --staged -- src/main.java   # staged changes to src/main.java
git diff HEAD~2..HEAD -- fruits.txt  # changes to fruits.txt between commits
Sourcetree UI shows changes to one file at a time by default; just click on the file to view changes to that file. To view changes to multiple files, Ctrl-Click (or Cmd-Click) on multiple files to select them.
done!
Another useful feature of revision control is to be able to view the working directory as it was at a specific point in history, by checking out a commit created at that point.
Suppose you added a new feature to a software product, and while testing it, you noticed that another feature added two commits ago doesn’t handle a certain edge case correctly. Now you’re wondering: did the new feature break the old one, or was it already broken? Can you go back to the moment you committed the old feature and test it in isolation, and come back to the present after you found the answer? With Git, you can.
To view the working directory at a specific point in history, you can check out a commit created at that point.
When you check out a commit, Git:
- Updates your working directory to match the snapshot in that commit, overwriting current files as needed.
- Moves the
HEADref to that commit, marking it as the current state you’re viewing.
→
[check out commit C2...]
Checking out a specific commit puts you in a "detached HEAD" state: i.e., the HEAD no longer points to a branch, but directly to a commit (see the above diagram for an example). This isn't a problem by itself, but any commits you make in this state can be lost, unless certain follow-up actions are taken. It is perfectly fine to be in a detached state if you are only examining the state of the working directory at that commit.
To get out of a "detached HEAD" state, you can simply check out a branch, which "re-attaches" HEAD to the branch you checked out.
→
[check out master...]
Checkout a few commits in a local repo (e.g., the things repo), while examining the working directory to verify that it matches the state when you created the corresponding commit:
1 Examine the revision tree, to get your bearing first.
git log --oneline --decorate
Reminder: You can use aliases to reduce typing Git commands.
e60deae (HEAD -> master, origin/master) Update fruits list
f761ea6 (tag: v1.0) Add colours.txt, shapes.txt
2bedace (tag: v0.9) Add figs to fruits.txt
d5f91de Add fruits.txt
2 Use the checkout <commit-identifier> command to check out a commit other than the one currently pointed by HEAD. You can use any of the following methods:
git checkout v1.0: checks out the commit taggedv1.0git checkout 0023cdd: checks out the commit with the hash0023cddgit checkout HEAD~2: checks out the commit 2 commits behind the most recent commit.
git checkout HEAD~2
Note: switching to 'HEAD~2'.

You are in 'detached HEAD' state.
# rest of the warning about the detached head ...

HEAD is now at 2bedace Add figs to fruits.txt
3 Verify HEAD and the working directory have updated as expected.
HEADshould now be pointing at the target commit- The working directory should match the state it was in at that commit (e.g., files added after that commit -- such as
shapes.txtshould not be in the folder).
git log --one-line --decorate
2bedace (HEAD, tag: v0.9) Add figs to fruits.txt
d5f91de Add fruits.txt
HEAD is indeed pointing at the target commit.
But note how the output does not show commits you added after the checked-out commit.
The --all switch tells git log to show commits from all refs, not just those reachable from the current HEAD. This includes commits from other branches, tags, and remotes.
git log --one-line --decorate --all
e60deae (origin/master, master) Update fruits list
f761ea6 (tag: v1.0) Add colours.txt, shapes.txt
2bedace (HEAD, tag: v0.9) Add figs to fruits.txt
d5f91de Add fruits.txt
4 Go back to the latest commit by checking out the master branch again.
git checkout master
In the revision graph, double-click the commit you want to check out, or right-click on that commit and choose Checkout....
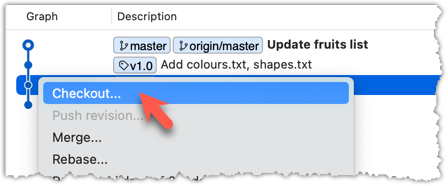
Click OK to the warning about ‘detached HEAD’ (similar to below).

The specified commit is now loaded onto the working folder, as indicated by the HEAD label.
To go back to the latest commit on the master branch, double-click the master branch.
If you check out a commit that comes before the commit in which you added a certain file (e.g., temp.txt) to the .gitignore file, and if the .gitignore file is version controlled as well, Git will now show it under ‘unstaged modifications’ because at Git hasn’t been told to ignore that file yet.
done!
If there are uncommitted changes in the working directory, Git proceeds with a checkout only if it can preserve those changes.
- Example 1: There is a new file in the working directory that is not committed yet.
→ Git will proceed with the checkout and will keep the uncommitted file as well. - Example 2: There is an uncommitted change to a file that conflicts with the version of that file in the commit you wish to check out.
→ Git will abort the checkout, and the repo will remain in the current commit.
The Git stash feature temporarily set aside uncommitted changes you’ve made (in your working directory and staging area), without committing them. This is useful when you’re in the middle of some work, but need to switch to another state (e.g., checkout a previous commit), and your current changes are not yet ready to be committed or discarded. You can later reapply the stashed changes when you’re ready to resume that work.
The next step is to create a local copy of the remote repo, by cloning the remote repo.
You can clone a repository to create a full copy of it on your computer. This copy includes the entire revision history, branches, and files of the original, so it behaves just like the original repository. For example, you can clone a repository from a hosting service like GitHub to your computer, giving you a complete local version to work with.
Cloning a repo automatically creates a remote named origin which points to the repo you cloned from.
The repo you cloned from is often referred to as the upstream repo.
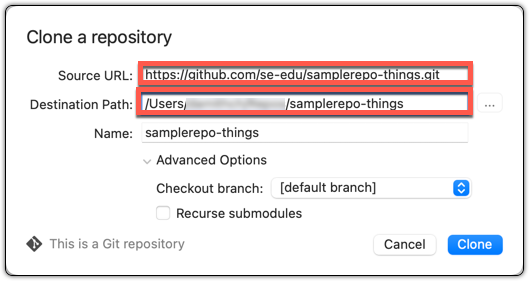
1 Clone the remote repo to your computer. For example, you can clone the samplerepo-things repo, or the fork your created from it in a previous lesson.
Note that the URL of the GitHub project is different from the URL you need to clone a repo in that GitHub project. e.g.
https://github.com/se-edu/samplerepo-things  # GitHub project URL
https://github.com/se-edu/samplerepo-things.git # the repo URL
You can use the git clone <repository-url> [directory-name] command to clone a repo.
<repository-url>: The URL of the remote repository you want to copy.[directory-name](optional): The name of the folder where you want the repository to be cloned. If you omit this, Git will create a folder with the same name as the repository.
git clone https://github.com/se-edu/samplerepo-things.git  # if using HTTPS
git clone git@github.com:se-edu/samplerepo-things.git  # if using SSH

git clone https://github.com/foo/bar.git my-bar-copy  # also specifies a dir to use
For exact steps for cloning a repo from GitHub, refer to this GitHub document.
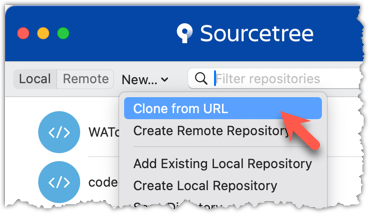
File → Clone / New ... and provide the URL of the repo and the destination directory.
File → New ... → Choose as shown below → Provide the URL of the repo and the destination directory in the next dialog.
2 Verify the clone has a remote named origin pointing to the upstream repo.
Use the git remote -v command that you learned earlier.
Choose Repository → Repository Settings menu option.
done!
When there are new changes in the remote, you need to pull those changes down to your local repo.
There are two steps to bringing down changes from a remote repository into a local repository: fetch and merge.
- Fetch is the act of downloading the latest changes from the remote repository, but without applying them to your current branch yet. It updates metadata in your repo so that repo knows what has changed in the remote repo, but your own local branch remain untouched.
- Merge is what you do after fetching, to actually incorporate the fetched changes into your local branch. It combines your local branch with the changes from the corresponding branch from the remote repo.
1 Clone the repo se-edu/samplerepo-finances. It has 3 commits. Your clone now has a remote origin pointing to the remote repo you cloned from.
2 Change the remote origin to point to samplerepo-finances-2. This remote repo is a copy of the one you cloned, but it has two extra commits.
git remote set-url origin https://github.com/se-edu/samplerepo-finances-2.git
Go to Repository → Repository settings ... to update remotes.
3 Verify the local repo is unaware of the extra commits in the remote.
git status
On branch master
Your branch is up to date with 'origin/master'.

nothing to commit, working tree clean
The revision graph should look like the below:
If it looks like the below, it is possible that Sourcetree is auto-fetching data from the repo periodically.
3 Fetch from the new remote.
Use the git fetch <remote> command to fetch changes from a remote. If the <remote> is not specified, the default remote origin will be used.
git fetch origin
remote: Enumerating objects: 8, done.
... # more output ...
   afbe966..cc6a151  master     -> origin/master
 * [new tag]         beta       -> beta
Click on the Fetch button on the top menu:

4 Verify the fetch worked i.e., the local repo is now aware of the two missing commits. Also observe how the local branch ref of the master branch, the staging area, and the working directory remain unchanged after the fetch.
Use the git status command to confirm the repo now knows that it is behind the remote repo.
git status
On branch master
Your branch is behind 'origin/master' by 2 commits, and can be fast-forwarded.
  (use "git pull" to update your local branch)

nothing to commit, working tree clean
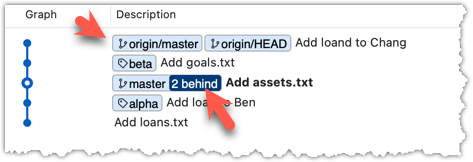
Now, the revision graph should look something like the below. Note how the origin/master ref is now two commits ahead of the master ref.
5 Merge the fetched changes.
Use the git merge <remote-tracking-branch> command to merge the fetched changes. Check the status and the revision graph to verify the branch tip has now moved by two more commits.
git merge origin/master

git status
git log --oneline --decorate
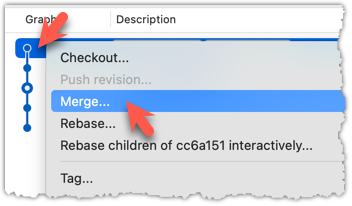
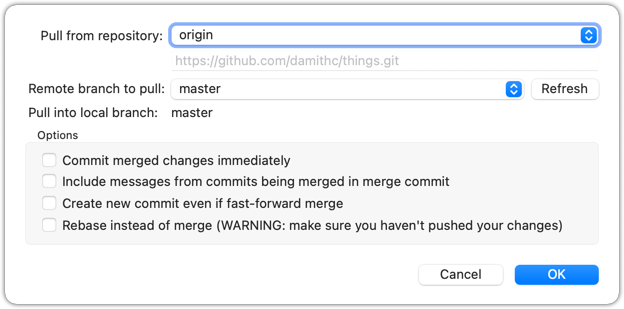
To merge the fetched changes, right-click on the latest commit on origin/remote branch and choose Merge.
In the next dialog, choose as follows:
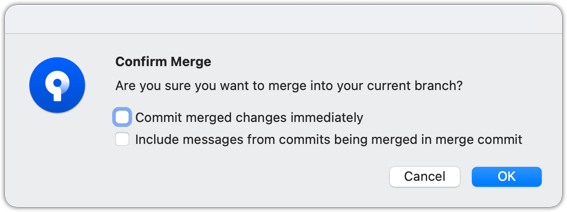
The final result should be something like the below (same as the repo state before we started this hands-on practical):

Note that merging the fetched changes can get complicated if there are multiple branches or the commits in the local repo conflict with commits in the remote repo. We will address them when we learn more about Git branches, in a later lesson.
done!
Pull is a shortcut that combines fetch and merge — it fetches the latest changes from the remote and immediately merges them into your current branch. In practice, Git users typically use the pull instead of the fetch-then-merge.
pull = fetch + merge
1 Similar to the previous hands-on practical, clone the repo se-edu/samplerepo-finances (to a new location).
Change the remote origin to point to samplerepo-finances-2.
2 Pull the newer commits from the remote, instead of a fetch-then-merge.
Use the git pull <remote> <branch> command to pull changes.
git pull origin master
The following works too. If the <remote> and <branch> are not specified, Git will pull to the current branch from the remote branch it is tracking.
git pull
Click on the Pull button on the top menu:
3 Verify the outcome is same as the fetch + merge steps you did in the previous hands-on practical.
done!
You can pull from any number of remote repos, provided the repos involved have a shared history. This can be useful when the upstream repo you forked from has some new commits that you wish to bring over to your copies of the repo (i.e., your fork and your local repo).
Fork se-edu/samplerepo-finances to your GitHub account.
Clone your fork to your computer.
Now, let's pretend that there are some new commits in upstream repo that you would like to bring over to your fork, and your local repo. Here are the steps:
1 Add the upstream repo se-edu/samplerepo-finances as remote named upstream in your local repo.
2 Pull from the upstream repo. If there are new commits (in this case, there will be none), those will come over to your local repo. For example:
git pull upstream master
.3 Push to your fork. Any new commits you pulled from the upstream repo will now appear in your fork as well. For example:
git push origin master
The method given above is the more 'standard' method of synchronising a fork with the upstream repo. In addition, platforms such as GitHub can provide other ways (example: GitHub's Sync fork feature).
4 For good measure, let's pull from another repo.
- Add the upstream repo se-edu/samplerepo-finances-2 as remote named
other-upstreamin your local repo. - Pull from it to your local repo; this will bring some new commits.
- Now, you can push those new commits to your fork.
git remote add other-upstream https://github.com/se-edu/samplerepo-finances-2.git
git pull other-upstream master
git push origin master
done!
The third step of backing up a local repo on GitHub: push a copy of the local repo to the remote repo.
You can push content of one repository to another. Pushing can transfer Git history (e.g., past commits) as well as files in the working directory. Note that pushing to a remote repo requires you to have write-access to it.
When pushing to a remote repo, you typically need to specify the following information:
- The name of the remote (e.g.,
origin). - The name of your current local branch (e.g.,
master).
If this is the first time you are pushing this branch to the remote repo, you can also ask Git to track this remote/branch pairing (e.g., remember that this local master branch is tracking the master branch in the repo origin i.e., local master branch is tracking upstream origin/master branch), so in future you can push the same remote/branch without needing to specify them again.
Here, we assume you already have a local repo that is connected to an empty remote repo, from previous hands-on practicals:
# format: git push -u <remote-repo-name> <branch-name>
git push -u origin master
Explanation:
push: the Git sub-command that pushes the current local repo content to a remote repoorigin: name of the remotemaster: branch to push-u(or--set-upstream): the flag that tells Git to track that this localmasteris trackingorigin/masterbranch
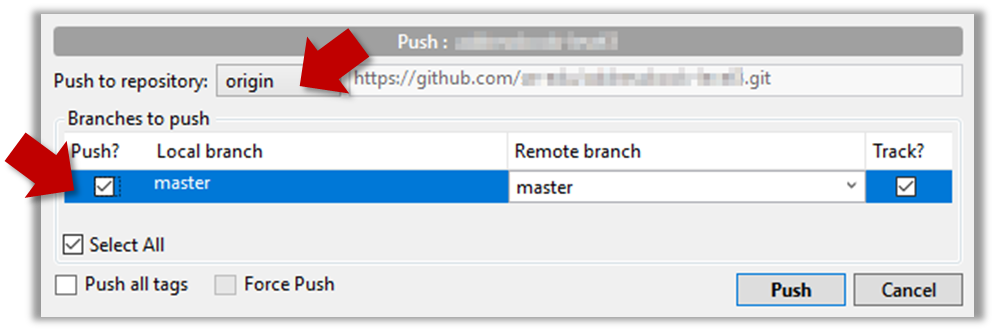
Click the Push button on the buttons ribbon at the top.
In the next dialog, ensure the settings are as follows, ensure the Track option is selected, and click the Push button on the dialog.
done!
The push command can be used repeatedly to send further updates to another repo e.g., to update the remote with commits you created since you pushed the first time.
Add a few more commits to your local repo, and push those commits to the remote repo, as follows:
1 Commit some changes in your local repo.
Use the git commit command to create commits, as you did before.
Optionally, you can run the git status command, which should confirm that your local branch is 'ahead' by one commit (i.e., the local branch has one new commit that is not in the corresponding branch in the remote repo).
git status
On branch master
Your branch is ahead of 'origin/master' by 1 commit.
  (use "git push" to publish your local commits)

nothing to commit, working tree clean
Create commits as you did before.
Before pushing the new commit, Sourcetree will indicate that your local branch is 'ahead' by one commit (i.e., the local branch has one new commit that is not in the corresponding branch in the remote repo).

2 Push the new commits to your fork on GitHub.
To push the newer commit(s) to the remote, any of the following commands should work:
git push origin mastergit push origin
(due to tracking you set up earlier, Git will assume you are pushing themasterbranch)git push
(due to tracking, Git will assume you are pushing to the remoteoriginand to the branchmasteri.e.,origin/master)
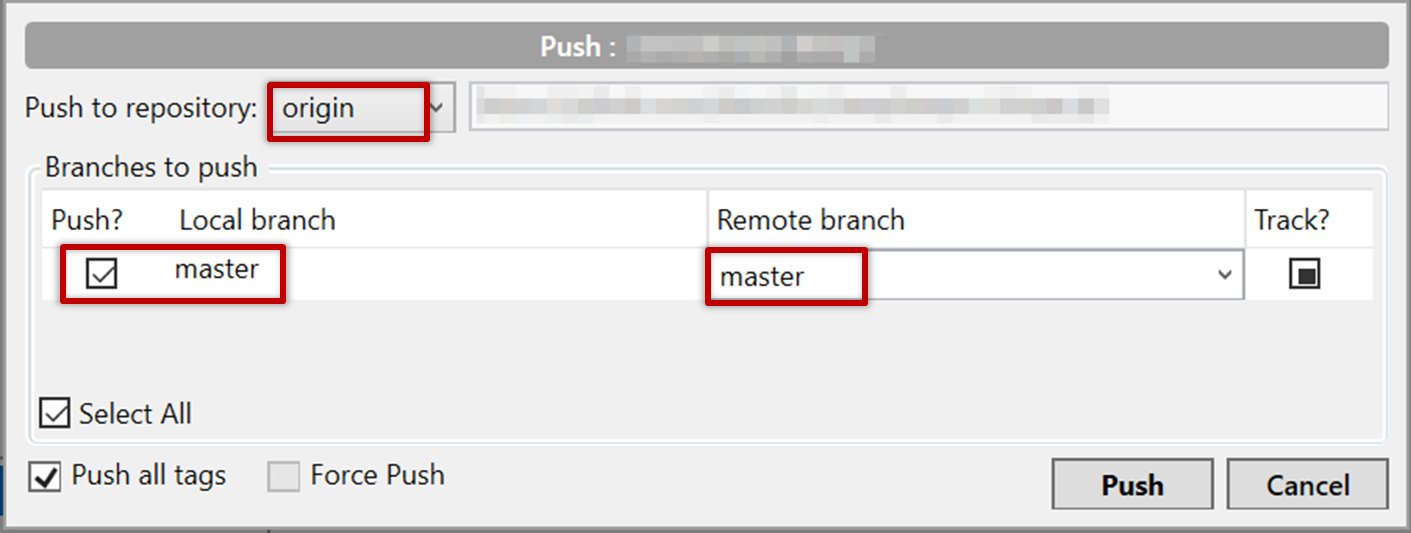
To push, click the Push button on the top buttons ribbon, ensure the settings are as follows in the next dialog, and click the Push button on the dialog.
done!
Note that you can push between two repos only if those repos have a shared history among them (i.e., one should have been created by copying the other).
DETOUR: Pushing to Multiple Repos
You can push to any number of repos, as long as the target repos and your repo have a shared history.
- Add the GitHub repo URL as a remote while giving a suitable name (e.g.,
upstream,central,production,backup...), if you haven't done so already. - Push to the target repo -- remember to select the correct target repo when you do.
e.g., git push backup master
To work in parallel timelines, you can use Git branches.
Git branches let you develop multiple versions of your work in parallel — effectively creating diverged timelines of your repository’s history. For example, one team member can create a new branch to experiment with a change, while the rest of the team continues working on another branch. Branches can have meaningful names, such as master, release, or draft.
A Git branch is simply a ref (a named label) that points to a commit and automatically moves forward as you add new commits to that branch. As you’ve seen before, the HEAD ref indicates which branch you’re currently working on, by pointing to corresponding branch ref.
When you add a commit, it goes into the branch you are currently on, and the branch ref (together with the HEAD ref) moves to the new commit.
Git creates a branch named master by default (Git can be configured to use a different name e.g., main).
Given below is an illustration of how branch refs move as branches evolve. Refer to the text below it for explanations of each stage.
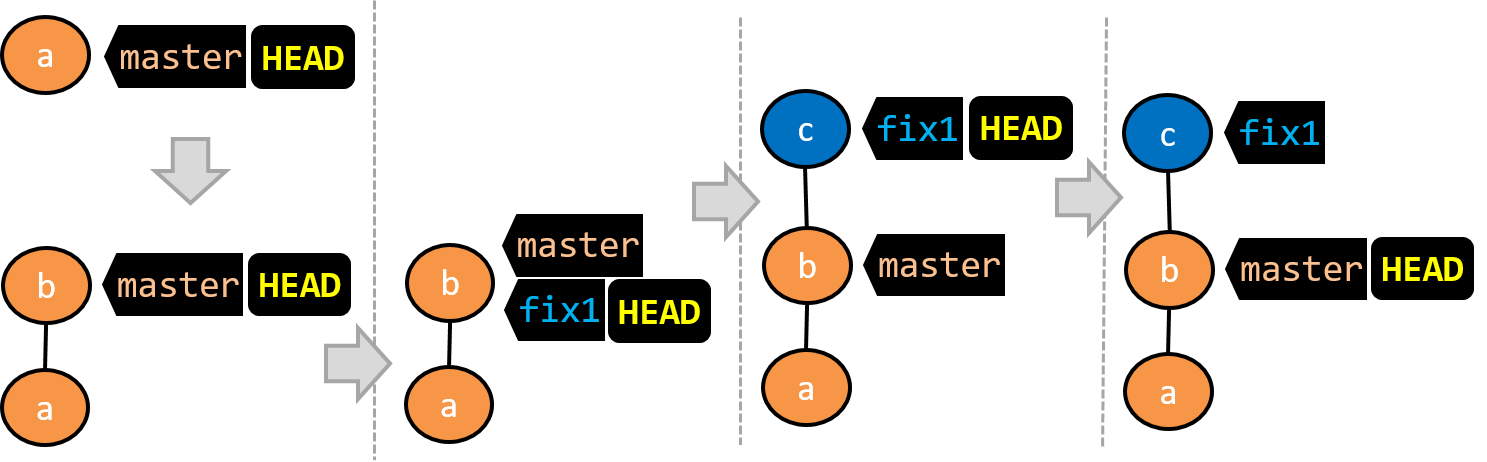
- There is only one branch (i.e.,
master) and there is only one commit on it. TheHEADref is pointing to themasterbranch (as we are currently on that branch). - A new commit has been added. The
masterand theHEADrefs have moved to the new commit. - A new branch
fix1has been added. The repo has switched to the new branch too (hence, theHEADref is attached to thefix1branch). - A new commit (
c) has been added. The current branch reffix1moves to the new commit, together with theHEADref. - The repo has switched back to the
masterbranch. Hence, theHEADhas moved back tomasterbranch's .
At this point, the repo's working directory reflects the code at commitb(notc).
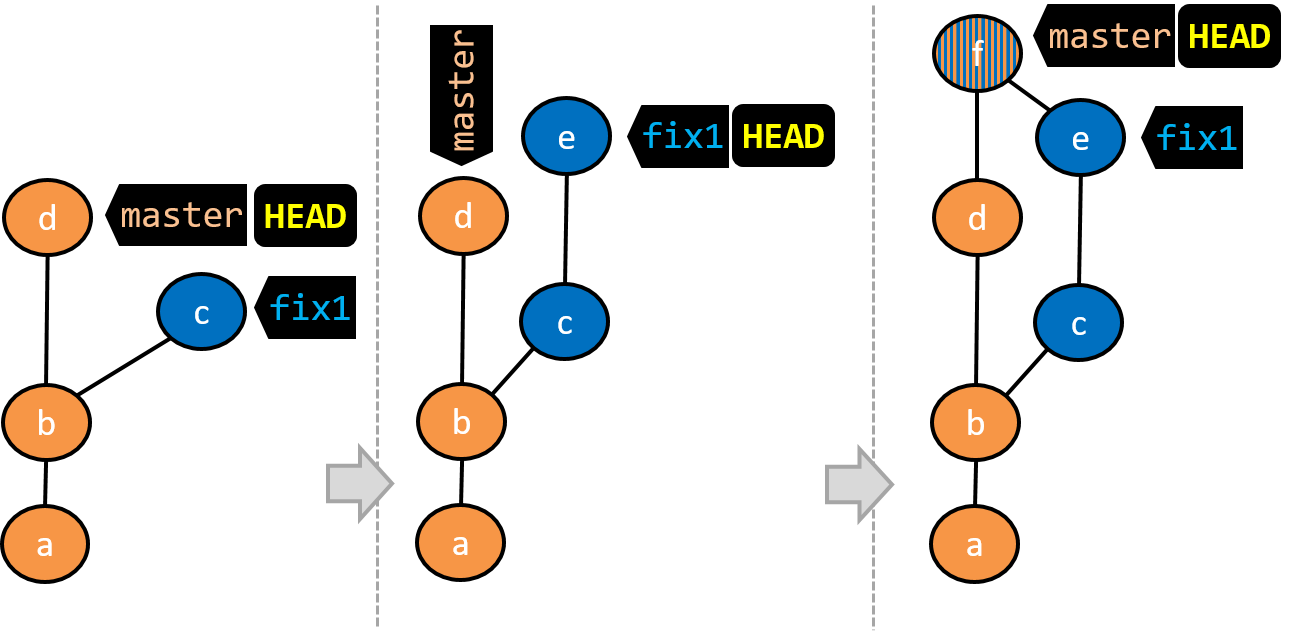
- A new commit (
d) has been added. Themasterand theHEADrefs have moved to that commit. - The repo has switched back to the
fix1branch and added a new commit (e) to it.
Note that appearance of the revision graph (colors, positioning, orientation etc.) varies based on the Git client you use, and might not match the exact diagrams given above.
1 Fork the samplerepo-things repo, and clone it onto your computer.
2 Observe that you are in the branch called master.
$ git status
on branch master
3 Start a branch named feature1 and switch to the new branch.
You can use the branch command to create a new branch and the checkout command to switch to a specific branch.
$ git branch feature1
$ git checkout feature1
One-step shortcut to create a branch and switch to it at the same time:
$ git checkout –b feature1
The new switch command
Git recently introduced a switch command that you can use instead of the checkout command given above.
To create a new branch and switch to it:
$ git branch feature1
$ git switch feature1
One-step shortcut (by using -c or --create switch):
$ git switch –c feature1
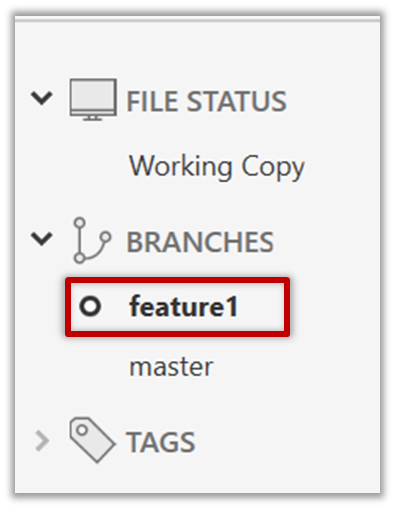
Click on the Branch button on the main menu. In the next dialog, enter the branch name and click Create Branch.

Note how the feature1 is indicated as the current branch (reason: Sourcetree automatically switches to the new branch when you create a new branch, if the Checkout New Branch was selected in the previous dialog).
4 Create some commits in the new branch. Just commit as per normal. Commits you add while on a certain branch will become part of that branch.
Note how the master ref and the HEAD ref moves to the new commit.
As before, you can use the git log --one-line --decorate command for this.
At times, the
HEADref of the local repo is represented as in Sourcetree, as illustrated in the screenshot below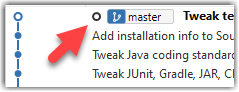 .
.The
HEADref is not shown in the UI if it is already pointing at the active branch.
5 Switch to the master branch. Note how the changes you did in the feature1 branch are no longer in the working directory.
$ git switch master
Double-click the master branch.
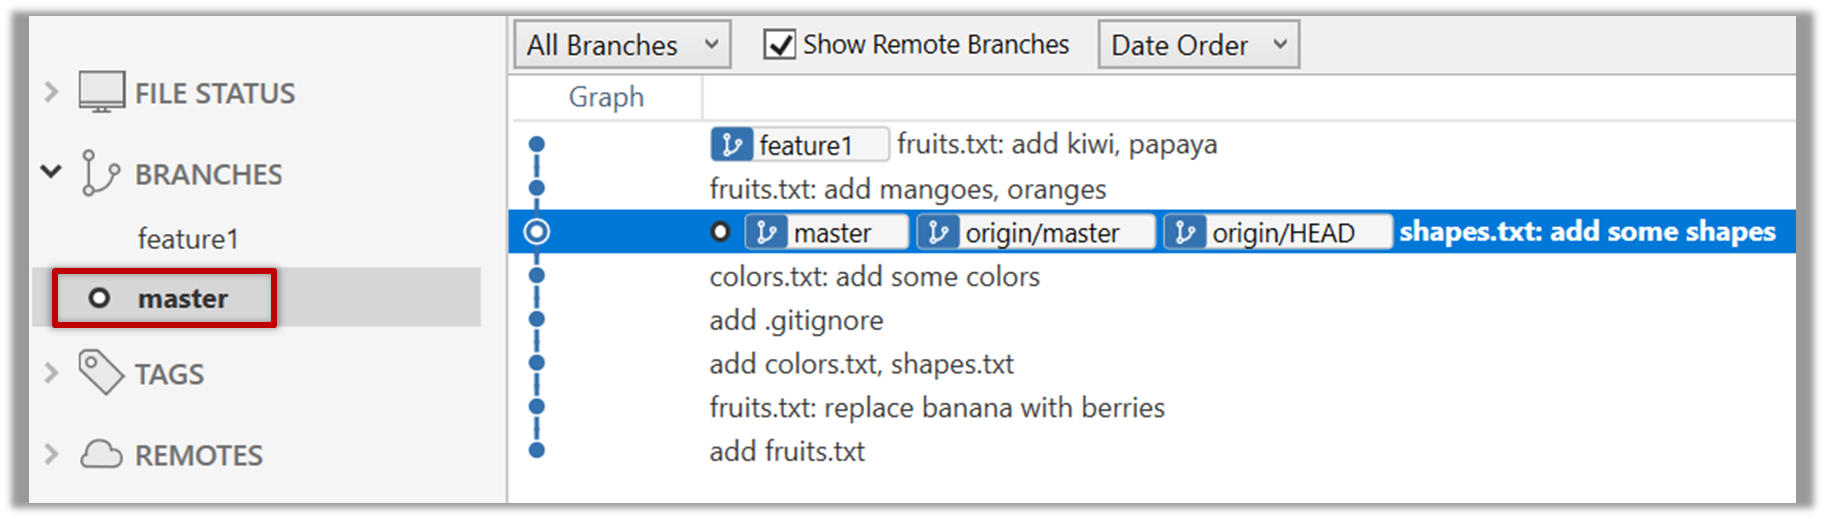
Revisiting master vs origin/master
In the screenshot above, you see a master ref and a origin/master ref for the same commit. The former identifies the of the local master branch while the latter identifies the tip of the master branch at the remote repo named origin. The fact that both refs point to the same commit means the local master branch and its remote counterpart are with each other.
Similarly, origin/HEAD ref appearing against the same commit indicates that of the remote repo is pointing to this commit as well.
6 Add a commit to the master branch. Let’s imagine it’s a bug fix.
To keep things simple for the time being, this commit should not involve the same content that you changed in the feature1 branch. To be on the safe side, you can change an entirely different file in this commit.
gitGraph BT:
    %%{init: { 'theme': 'default', 'gitGraph': {'mainBranchName': 'master'}} }%%
    commit id: "m1"
    commit id: "m2"
    branch feature1
    commit id: "f1"
    commit id: "[feature] f2"
    checkout master
    commit id: "[HEAD → master] m3"
    checkout feature1
7 Switch between the two branches and see how the working directory changes accordingly. That is, now you have two parallel timelines that you can freely switch between.
done!
You can also start a branch from an earlier commit, instead of the latest commit in the current branch. For that, simply check out the commit you wish to start from.
In the samplerepo-things repo that you used above, let's create a new branch that starts from the same commit the feature1 branch started from. Let's pretend this branch will contain an alternative version of the content we added in the feature1 branch.
gitGraph BT:
    %%{init: { 'theme': 'default', 'gitGraph': {'mainBranchName': 'master'}} }%%
    commit id: "m1"
    commit id: "m2"
    branch feature1
    branch feature1-alt
    checkout feature1
    commit id: "f1"
    commit id: "[feature1] f2"
    checkout master
    commit id: "[HEAD → master] m3"
    checkout feature1-alt
    commit id: "[HEAD → feature1-alt] a1"
Avoid this rookie mistake!
Always remember to switch back to the master branch before creating a new branch. If not, your new branch will be created on top of the current branch.
- Switch to the
masterbranch. - Checkout the commit that is at which the
feature1branch diverged from themasterbranch (e.g.git checkout HEAD~1). This will create a detachedHEAD. - Create a new branch called
feature1-alt. TheHEADwill now point to this new branch (i.e., no longer 'detached'). - Add a commit on the new branch.
done!
When merging branches, you need to guide Git on how to resolve conflicting changes in different branches.
A merge conflict happens when Git can't automatically combine changes from two branches because the same parts of a file were modified differently in each branch. When this happens, Git pauses the merge and marks the conflicting sections in the affected files so you can resolve them yourself. Once you've reviewed and fixed the conflicts, you can tell Git they're resolved and complete the merge.
More generally, a conflict occurs when Git cannot automatically reconcile different changes made to the same part of a file -- branch merge conflicts is just one example.
In this hands-on practical, we simulate a merge conflict and use it to learn how to resolve merge conflicts. You can use any repo with at least one commit in the master branch for this.
1 Start a branch named fix1 in the repo. Create a commit that adds a line with some text to one of the files.
2 Switch back to master branch. Create a commit with a conflicting change i.e., it adds a line with some different text in the exact location the previous line was added.
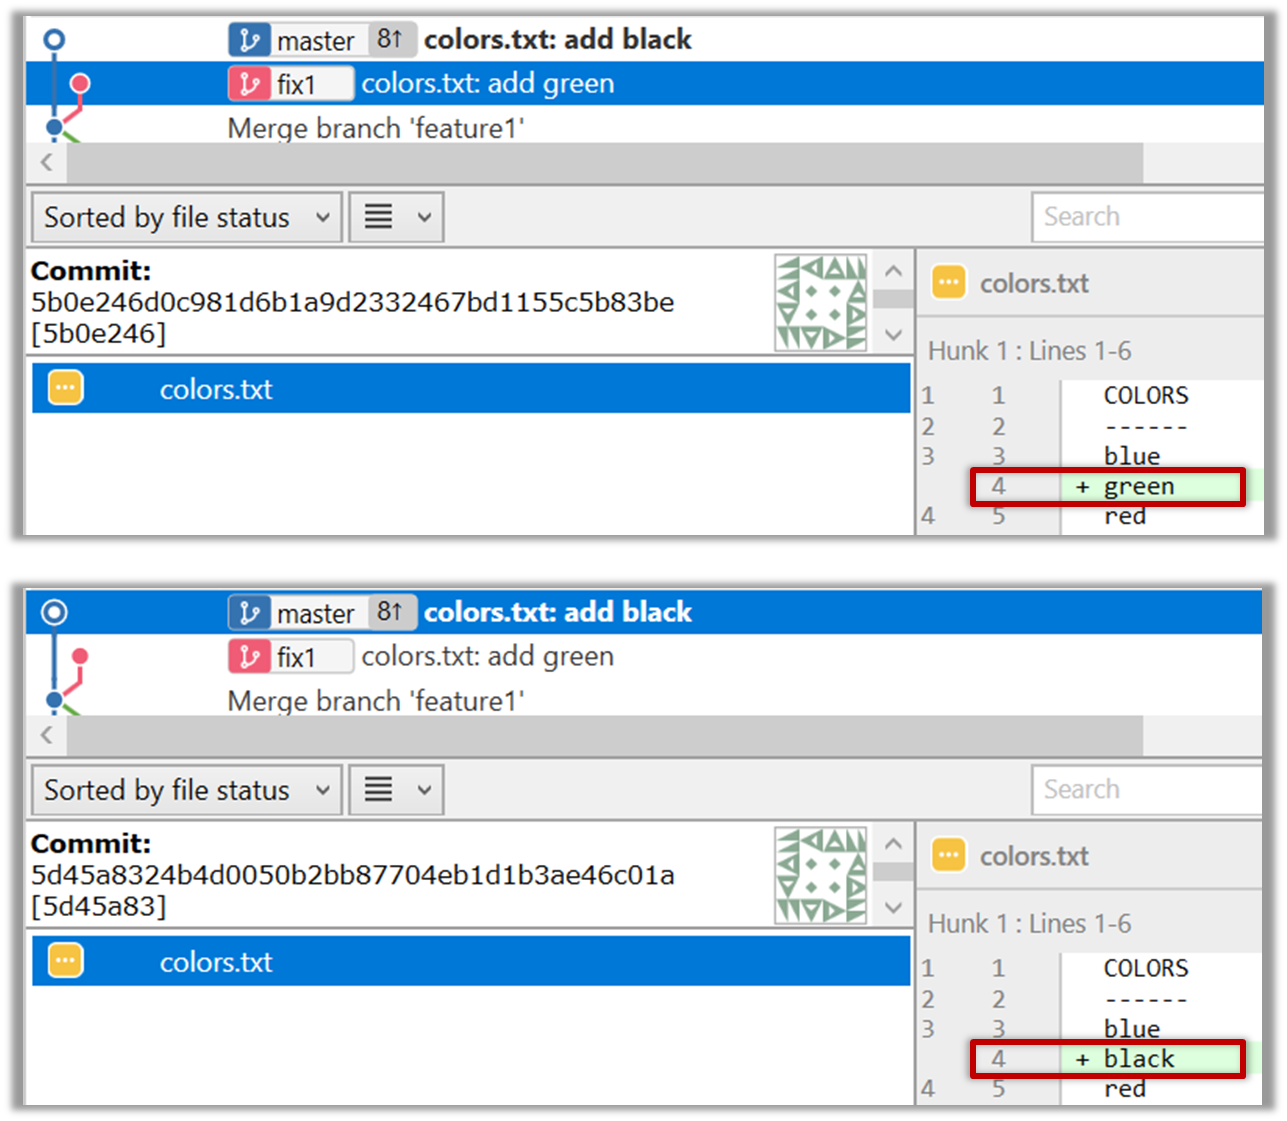
3 Try to merge the fix1 branch onto the master branch. Git will pause mid-way during the merge and report a merge conflict. If you open the conflicted file, you will see something like this:
COLORS
------
blue
<<<<<< HEAD
black
=======
green
>>>>>> fix1
red
white
4 Observe how the conflicted part is marked between a line starting with <<<<<< and a line starting with >>>>>>, separated by another line starting with =======.
Highlighted below is the conflicting part that is coming from the master branch:
blue
<<<<<< HEAD
black
=======
green
>>>>>> fix1
red
This is the conflicting part that is coming from the fix1 branch:
blue
<<<<<< HEAD
black
=======
green
>>>>>> fix1
red
5 Resolve the conflict by editing the file. Let us assume you want to keep both lines in the merged version. You can modify the file to be like this:
COLORS
------
blue
black
green
red
white
6 Stage the changes, and commit. You have now successfully resolved the merge conflict.
done!
Git branches in a local repo can be linked to a branch in a remote repo so the local branch can 'track' the corresponding remote branch, and revision history contained in the local and the remote branch pair can be synchronized as desired.
[A] Pushing a new branch to a remote repo
Let's see how you can push a branch that you created in your local repo to the remote repo. Note that this branch does not exist in the remote repo yet.
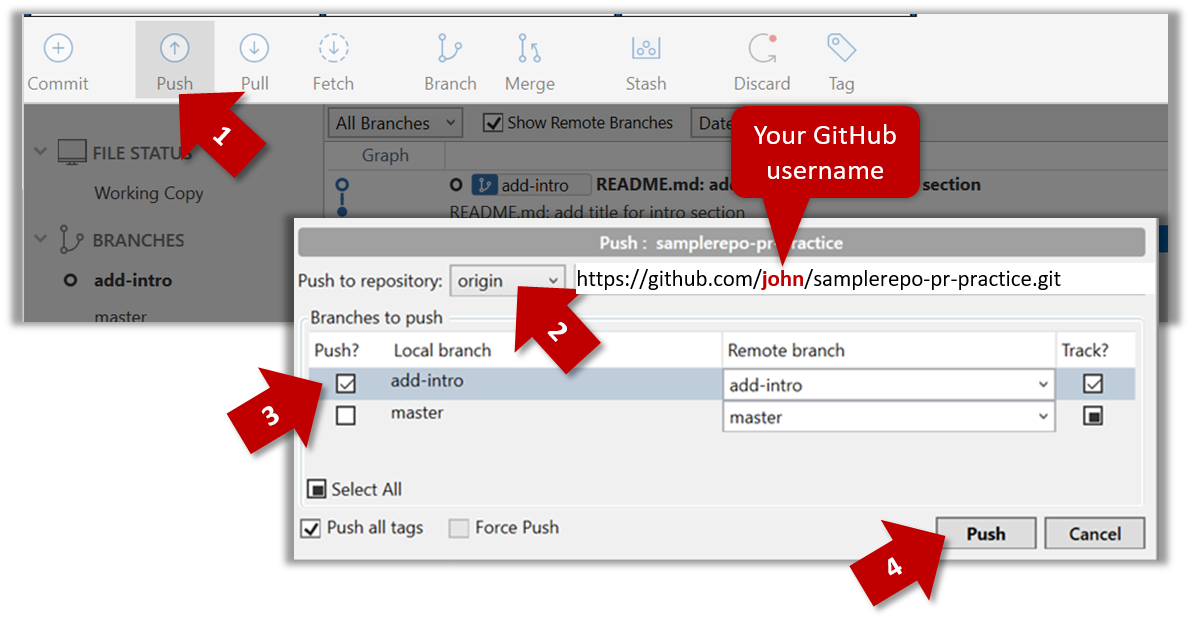
Given below is how to push a branch named add-intro to your own fork named samplerepo-pr-practice.
We assume that your local repo already has the remote added to it with the name origin. If that is not the case, you should first configure your local repo to be able to communicate with the target remote repo.
$ git push -u origin add-intro
The -u (or --set-upstream) flag tells Git that you wish the local branch to 'track' the remote branch that will be created as a result of this push.
See git-scm.com/docs/git-push for details of the push command.
- Click on
Pushbutton, which opens up the Push dialog. - Choose the remote that you wish to push the branch (assuming you've added that repo to your Sourcetree already).
- Select the branch(es) you want to push -- in this case,
add-intro.
Ensure theTrack?checkbox is ticked for the selected branch(es). - Click
Push.
[B] Pulling a remote branch for the first time
Here, let's see how to fetch a new branch (i.e., it does not exist in your local repo yet) from a remote repo.
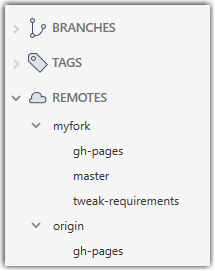
1. Fetch details from the remote. e.g., if the remote is named myfork
$ git fetch myfork
2. List the branches to see the name of the branch you want to pull.
$ git branch -a
master
remotes/myfork/master
remotes/myfork/branch1
-a flag tells Git to list both local and remote branches.
3. Create a matching local branch and switch to it.
$ git switch -c branch1 myfork/branch1
Switched to a new branch 'branch1'
branch 'branch1' set up to track 'myfork/branch1'.
-c flag tells Git to create a new local branch.
1. Check the list of remote branches by expanding the REMOTES menu on the left edge of Sourcetree. If the branch you expected to find is missing, you can click the Fetch button (in the top toolbar) to refresh the information shown under remotes.
2. Double-click the branch name (e.g., tweak-requirements branch in the myfork remote), which should open the checkout dialog shown below.
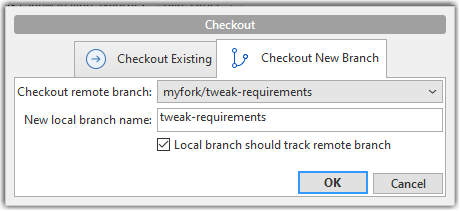
3. Go with the default settings (shown above) should be fine. Once you click OK, the branch will appear in your local repo. Furthermore, that repo will switch to that branch, and the local branch will the remote branch as well.
[C] Syncing branches
In this section we assume that you have a local branch that is already tracking a remote branch (e.g., as a result of doing [A] or [B] above).
[C1] To push new changes in the local branch to the corresponding remote branch:
Similar to [A] above, but omit the -u flag. e.g.,
$ git push origin add-intro
Similar to how you pushed a new branch (in [A]):
If you push but the remote branch has new commits that you don't have locally, Git will abort the push and will ask you to pull first.
[C2] To pull new changes from a remote branch to the corresponding local branch:
1. Switch to the branch you want to update using git checkout <branch> e.g.,
$ git checkout branch1
2. Pull the updated in the remote branch to the local branch, using git pull <remote> <branch> e.g.,
$ git pull origin branch1
1. Switch to the branch you want to update by double-clicking the branch name. e.g.,

2. Pull the updated in the remote branch to the local branch by right-clicking on the branch name (in the same place as above), and choosing Pull <remote>/<branch> (tracked) e.g., Pull myfork/add-intro (tracked).
If you pull but your local branch has new commits the remote branch doesn't have, Git will automatically perform a merge between the local branch and the remote branch.
The PR review stage is a dialog between the PR author and members of the repo that received the PR, in order to refine and eventually merge the PR.
Given below are some steps you can follow when reviewing a PR.
1. Locate the PR:
- Go to the GitHub page of the repo.
- Click on the Pull requests tab.
- Click on the PR you want to review.
2. Read the PR description. It might contain information relevant to reviewing the PR.
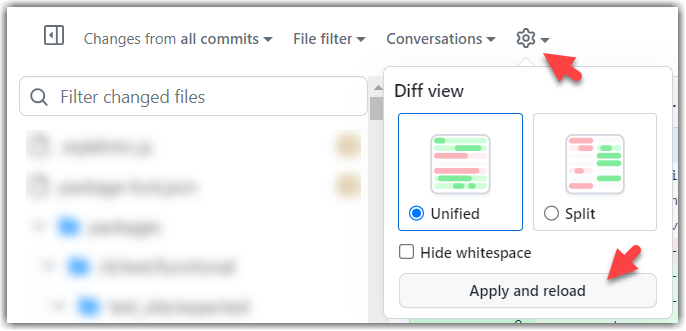
3. Click on the Files changed tab to see the diff view.
You can use the following setting to try the two different views available and pick the one you like.
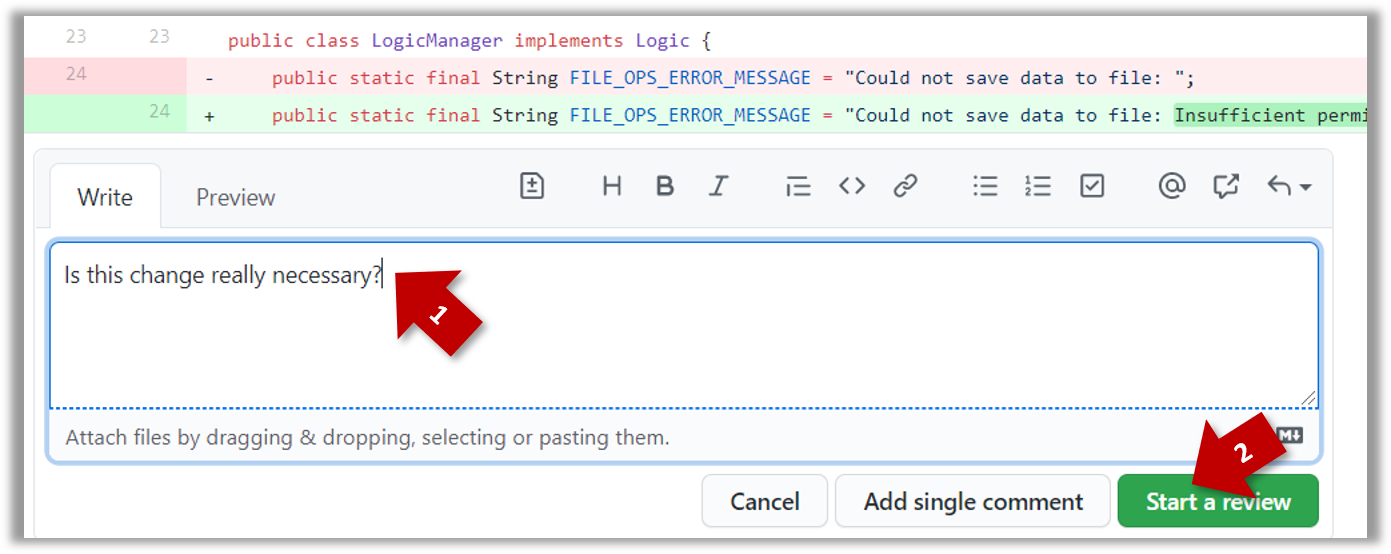
4. Add review comments:
- Hover over the line you want to comment on and click on the icon that appears on the left margin. That should create a text box for you to enter your comment.
- To give a comment related to multiple lines, click-and-drag the icon. The result will look like this:
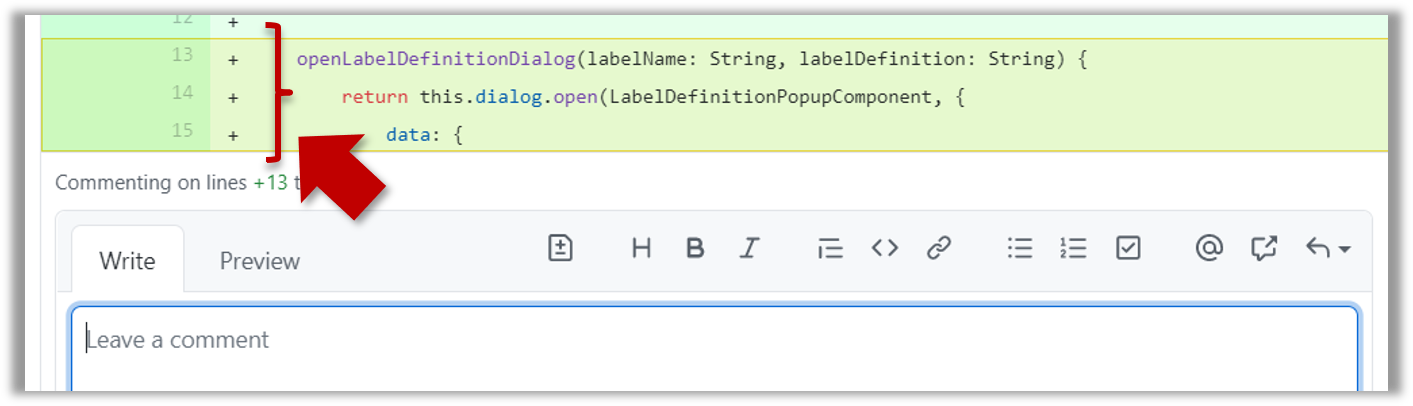
- To give a comment related to multiple lines, click-and-drag the icon. The result will look like this:
- Enter your comment.
- This page @SE-EDU/guides has some best practices PR reviewers can follow.
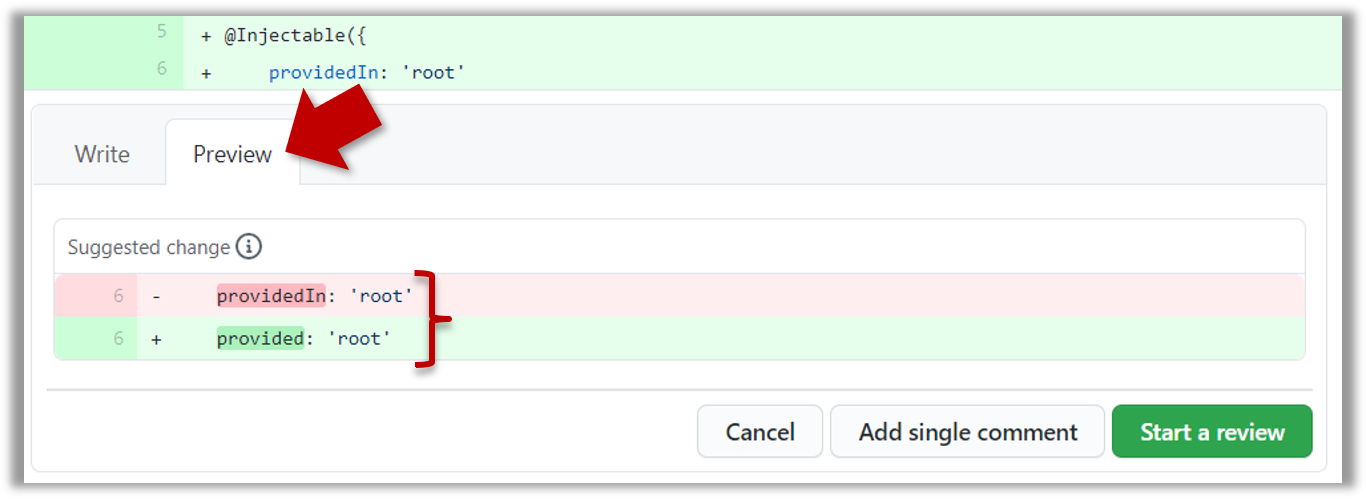
- To suggest an in-line code change, click on this icon:
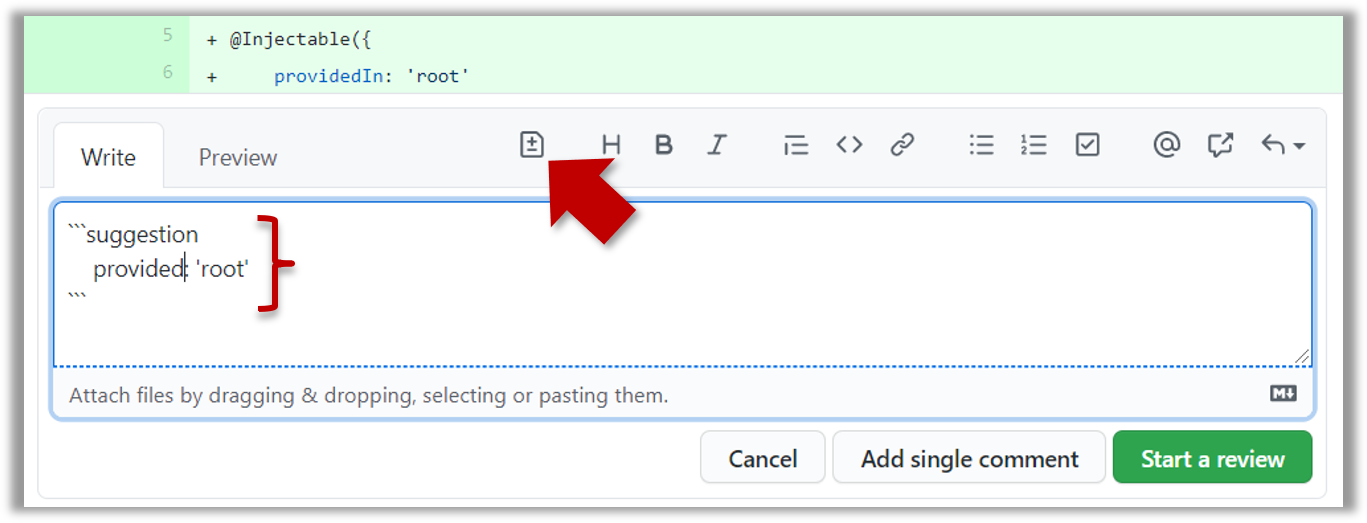
After that, you can proceed to edit thesuggestioncode block generated by GitHub (as seen in the screenshot above).
The comment will look like this to the viewers:
- After typing in the comment, click on the Start a review button (not the Add single comment button. This way, your comment is saved but not visible to others yet. It will be visible to others only when you have finished the entire review.
- Repeat the above steps to add more comments.
5. Submit the review:
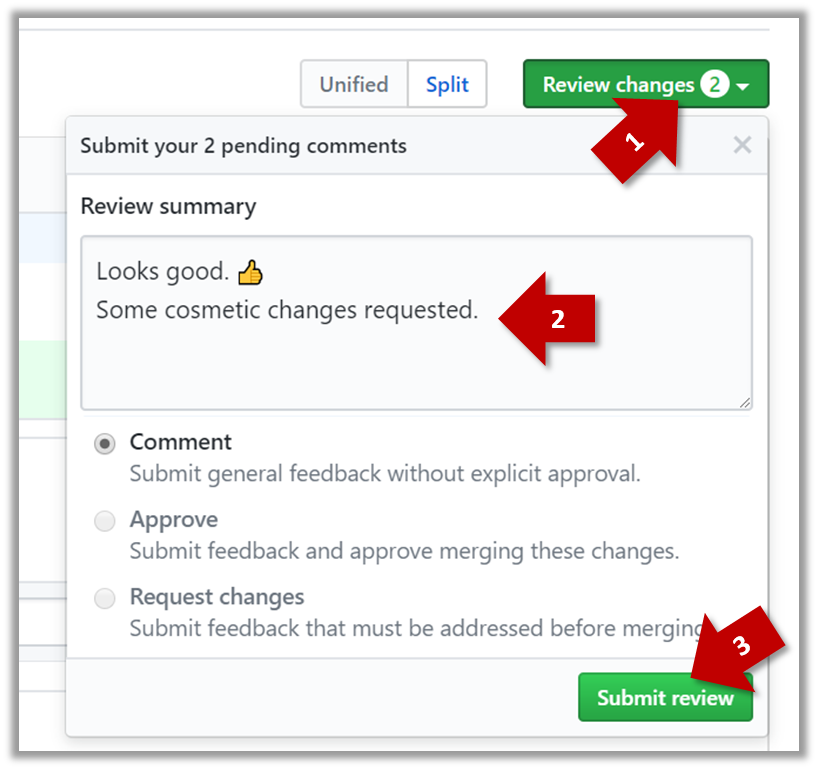
- When there are no more comments to add, click on the Review changes button (on the top right of the diff page).
- Type in an overall comment about the PR, if any. e.g.,
Overall, I found your code easy to read for the most part except a few places where the nesting was too deep. I noted a few minor coding standard violations too. Some of the classes are getting quite long. Consider splitting into smaller classes if that makes sense.LGTMis often used in such overall comments, to indicateLooks good to me(orLooks good to merge).
nit(as in nit-picking) is another such term, used to indicate minor flaws e.g.,LGTM. Just a few nits to fix.. - Choose
Approve,Comment, orRequest changesoption as appropriate and click on the Submit review button.
Let's look at the steps involved in merging a PR, assuming the PR has been reviewed, refined, and approved for merging already.
Preparation: If you would like to try merging a PR yourself, you can create a dummy PR in the following manner.
- Fork any repo (e.g., samplerepo-pr-practice).
- Clone in to your computer.
- Create a new branch e.g., (
feature1) and add some commits to it. - Push the new branch to the fork.
- Create a PR from that branch to the
masterbranch in your fork. Yes, it is possible to create a PR within the same repo.
1. Locate the PR to be merged in your repo's GitHub page.
2. Click on the Conversation tab and scroll to the bottom. You'll see a panel containing the PR status summary.
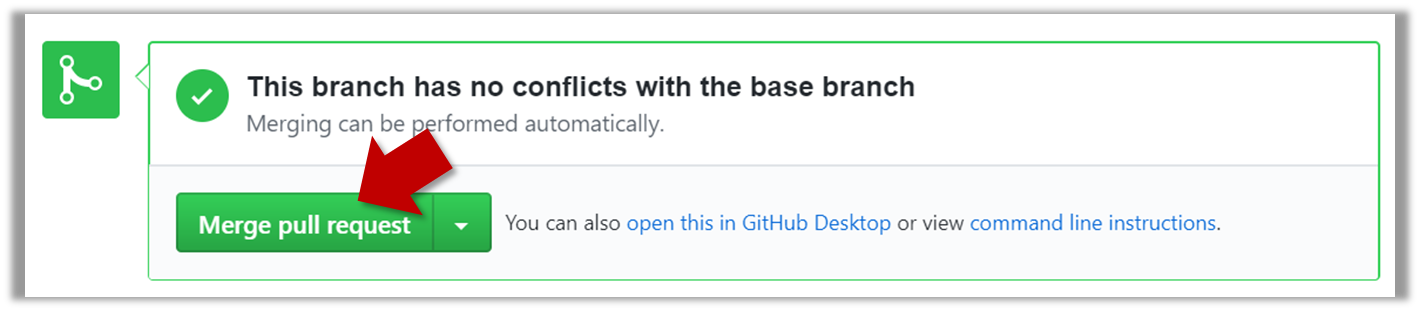
3. If the PR is not merge-able in the current state, the Merge pull request will not be green. Here are the possible reasons and remedies:
- Problem: The PR code is out-of-date, indicated by the message This branch is out-of-date with the base branch. That means the repo's
masterbranch has been updated since the PR code was last updated.- If the PR author has allowed you to update the PR and you have sufficient permissions, GitHub will allow you to update the PR simply by clicking the Update branch on the right side of the 'out-of-date' error message. If that option is not available, post a message in the PR requesting the PR author to update the PR.
- Problem: There are merge conflicts, indicated by the message This branch has conflicts that must be resolved. That means the repo's
masterbranch has been updated since the PR code was last updated, in a way that the PR code conflicts with the currentmasterbranch. Those conflicts must be resolved before the PR can be merged.- If the conflicts are simple, GitHub might allow you to resolve them using the Web interface.
- If that option is not available, post a message in the PR requesting the PR author to update the PR.
4. Merge the PR by clicking on the Merge pull request button, followed by the Confirm merge button. You should see a Pull request successfully merged and closed message after the PR is merged.
- You can choose between three merging options by clicking on the down-arrow in the Merge pull request button. If you are new to Git and GitHub, the
Create merge commitoption is recommended.
Next, sync your local repos (and forks). Merging a PR simply merges the code in the upstream remote repository in which it was merged. The PR author (and other members of the repo) needs to pull the merged code from the upstream repo to their local repos and push the new code to their respective forks to sync the fork with the upstream repo.
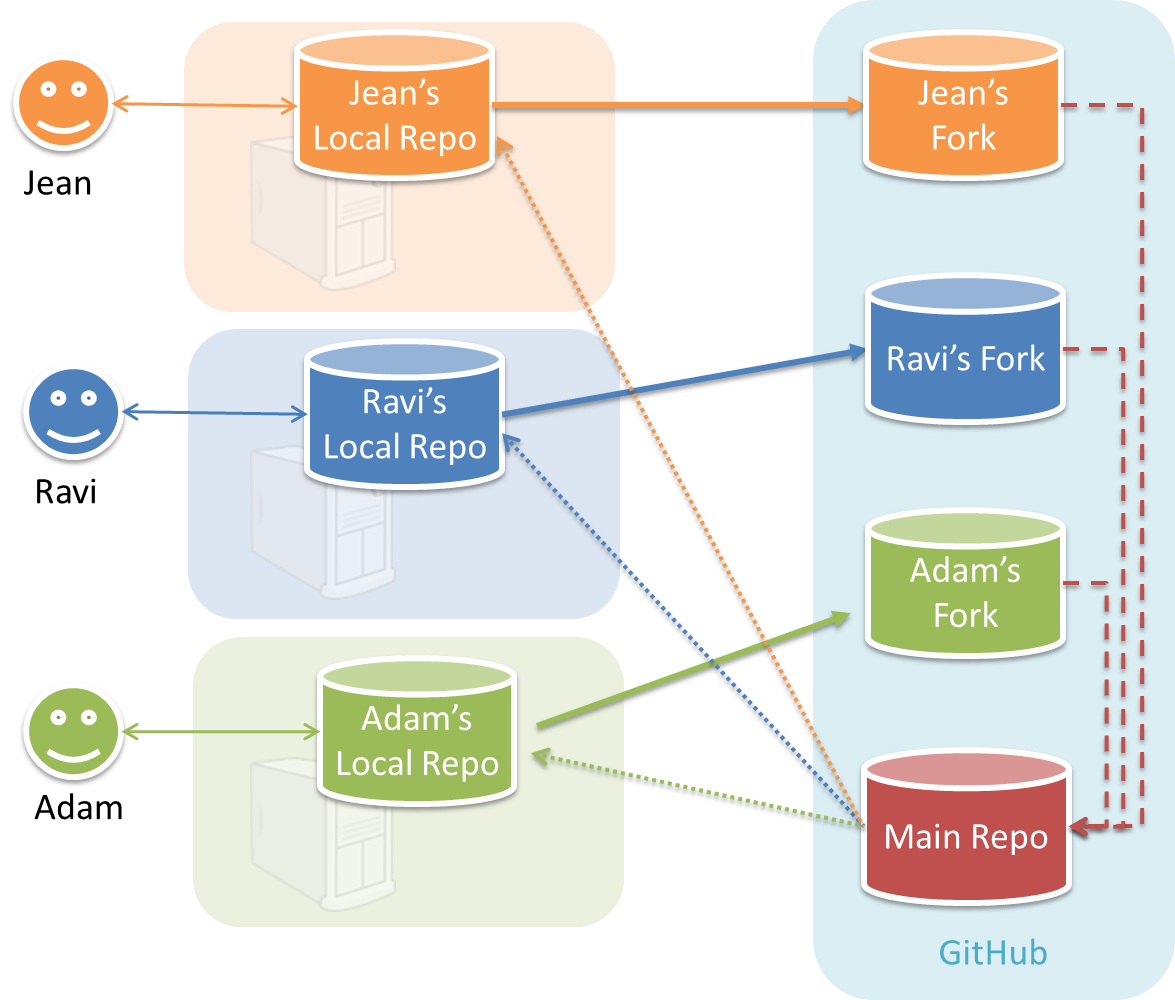
In the forking workflow, the 'official' version of the software is kept in a remote repo designated as the 'main repo'. All team members fork the main repo and create pull requests from their fork to the main repo.
To illustrate how the workflow goes, let’s assume Jean wants to fix a bug in the code. Here are the steps:
- Jean creates a separate branch in her local repo and fixes the bug in that branch.
Common mistake: Doing the proposed changes in themasterbranch -- if Jean does that, she will not be able to have more than one PR open at any time because any changes to themasterbranch will be reflected in all open PRs. - Jean pushes the branch to her fork.
- Jean creates a pull request from that branch in her fork to the main repo.
- Other members review Jean’s pull request.
- If reviewers suggested any changes, Jean updates the PR accordingly.
- When reviewers are satisfied with the PR, one of the members (usually the team lead or a designated 'maintainer' of the main repo) merges the PR, which brings Jean’s code to the main repo.
- Other members, realizing there is new code in the upstream repo, sync their forks with the new upstream repo (i.e., the main repo). This is done by pulling the new code to their own local repo and pushing the updated code to their own fork. If there are unmerged branches in the local repo, they can be updated too e.g., by merging the new
masterbranch to each of them.
Possible mistake: Creating another 'reverse' PR from the team repo to the team member's fork to sync the member's fork with the merged code. PRs are meant to go from downstream repos to upstream repos, not in the other direction.
One main benefit of this workflow is that it does not require most contributors to have write permissions to the main repository. Only those who are merging PRs need write permissions. The main drawback of this workflow is the extra overhead of sending everything through forks.
You can follow the steps in the simulation of a forking workflow given below to learn how to follow such a workflow.
This activity is best done as a team.
Step 1. One member: set up the team org and the team repo.
Create a GitHub organization for your team, if you don't have one already. The org name is up to you. We'll refer to this organization as team org from now on.
Add a team called
developersto your team org.Add team members to the
developersteam.Fork se-edu/samplerepo-workflow-practice to your team org. We'll refer to this as the team repo.
Add the forked repo to the
developersteam. Give write access.
Step 2. Each team member: create PRs via own fork.
Fork that repo from your team org to your own GitHub account.
Create a branch named
add-{your name}-info(e.g.add-johnTan-info) in the local repo.Add a file
yourName.mdinto themembersdirectory (e.g.,members/johnTan.md) containing some info about you into that branch.Push that branch to your fork.
Create a PR from that branch to the
masterbranch of the team repo.
Step 3. For each PR: review, update, and merge.
[A team member (not the PR author)] Review the PR by adding comments (can be just dummy comments).
[PR author] Update the PR by pushing more commits to it, to simulate updating the PR based on review comments.
[Another team member] Approve and merge the PR using the GitHub interface.
[All members] Sync your local repo (and your fork) with upstream repo. In this case, your upstream repo is the repo in your team org.
- The basic mechanism for this has two steps (which you can do using Git CLI or any Git GUI):
(1) First, pull from the upstream repo -- this will update your clone with the latest code from the upstream repo.
If there are any unmerged branches in your local repo, you can update them too e.g., you can merge the newmasterbranch to each of them.
(2) Then, push the updated branches to your fork. This will also update any PRs from your fork to the upstream repo. - Some alternatives mechanisms to achieve the same can be found in this GitHub help page.
If you are new to Git, we recommend that you use the above two-step mechanism instead, so that you get a better view of what's actually happening behind the scene.
- The basic mechanism for this has two steps (which you can do using Git CLI or any Git GUI):
Step 4. Create conflicting PRs.
[One member]: Update README: In the
masterbranch, remove John Doe and Jane Doe from theREADME.md, commit, and push to the main repo.[Each team member] Create a PR to add yourself under the
Team Memberssection in theREADME.md. Use a new branch for the PR e.g.,add-johnTan-name.
Step 5. Merge conflicting PRs one at a time. Before merging a PR, you’ll have to resolve conflicts.
[Optional] A member can inform the PR author (by posting a comment) that there is a conflict in the PR.
[PR author] Resolve the conflict locally:
- Pull the
masterbranch from the repo in your team org. - Merge the pulled
masterbranch to your PR branch. - Resolve the merge conflict that crops up during the merge.
- Push the updated PR branch to your fork.
- Pull the
[Another member or the PR author]: Merge the de-conflicted PR: When GitHub does not indicate a conflict anymore, you can go ahead and merge the PR.