To create well-crafted commits, you need to know how to control which precise changes go into a commit.
Crafting a commit involves two aspects:
- What changes to include in it: deciding what changes belong together in a single commit — this is about commit granularity, ensuring each commit represents a meaningful, self-contained change.
- How to include those changes: carefully staging just those changes — this is about using Git’s tools to precisely control what ends up in the commit.
SIDEBAR: Guidelines on what to include in a commit
A good commit represents a single, logical unit of change — something that can be described clearly in one sentence. For example, fixing a specific bug, adding a specific feature, or refactoring a specific function. If each commit tells a clear story about why the change was made and what it achieves, your repository history becomes a valuable narrative of the project’s development. Here are some (non-exhaustive) guidelines:
- No more than one change per commit: Avoid lumping unrelated changes into one commit, as this makes the history harder to understand, review, or revert (if each commit contains one standalone change, to reverse that change can be done by deleting or reverting that specific commit entirely, without affecting any other changes).
- Make the commit standalone: Don’t split a single logical change across multiple commits unnecessarily, as this can clutter the history and make it harder to follow the evolution of an idea or feature.
- Small enough to review easily, but large enough to stand on its own: For example, fixing the same typo in five files can be one commit — splitting it into five separate commits is excessive. Conversely, implementing a big feature may be too much for one commit — instead, break it down into a series of commits, each containing a meaningful yet standalone step towards the final goal.
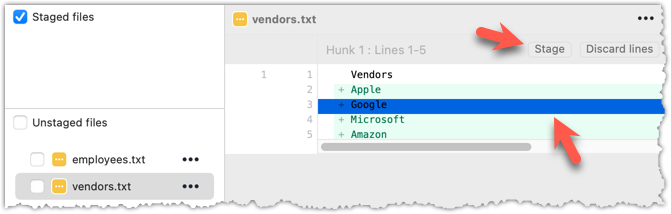
Git can let you choose not just which files, but which specific changes within those files, to include in a commit. Most Git tools — including the command line and many GUIs — let you interactively select which "hunks" or even individual lines of a file to stage. This allows you to separate unrelated changes and avoid committing unnecessary edits. If you make multiple changes in the same file, you can selectively stage only the parts that belong to the current logical change.
This level of control is particularly useful when:
- You noticed and fixed a small, unrelated issue while working on something else.
- You experimented with multiple approaches in the same file and now want to commit only the final, clean solution.
- You want your commit history to clearly separate concerns, even when the edits touch the same files.
You can use any repo for this.
1 Do several changes to some tracked files. Change multiple files. Also change multiple locations in the same file.
2 Stage some changes in some files while keeping other changes in the same files unstaged.
As you know, you can use git add <filename> to stage changes to an entire file.
To select which hunks to stage, you can use the git add -p command instead (-p stands for 'by patch'):
git add -p
This command will take you to an interactive mode in which you can go through each hunk and decide if you want to stage it. The video below has contains a demonstration of how this feature works:
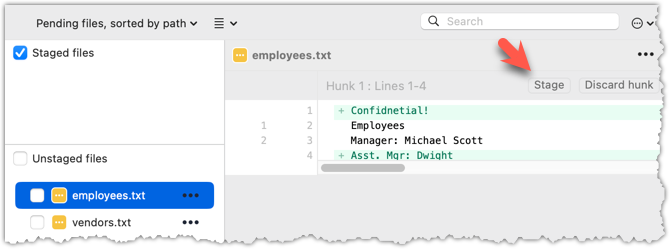
To stage a hunk, you can click the Stage button above the hunk in question:
 Unstaging can be done similarly:
Most git operations can be done faster through the CLI than equivalent Git GUI clients, once you are familiar enough with the CLI commands.
However, selective staging is one exception where a good GUI can do better than the CLI, if you need to do many fine-grained staging operations (e.g., frequently staging only parts of hunks).
done!