Destination: To be able to back up a Git repository on a cloud-based Git service such as GitHub.
Motivation: One (of several) benefits of maintaining a copy of a repo on a cloud server: it acts as a safety net (e.g., against the folder becoming inaccessible due to a hardware fault).
Lesson plan:
Lesson: Remote Repositories covers that part.
Lesson: Preparing to use GitHub covers that part.
Lesson: Creating a Repo on GitHub covers that part.
Lesson: Linking a Local Repo With a Remote Repo covers that part.
Lesson: Updating the Remote Repo covers that part.
Lesson: Omitting Files from Revision Control covers that part.
To use GitHub, you need to sign up for an account, and configure related tools/settings first.
GitHub is a web-based services that host Git repositories and add collaboration features on top of Git. Two other similar platforms are GitLab or Bitbucket. While Git manages version control locally, these platforms make it easier for individuals and teams to work together by providing shared access to repositories, issue tracking, pull requests, and permission controls. They are widely used in both open-source and commercial software development. Here we'll be GitHub.
On GitHub, a Git repo can be put in one of two spaces:
- A GitHub user acccount represents an individual user. It is created when you sign up for GitHub and includes a username, profile page, and personal settings. With a user account, you can create your own repositories, contribute to others’ projects, and manage collaboration settings for any repositories you own.
- A GitHub organisation (org for short) is a shared account used by a group such as a team, company, or open-source project. Organisations can own repositories and manage access to them through teams, roles, and permissions. Organisations are especially useful when managing repositories with shared ownership or when working at scale.
Every GitHub user must have a user account, even if they primarily work within an organisation.
Before you can interact with GitHub from your local Git client, you need to set up authentication. In the past, you could simply enter your GitHub username and password, but GitHub no longer accepts passwords for Git operations. Instead, you’ll use a more secure method — such as a Personal Access Token (PAT) or SSH keys — to prove your identity.
A Personal Access Token (PAT) is essentially a long, random string that acts like a password, but it can be scoped to specific permissions (e.g., read-only or full access) and revoked at any time. This makes it more secure and flexible than a traditional password.
Git supports two main protocols for communicating with GitHub: HTTPS and SSH.
- With HTTPS, you connect over the web and authenticate using your GitHub username and a Personal Access Token.
- With SSH, you connect using a cryptographic key pair you generate on your machine. Once you add your public key to your GitHub account, GitHub recognises your machine and lets you authenticate without typing anything further.
GitHub associates a commit to a user based on the email address in the commit metadata. When you push a commit, GitHub checks if the email matches a verified email on a GitHub account. If it does, the commit is shown as authored by that user. If the email doesn’t match any account, the commit is still accepted but won’t be linked to any profile.
GitHub provides a no-reply email (e.g., 12345678+username@users.noreply.github.com) that you can use as your Git user.email to hide your real email while still associating commits with your GitHub account.
PREPARATION: [Optional] Configure user.email to use the no-reply email from GitHub
If you prefer not to include your real email address in commits, you can do the following:
Find your no-reply email provided by GitHub: Navigate to the email settings of your GitHub account and select the option to
Keep my email address private. The no-reply address will then be displayed, typically in the formatID+USERNAME@users.noreply.github.com.

Update your
user.emailwith that email address e.g.,git config --global user.email "12345678+username@users.noreply.github.com"
GitHub offers its own clients to make working with GitHub more convenient.
- The GitHub Desktop app provides a GUI for performing GitHub operations from your desktop, without needing to visit the GitHub web UI.
- The GitHub CLI (
gh) brings GitHub-specific commands to your terminal, letting you perform operations on GitHub from your commandline.
If you are using Git-Mastery exercises (strongly recommended), you need to install and configure GitHub CLI because it is needed by Git-Mastery exercises involving GitHub.
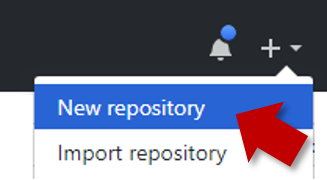
The first step of backing up a local repo on GitHub: create an empty repository on GitHub.
You can create a remote repository based on an existing local repository, to serve as a remote copy of you local repo. For example, suppose you created a local repo and worked with it for a while, but now you want to upload it onto GitHub. The first step is to create an empty repository on GitHub.
1 Login to your GitHub account and choose to create a new repo.
2 In the next screen, provide a name for your repo but keep the Initialize this repo ... tick box unchecked.
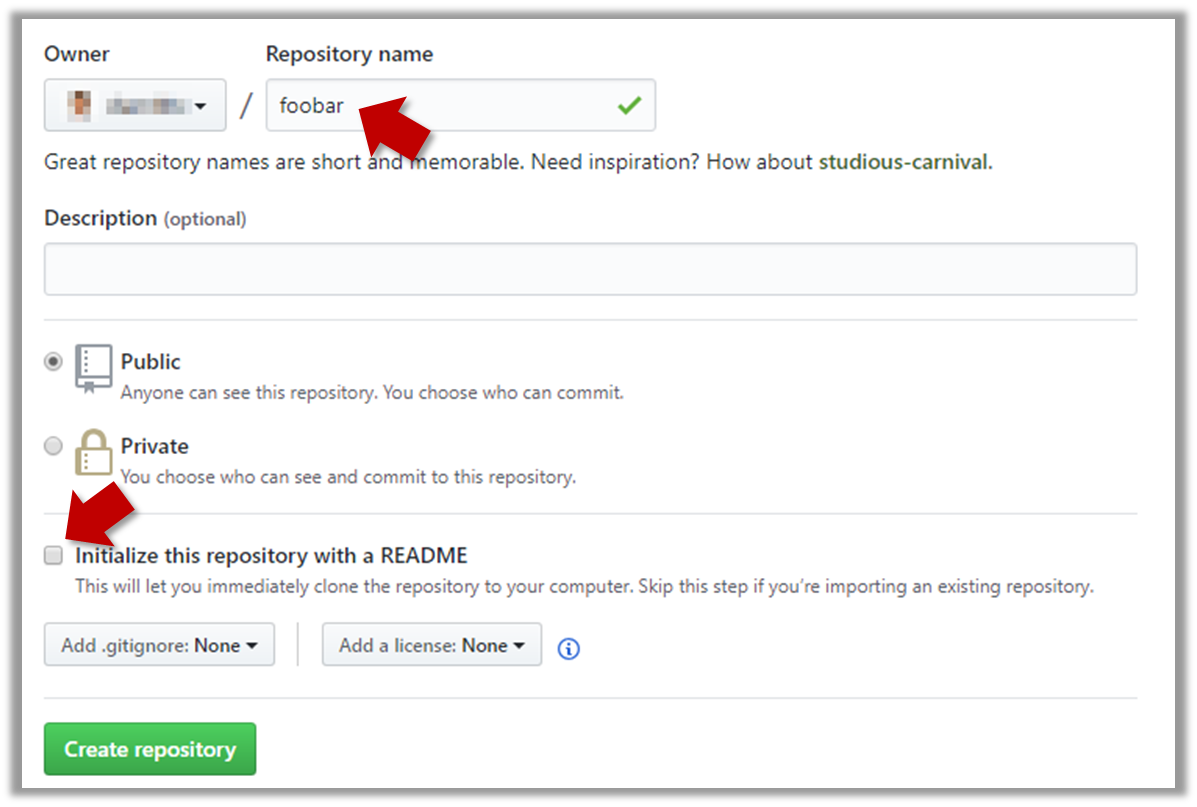
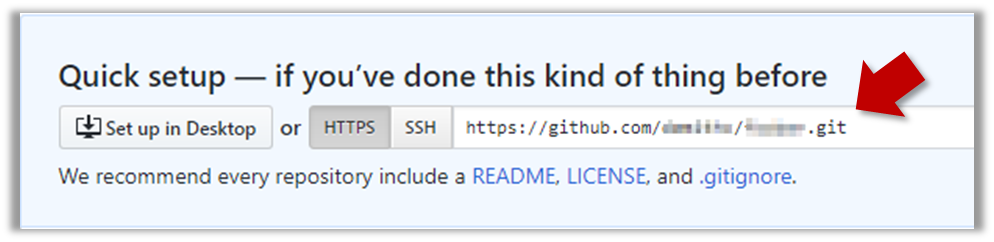
3 Note the URL of the repo. It will be of the form https://github.com/{your_user_name}/{repo_name}.git.
e.g., https://github.com/johndoe/foobar.git (note the .git at the end)
The second step of backing up a local repo on GitHub: link the local repo with the remote repo on GitHub.
A Git remote is a reference to a repository hosted elsewhere, usually on a server like GitHub, GitLab, or Bitbucket. It allows your local Git repo to communicate with another remote copy — for example, to upload to commits that you created locally but missing in the remote copy.
By adding a remote, you are informing the local repo details of a remote repo it can communicate with, for example, where the repo exists and what name to use to refer to the remote.
The URL you use to connect to a remote repo depends on the protocol — HTTPS or SSH:
- HTTPS URLs use the standard web protocol and starts with
https://github.com/(for GitHub users). e.g.,https://github.com/username/repo-name.git - SSH URLs use the secure shell protocol and starts with
git@github.com:. e.g.,git@github.com:username/repo-name.git
A Git repo can have multiple remotes. You simply need to specify different names for each remote (e.g., upstream, central, production, other-backup ...).
Add the empty remote repo you created on GitHub as a remote of a local repo you have.
1 In a terminal, navigate to the folder containing the local repo things your created earlier.
2 List the current list of remotes using the git remote -v command, for a sanity check. No output is expected if there are no remotes yet.
3 Add a new remote repo using the git remote add <remote-name> <remote-url> command.
i.e., if using HTTPS, git remote add origin https://github.com/{YOUR-GITHUB-USERNAME}/things.git
4 List the remotes again to verify the new remote was added.
git remote -v
origin  https://github.com/johndoe/things.git (fetch)
origin  https://github.com/johndoe/things.git (push)
The same remote will be listed twice, to show that you can do two operations (fetch and push) using this remote. You can ignore that for now. The important thing is the remote you added is being listed.
1 Open the local repo in Sourcetree.
2 Choose Repository → Repository Settings menu option.
3 Add a new remote to the repo with the following values.
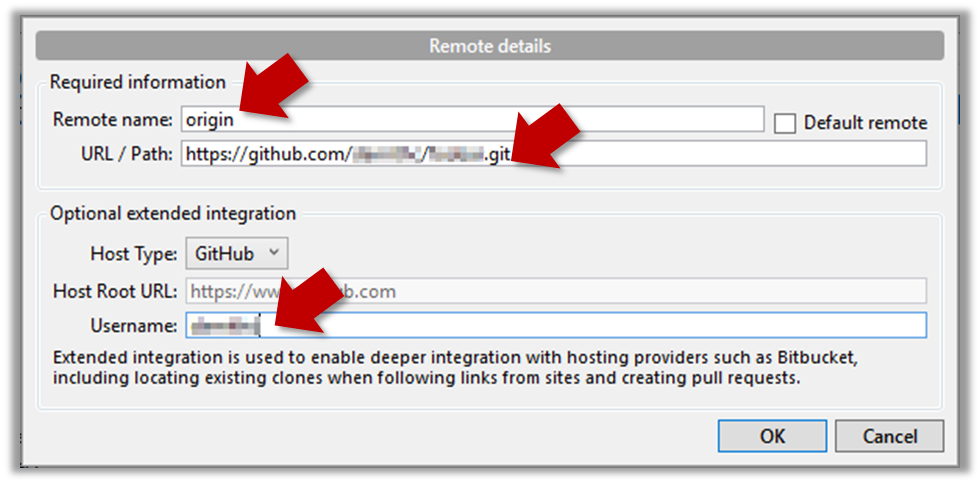
Remote name: the name you want to assign to the remote repo i.e.,originURL/path: the URL of your remote repo
i.e.,https://github.com/{YOUR-GITHUB-USERNAME}/things.gitUsername: your GitHub username
4 Verify the remote was added by going to Repository → Repository Settings again.
5 Add another remote, to verify that a repo can have multiple remotes. You can use any name (e.g., backup and any URL for this).
The third step of backing up a local repo on GitHub: push a copy of the local repo to the remote repo.
You can push content of one repository to another. Pushing can transfer Git history (e.g., past commits) as well as files in the working directory. Note that pushing to a remote repo requires you to have write-access to it.
When pushing to a remote repo, you typically need to specify the following information:
- The name of the remote (e.g.,
origin). - The name of your current local branch (e.g.,
master).
If this is the first time you are pushing this branch to the remote repo, you can also ask Git to track this remote/branch pairing (e.g., remember that this local master branch is tracking the master branch in the repo origin i.e., local master branch is tracking upstream origin/master branch), so in future you can push the same remote/branch without needing to specify them again.
Here, we assume you already have a local repo that is connected to an empty remote repo, from previous hands-on practicals:
# format: git push -u <remote-repo-name> <branch-name>
git push -u origin master
Explanation:
push: the Git sub-command that pushes the current local repo content to a remote repoorigin: name of the remotemaster: branch to push-u(or--set-upstream): the flag that tells Git to track that this localmasteris trackingorigin/masterbranch
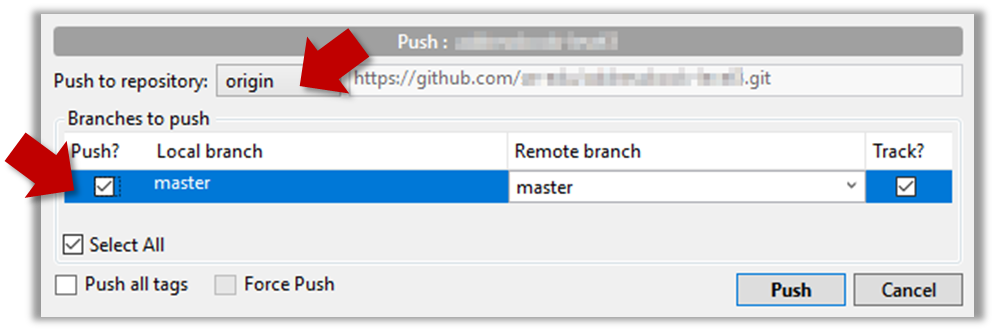
Click the Push button on the buttons ribbon at the top.

In the next dialog, ensure the settings are as follows, ensure the Track option is selected, and click the Push button on the dialog.
The push command can be used repeatedly to send further updates to another repo e.g., to update the remote with commits you created since you pushed the first time.
Add a few more commits to your local repo, and push those commits to the remote repo, as follows:
1 Commit some changes in your local repo.
2 Push the new commits to your fork on GitHub
Optionally, you can run the git status command, which should confirm that your local branch is 'ahead' by one commit (i.e., the local branch has one new commit that is not in the corresponding branch in the remote repo).
On branch master
Your branch is ahead of 'origin/master' by 1 commit.
  (use "git push" to publish your local commits)

nothing to commit, working tree clean
To push the newer commit(s) to the remote, any of the following commands should work:
git push origin mastergit push origin
(due to tracking you set up earlier, Git will assume you are pushing themasterbranch)git push
(due to tracking, Git will assume you are pushing to the remoteoriginand to the branchmasteri.e.,origin/master)
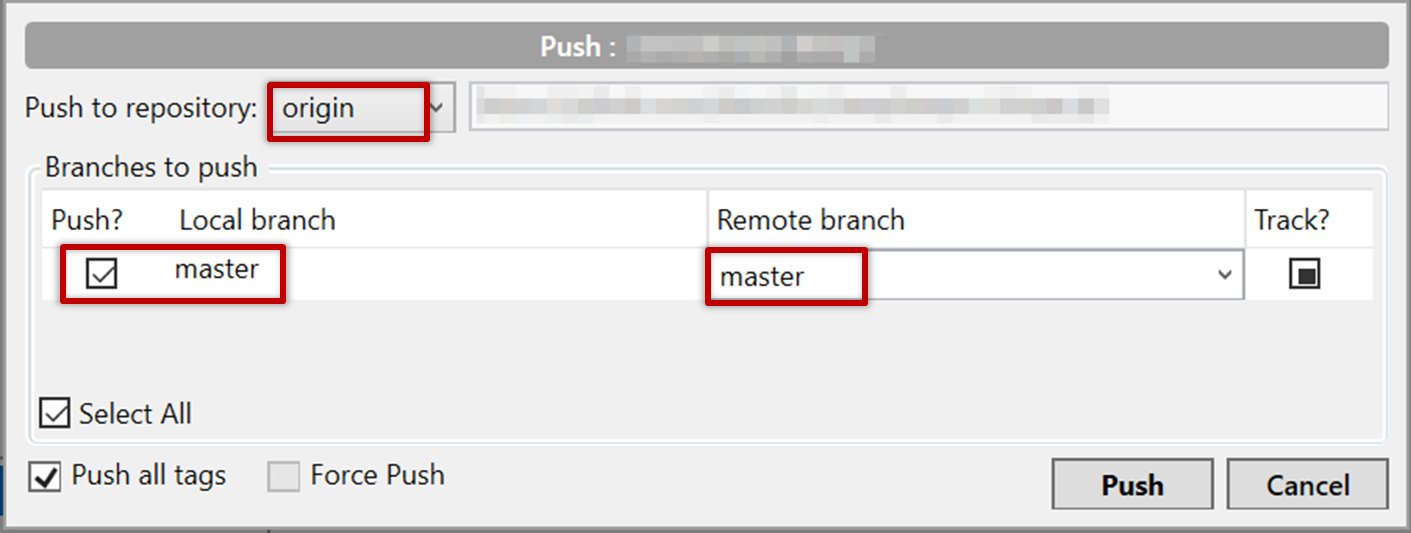
Before pushing the new commit, Sourcetree will indicate that your local branch is 'ahead' by one commit (i.e., the local branch has one new commit that is not in the corresponding branch in the remote repo).

To push, click the Push button on the top buttons ribbon, ensure the settings are as follows in the next dialog, and click the Push button on the dialog.
Note that you can push between two repos only if those repos have a shared history among them (i.e., one should have been created by copying the other).
DETOUR: Pushing to Multiple Reposs
You can push to any number of repos, as long as the target repos and your repo have a shared history.
- Add the GitHub repo URL as a remote while giving a suitable name (e.g.,
upstream,central,production,backup...), if you haven't done so already. - Push to the target repo -- remember to select the correct target repo when you do.
e.g., git push backup master
Git allows you to specify which files should be omitted from reversion control.
You can specify which files Git should ignore from reversion control. While you can always omit files from revision control simply by not staging them, having an 'ignore-list' is more convenient, especially if there are files inside the working folder that are not suitable for revision control (e.g., temporary log files) or files you want to prevent from accidentally including in a commit (files containing confidential information).
A repo-specific ignore-list of files can be specified in a .gitignore file, stored in the root of the repo folder.
- The
.gitignorefile itself can be either revision controlled or ignored.- To version control it (the more common choice – which allows you to track how the
.gitignorefile changes over time), simply commit it as you would commit any other file. - To ignore it, simply add its name to the
.gitignorefile itself.
- To version control it (the more common choice – which allows you to track how the
- It supports file patterns e.g., adding
temp/*.tmpto the.gitignorefile prevents Git from tracking any.tmpfiles in thetempdirectory.
1 Add a file into your repo's working folder that you presumably do not want to revision-control e.g., a file named temp.txt. Observe how Git has detected the new file.
Add a few other files with .tmp extension.
2 Configure Git to ignore those files:
Create a file named .gitignore in the working directory root and add the following line in it.
temp.txt
Observe how temp.text is no longer detected as 'untracked' by running the git status command (but now it will detect the .gitignore file as 'untracked'.
Update the .gitignore file as follows:
temp.txt
*.tmp
Observe how .tmp files are no longer detected as 'untracked' by running the git status command.
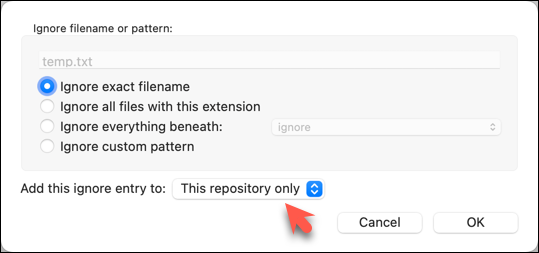
The file should be currently listed under Unstaged files. Right-click it and choose Ignore.... Choose Ignore exact filename(s) and click OK.
Also take note of other options available e.g., Ignore all files with this extension etc. They may be useful in future.
Note how the temp.text is no longer listed under Unstaged files. Observe that a file named .gitignore has been created in the working directory root and has the following line in it. This new file is now listed under Unstaged files.
temp.txt
Right-click on any of the .tmp files you added, and choose Ignore... as you did previously. This time, choose the option Ignore files with this extension.
Note how .temp files are no longer shown as unstaged files, and the .gitignore file has been updated as given below:
temp.txt
*.tmp
3 Optionally, stage and commit the .gitignore file.
Files recommended to be omitted from version control
- Binary files generated when building your project e.g.,
*.class,*.jar,*.exe(reasons: 1. no need to version control these files as they can be generated again from the source code 2. Revision control systems are optimized for tracking text-based files, not binary files. - Temporary files e.g., log files generated while testing the product
- Local files i.e., files specific to your own computer e.g., local settings of your IDE
- Sensitive content i.e., files containing sensitive/personal information e.g., credential files, personal identification data (especially, if there is a possibility of those files getting leaked via the revision control system).
At this point: You should now be able to creat a copy of your repo on GitHub, and keep it updated as you add more commits to your local repo. If something goes wrong with your local repo (e.g., disk crash), you can now recover the repo using the remote repo (this tour did not cover how exactly you can do that -- it will be covered in a future tour).
What's next: Tour 3: Working Off a Remote Repo