Destination: To be able to synchronise branches in the local repo with a remote repo.
Motivation: It is useful to be able to have another copy of branches on a remote repo.
Lesson plan:
Lesson: Pushing Branches to a Remote covers that part.
Lesson: Pulling Branches from a Remote covers that part.
Lesson: Deleting Branches from a Remote covers that part.
Lesson: Renaming Branches in a Remote covers that part.
Local branches can be replicated in a remote.
Pushing a copy of a local branches to the corresponding remote repo makes those branches available remotely.
In a previous lesson, we saw how to push the default branch to a remote repository and have Git set up tracking between the local and remote branches using a remote-tracking reference. Pushing any other local branch to a remote works the same way as pushing the default branch — you simply specify the target branch instead of the default branch. Pushing any new commits in any local branch to a corresponding remote branch is done similarly as well.
gitGraph BT:
    %%{init: { 'theme': 'default', 'gitGraph': {'mainBranchName': 'master'}} }%%
    commit id: "m1"
    branch bug-fix
    checkout master
    commit id: "[origin/master][HEAD → master] m2"
    checkout bug-fix
    commit id: "[bug-fix] b1"
    checkout master
[bug-fix branch does not exist in the remote origin]
→
gitGraph BT:
    %%{init: { 'theme': 'default', 'gitGraph': {'mainBranchName': 'master'}} }%%
    commit id: "m1"
    branch bug-fix
    checkout master
    commit id: "[origin/master][HEAD → master] m2"
    checkout bug-fix
    commit id: "[origin/bug-fix][bug-fix] b1"
    checkout master
[after pushing bug-fix branch to origin,
and setting up a remote-tracking branch]
1 Fork the samplerepo-company to your GitHub account. When doing so, un-tick the Copy the master branch only option.
After forking, go to the fork and ensure both branches (master, and track-sales) are in there.
2 Clone the fork to your computer. It should look something like this:
gitGraph BT:
    %%{init: { 'theme': 'default', 'gitGraph': {'mainBranchName': 'master'}} }%%
    commit id: "m1"
    commit id: "m2"
    branch track-sales
    checkout track-sales
    commit id: "[origin/track-sales] s1"
    checkout master
    commit id: "[origin/master][origin/HEAD][HEAD → master] m3"
The origin/HEAD remote-tracking ref indicates where the HEAD ref is in the remote origin.
3 Create a new branch hiring, and add a commit to that branch. The commit can contain any changes you want.
Here are the commands you can run in the terminal to do this step in on shot:
git switch -c hiring
echo "Receptionist: Pam" >> employees.txt
git commit -am "Add Pam to employees.txt"
gitGraph BT:
    %%{init: { 'theme': 'default', 'gitGraph': {'mainBranchName': 'master'}} }%%
    commit id: "m1"
    commit id: "m2"
    branch track-sales
    checkout track-sales
    commit id: "[origin/track-sales] s1"
    checkout master
    commit id: "[origin/master][origin/HEAD][master] m3"
    branch hiring
    checkout hiring
    commit id: "[HEAD → hiring] h1"
The resulting revision graph should look like the one above.
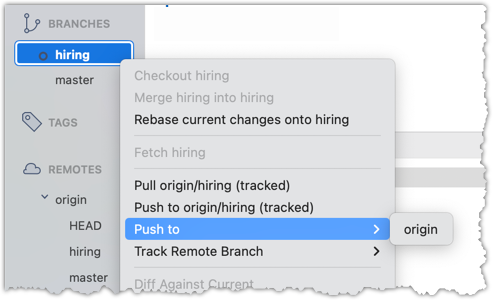
4 Push the hiring branch to the remote.
You can use the usual git push <remote> -u <branch> command to push the branch to the remote, and set up a remote-tracking branch at the same time.
git push origin -u hiring
5 Verify the branch has been pushed to the remote by visiting the fork on GitHub, and looking for the origin/hiring remote-tracking ref in the local repo.
Branches in a remote can be replicated in the local repo, and maintained in sync with each other.
Sometimes we need to create a local copy of a branch from a remote repository, make further changes to it, and keep it synchronised with the remote branch. Let's explore how to handle this in a few common use cases:
Use case 1: Working with branches that already existed in the remote repo when you cloned it to your computer.
When you clone a repository,
- Git checks out the default branch. You can start working on this branch immediately. This branch is tracking the default branch in the remote, which means you easily synchronise changes in this branch with the remote by pulling and pushing.
- Git also fetches all the other branches from the remote. These other branches are not immediately available as local branches, but they are visible as remote-tracking branches.
You can think of remote-tracking branches as read-only references to the state of those branches in the remote repository at the time of cloning. They allow you to see what work has been done on those branches without yet making local copies of them.
To work on one of these branches, you can create a new local branch based on the remote-tracking branch. Once you do this, your local branch will usually be configured to track the corresponding branch on the remote, so you can easily synchronise your work later.
This hands-on practical uses the same samplerepo-company repo you used in Lesson: Pushing Branches to a Remote. Fork and clone it if you haven't done that already.
1 Verify that the remote-tracking branch origin/track-sales exists in the local repo, but there is no local copy of it.
You can use the git branch -a command to list all local and tracking branches.
git branch -a
* hiring
  master
  remotes/origin/HEAD -> origin/master
  remotes/origin/hiring
  remotes/origin/master
  remotes/origin/track-sales
The * in the output above indicates the currently active branch.
Note how there is no track-sales in the list of branches (i.e., no local branch named track-sales), but there is a remotes/origin/track-sales (i.e., the remote-tracking branch)
Observe how the branch track-sales appear under REMOTES → origin but not under BRANCHES.
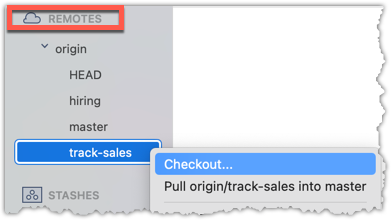
2 Create a local copy of the remote branch origin/track-sales.
You can use the git switch -c <branch> <remote-branch> command for this e.g.,
git switch -c track-sales origin/track-sales
Locate the track-sales remote-tracking branch (look under REMOTES → origin), right-click, and choose Checkout....
In the next dialog, choose as follows:
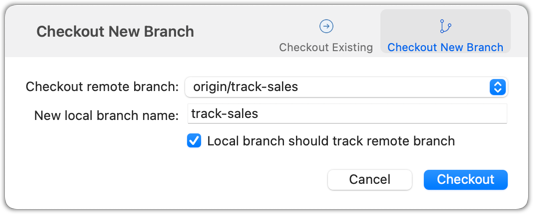
The above command/action does several things:
- Creates a new branch
track-sales. - Sets the new branch to track the remote branch
origin/track-sales, which means the local branch reftrack-saleswill also move to where theorigin/track-salesis. - Switch to the newly-created branch i.e., makes it the current branch.
3 Add a commit to the track-sales branch and push to the remote, to verify that the local branch is tracking the remote branch.
Commands to perform this step in one shot:
echo "5 reams of paper" >> sales.txt
git commit -am "Update sales.txt"
git push origin track-sales
Use case 2: Working with branches that were added to the remote repository after you cloned it e.g., a branch someone else pushed to the remote after you cloned.
Simply fetch to update your local repository with information about the new branch. After that, you can create a local copy of it and work with it just as you did in Use Case 1.
Often, you'll need to delete a branch in a remote repo after it has served it purpose.
To delete a branch in a remote repository, you simply tell Git to remove the reference to that branch from the remote. This does not delete the branch from your local repository — it only removes it from the remote, so others won’t see it anymore. This is useful for cleaning up clutter in the remote repo e.g., delete old or merged branches that are no longer needed on the remote.
1 Fork the samplerepo-books to your GitHub account. When doing so, un-tick the Copy the master branch only option.
After forking, go to the fork and ensure all three branches are in there.
2 Clone the fork to your computer.
3 Create a local copy of the fantasy branch in your clone.
Follow instructions in Lesson: Pushing Branches to a Remote.
4 Delete the remote branch fantasy.
You can use the git push <remote> --delete <branch> command to delete a branch in a remote. This is like pushing changes in a branch to a remote, except we request the branch to be deleted instead by adding the --delete switch.
git push origin --delete fantasy
Locate the remote branch under REMOTES → origin, right-click on the branch name, and choose Delete...:

5 Verify the branch was deleted from the remote, by going to the fork on GitHub and checking the branches page https://github.com/{YOUR_USERNAME}/samplerepo-books/branches
e.g., https://github.com/johndoe/samplerepo-books/branches.
Also verify the local copy has not been deleted.
6 Restore the remote branch from the local copy.
Push the local branch to the remote, while enabling the tracking option (as if pushing the branch to the remote for the first time), as covered in Lesson: Pushing Branches to a Remote.
In the above steps, we first created a local copy of the branch before deleting it in the remote repo. Doing so is optional. You can delete a remote branch without ever checking it out locally — you just need to know its name on the remote. Deleting the remote branch directly without creating a local copy is recommended if you simply want to clean up a remote branch you no longer need.
At this point: You should now be able to work with branches in a remote repo, and keep them synchronised with branches in the local repo.
What's next: coming soon ...