Destination: To be able to make use of multiple timelines of work in a local repository.
Motivation: At times, you need to do multiple parallel changes to files e.g., to try two alternative implementations of the same feature.
Lesson plan:
Lesson: Creating Branches covers that part.
Lesson: Merging Branches covers that part.
Lesson: Resolving Merge Conflicts covers that part.
Lesson: Renaming Branches covers that part.
Lesson: Deleting Branches covers that part.
To work in parallel timelines, you can use Git branches.
Git branches let you develop multiple versions of your work in parallel — effectively creating diverged timelines of your repository’s history. For example, one team member can create a new branch to experiment with a change, while the rest of the team continues working on another branch. Branches can have meaningful names, such as master, release, or draft.
A Git branch is simply a ref (a named label) that points to a commit and automatically moves forward as you add new commits to that branch. As you’ve seen before, the HEAD ref indicates which branch you’re currently working on, by pointing to corresponding branch ref.
When you add a commit, it goes into the branch you are currently on, and the branch ref (together with the HEAD ref) moves to the new commit.
Git creates a branch named master by default (Git can be configured to use a different name e.g., main).
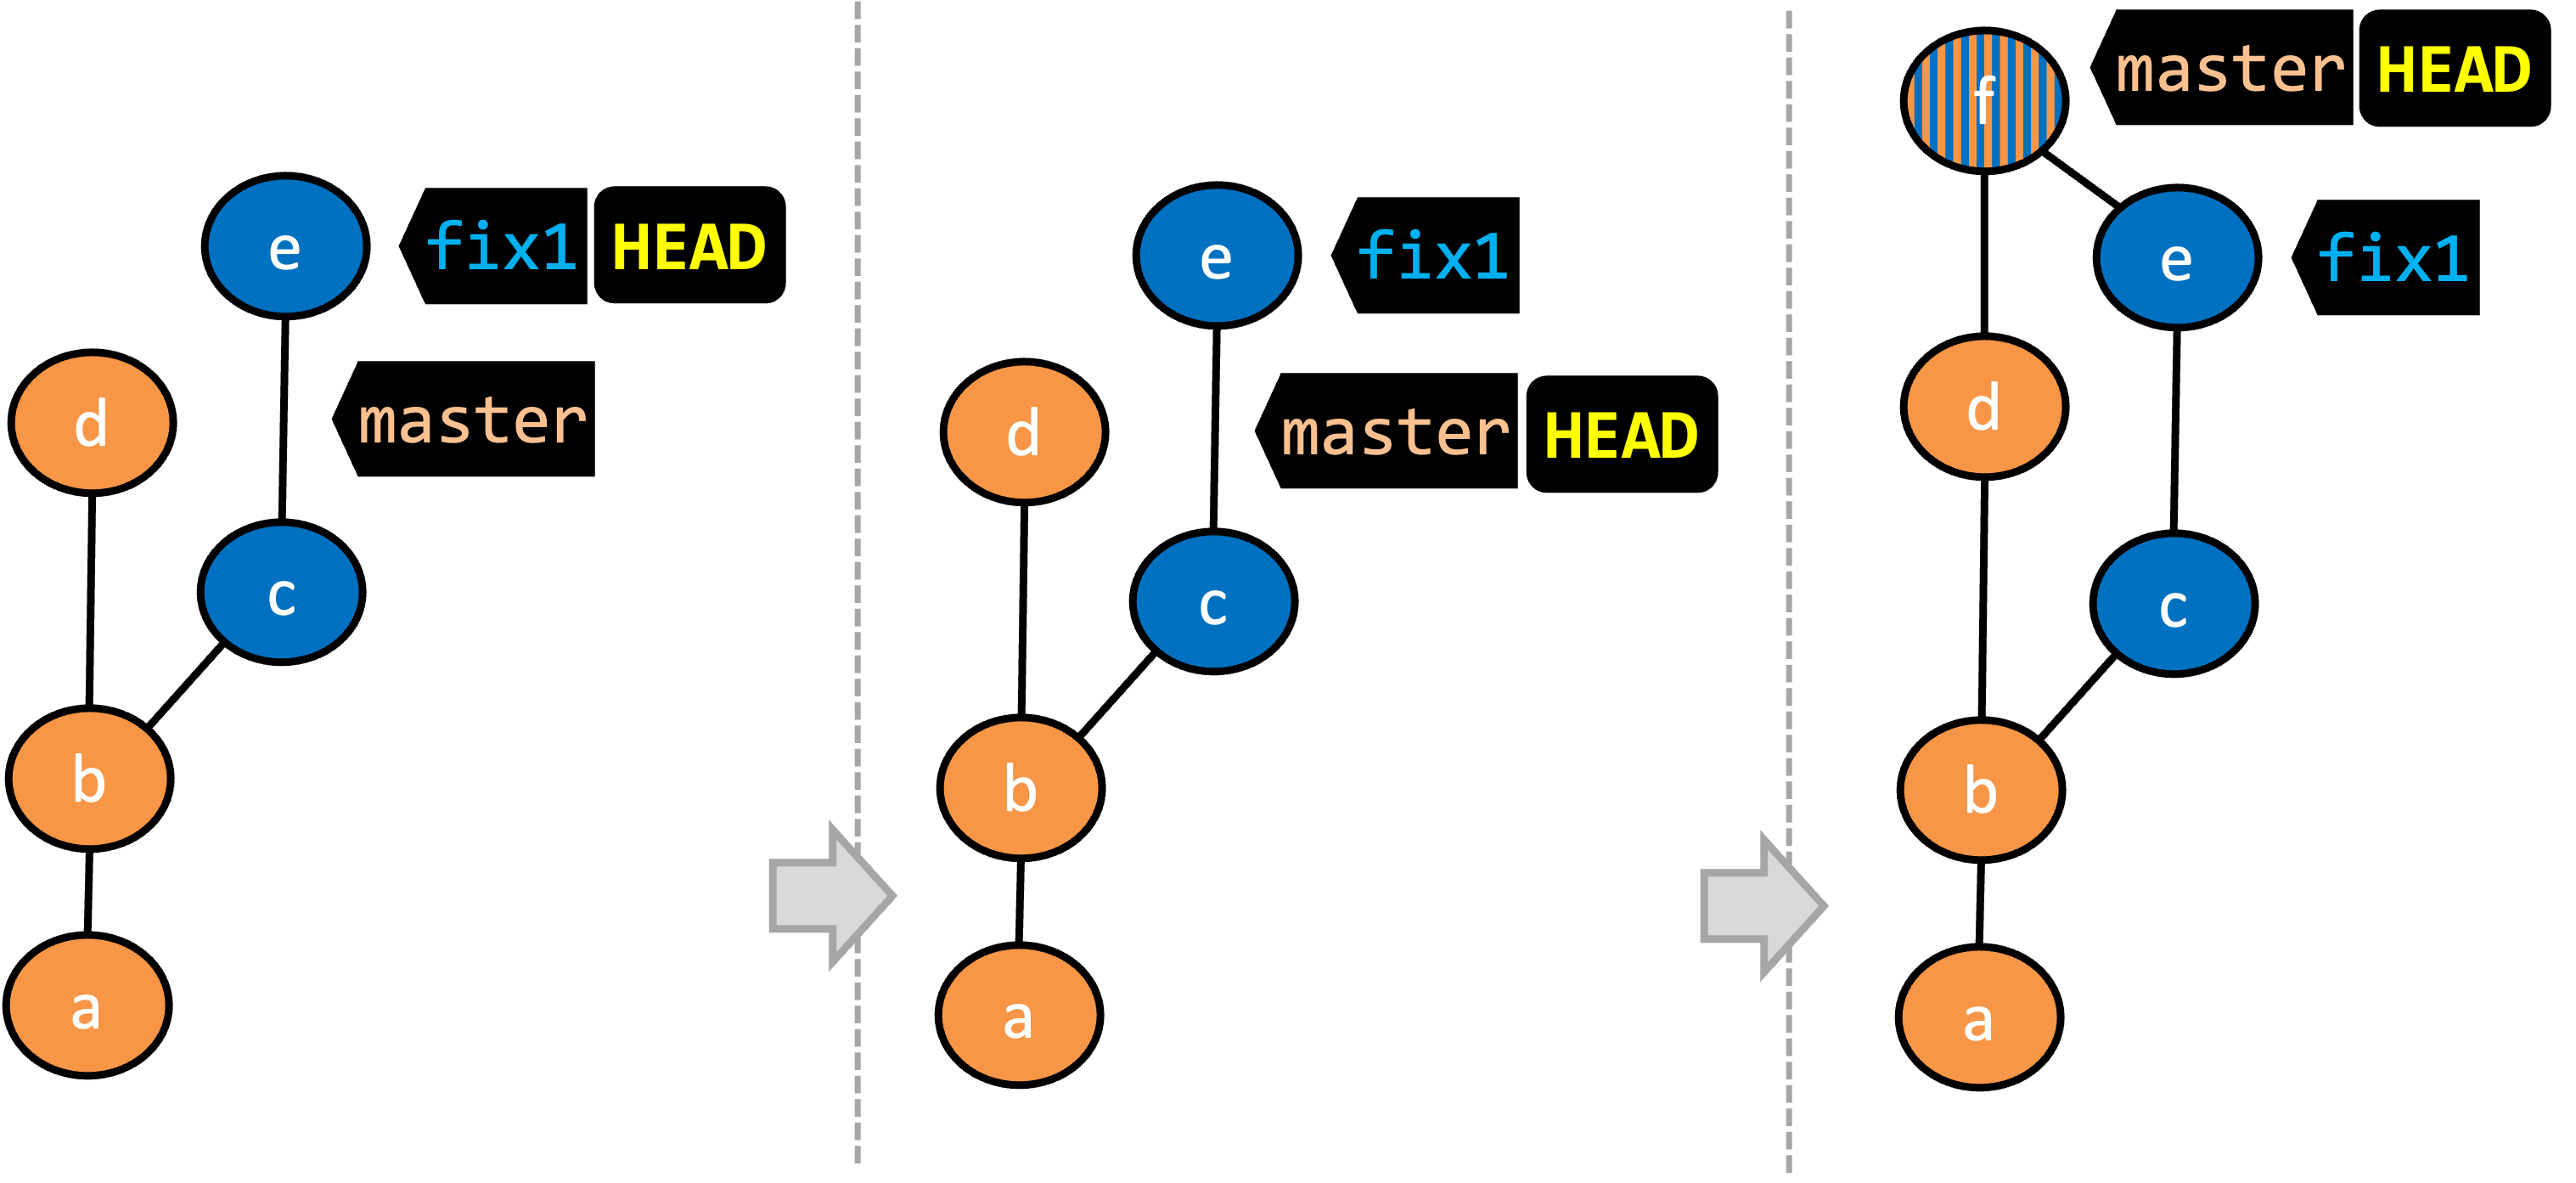
Given below is an illustration of how branch refs move as branches evolve. Refer to the text below it for explanations of each stage.
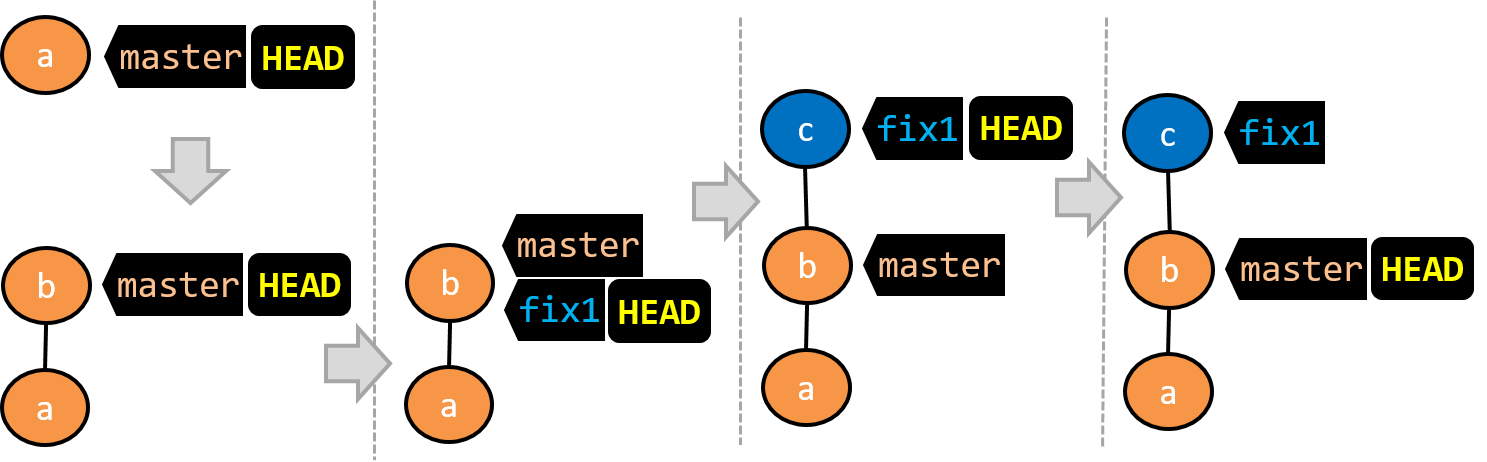
- There is only one branch (i.e.,
master) and there is only one commit on it. TheHEADref is pointing to themasterbranch (as we are currently on that branch). - A new commit has been added. The
masterand theHEADrefs have moved to the new commit. - A new branch
fix1has been added. The repo has switched to the new branch too (hence, theHEADref is attached to thefix1branch). - A new commit (
c) has been added. The current branch reffix1moves to the new commit, together with theHEADref. - The repo has switched back to the
masterbranch. Hence, theHEADhas moved back tomasterbranch's .
At this point, the repo's working directory reflects the code at commitb(notc).
- A new commit (
d) has been added. Themasterand theHEADrefs have moved to that commit. - The repo has switched back to the
fix1branch and added a new commit (e) to it.
Note that appearance of the revision graph (colors, positioning, orientation etc.) varies based on the Git client you use, and might not match the exact diagrams given above.
1 Fork the samplerepo-things repo, and clone it onto your computer.
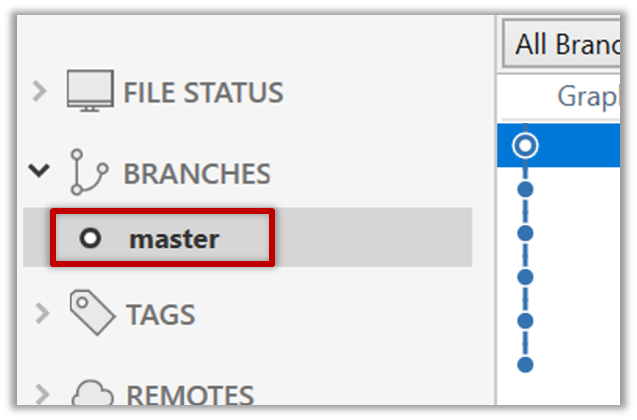
2 Observe that you are in the branch called master.
$ git status
on branch master
3 Start a branch named feature1 and switch to the new branch.
You can use the branch command to create a new branch and the checkout command to switch to a specific branch.
$ git branch feature1
$ git checkout feature1
One-step shortcut to create a branch and switch to it at the same time:
$ git checkout –b feature1
The new switch command
Git recently introduced a switch command that you can use instead of the checkout command given above.
To create a new branch and switch to it:
$ git branch feature1
$ git switch feature1
One-step shortcut:
$ git switch –c feature1
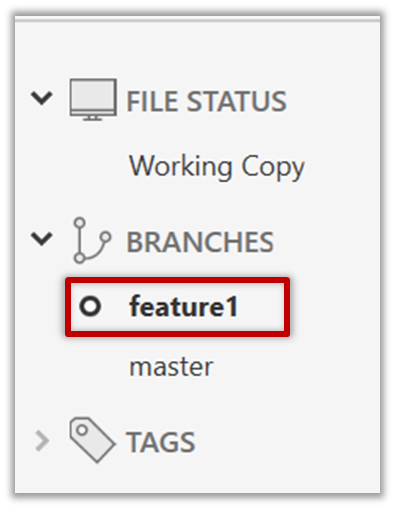
Click on the Branch button on the main menu. In the next dialog, enter the branch name and click Create Branch.

Note how the feature1 is indicated as the current branch (reason: Sourcetree automatically switches to the new branch when you create a new branch, if the Checkout New Branch was selected in the previous dialog).
4 Create some commits in the new branch. Just commit as per normal. Commits you add while on a certain branch will become part of that branch.
Note how the master ref and the HEAD ref moves to the new commit.
As before, you can use the git log --one-line --decorate command for this.
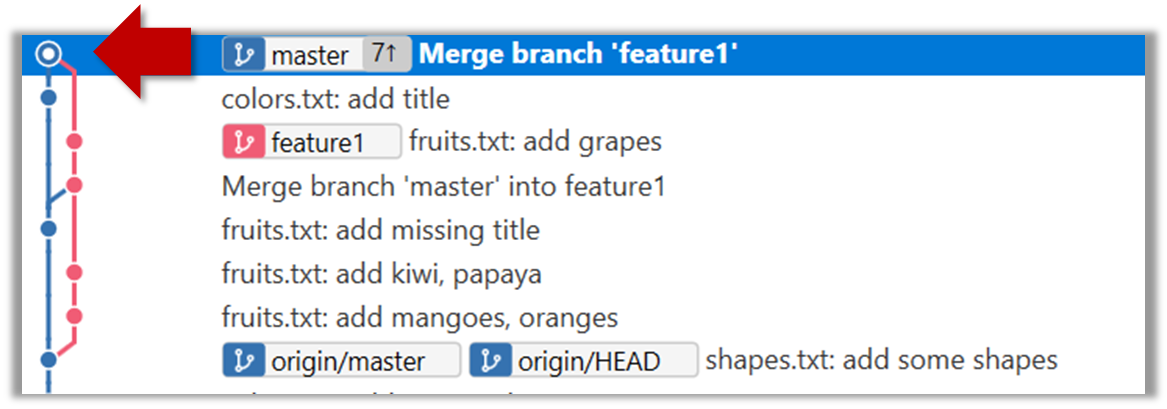
At times, the
HEADref of the local repo is represented as in Sourcetree, as illustrated in the screenshot below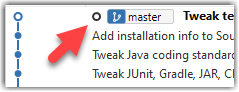 .
.The
HEADref is not shown in the UI if it is already pointing at the active branch.
5 Switch to the master branch. Note how the changes you did in the feature1 branch are no longer in the working directory.
$ git checkout master
Double-click the master branch.
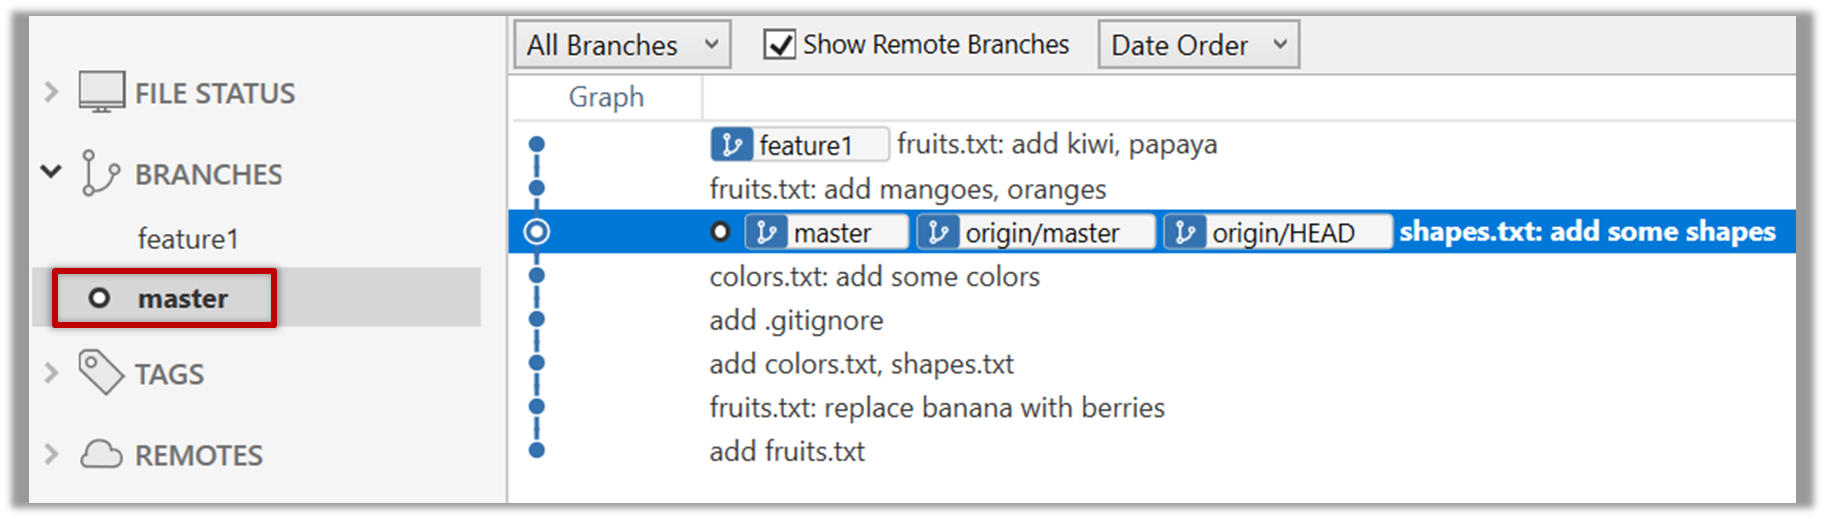
Revisiting master vs origin/master
In the screenshot above, you see a master ref and a origin/master ref for the same commit. The former identifies the of the local master branch while the latter identifies the tip of the master branch at the remote repo named origin. The fact that both refs point to the same commit means the local master branch and its remote counterpart are with each other.
Similarly, origin/HEAD ref appearing against the same commit indicates that of the remote repo is pointing to this commit as well.
6 Add a commit to the master branch. Let’s imagine it’s a bug fix.
To keep things simple for the time being, this commit should not involve the same content that you changed in the feature1 branch. To be on the safe side, you can change an entirely different file in this commit.
gitGraph BT:
    %%{init: { 'theme': 'default', 'gitGraph': {'mainBranchName': 'master'}} }%%
    commit id: "m1"
    commit id: "m2"
    branch feature1
    commit id: "f1"
    commit id: "[feature] f2"
    checkout master
    commit id: "[HEAD → master] m3"
    checkout feature1
7 Switch between the two branches and see how the working directory changes accordingly. That is, now you have two parallel timelines that you can freely switch between.
You can also start a branch from an earlier commit, instead of the latest commit in the current branch. For that, simply check out the commit you wish to start from.
In the samplerepo-things repo that you used above, let's create a new branch that starts from the same commit the feature1 branch started from. Let's pretend this branch will contain an alternative version of the content we added in the feature1 branch.
gitGraph BT:
    %%{init: { 'theme': 'default', 'gitGraph': {'mainBranchName': 'master'}} }%%
    commit id: "m1"
    commit id: "m2"
    branch feature1
    branch feature1-alt
    checkout feature1
    commit id: "f1"
    commit id: "[feature1] f2"
    checkout master
    commit id: "[HEAD → master] m3"
    checkout feature1-alt
    commit id: "[HEAD → feature1-alt] a1"
Avoid this rookie mistake!
Always remember to switch back to the master branch before creating a new branch. If not, your new branch will be created on top of the current branch.
- Switch to the
masterbranch. - Checkout the commit that is at which the
feature1branch diverged from themasterbranch (e.g.git checkout HEAD~1). This will create a detachedHEAD. - Create a new branch called
feature1-alt. TheHEADwill now point to this new branch (i.e., no longer 'detached'). - Add a commit on the new branch.
Most work done in branches eventually gets merged together.
Merging combines the changes from one branch into another, bringing their diverged timelines back together.
When you merge, Git looks at the two branches and figures out how their histories have diverged since their merge base (i.e., the most recent common ancestor commit of two branches). It then applies the changes from the other branch onto your current branch, creating a new commit. The new commit created when merging is called a merge commit — it records the result of combining both sets of changes.
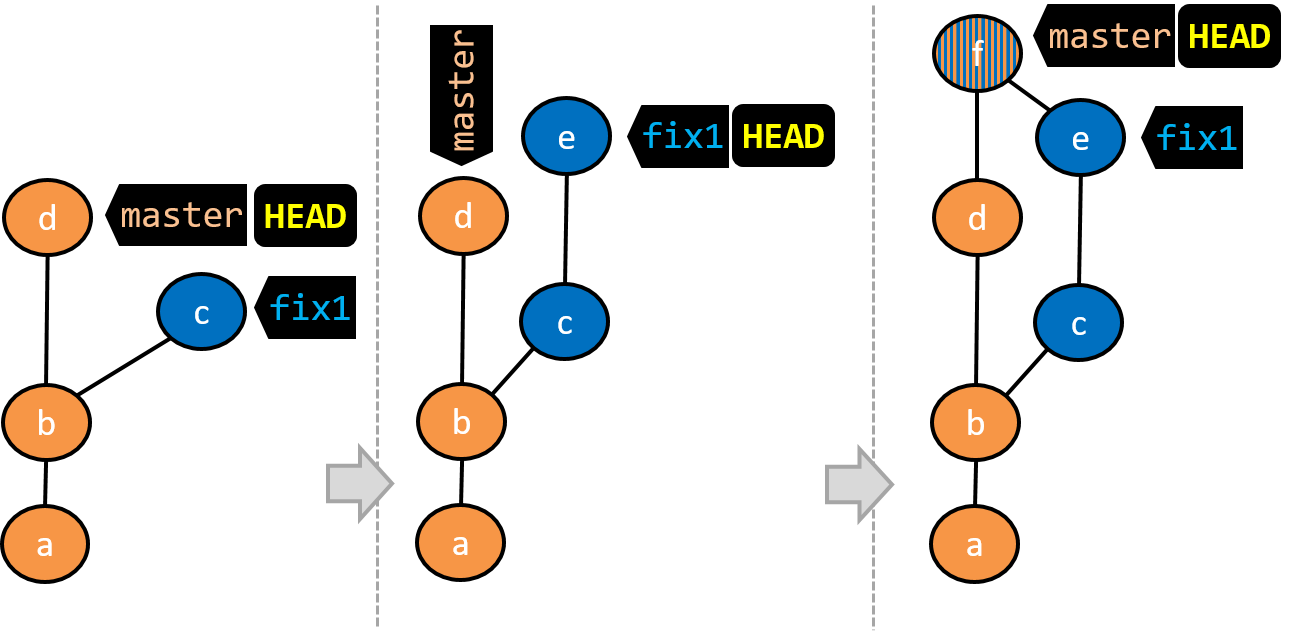
Given below is an illustration of how such a merge looks like in the revision graph:
- We are on the
fix1branch (as indicated byHEAD). - We have switched to the
masterbranch (thus,HEADis now pointing tomasterref). - The
fix1branch has been merged into themasterbranch, creating a merge commitf. The repo is still on themasterbranch.
In this hands-on practical, we continue with the samplerepo-things repo from earlier, which should look like the following. Note that we are ignoring the feature1-alt branch, for simplicity.
gitGraph BT:
    %%{init: { 'theme': 'default', 'gitGraph': {'mainBranchName': 'master'}} }%%
    commit id: "m1"
    commit id: "m2"
    branch feature1
    commit id: "f1"
    commit id: "[feature] f2"
    checkout master
    commit id: "[HEAD → master] m3"
    checkout feature1
1 Switch back to the feature1 branch.
gitGraph BT:
    %%{init: { 'theme': 'default', 'gitGraph': {'mainBranchName': 'master'}} }%%
    commit id: "m1"
    commit id: "m2"
    branch feature1
    commit id: "f1"
    commit id: "[HEAD → feature1] f2"
    checkout master
    commit id: "[master] m3"
    checkout feature1
2 Merge the master branch to the feature1 branch, giving an end-result like the following. Also note how Git has created a merge commit (shown as mc1 in the diagram below).
gitGraph BT:
    %%{init: { 'theme': 'default', 'gitGraph': {'mainBranchName': 'master'}} }%%
    commit id: "m1"
    commit id: "m2"
    branch feature1
    commit id: "f1"
    commit id: "f2"
    checkout master
    commit id: "[master] m3"
    checkout feature1
    merge master id: "[HEAD → feature1] mc1"
$ git merge master
Right-click on the master branch and choose merge master into the current branch. Click OK in the next dialog.
The revision graph should look like this now (colours and line alignment might vary but the graph structure should be the same):
Observe how the changes you did in the master branch (i.e. the imaginary bug fix in m3) is now available even when you are in the feature1 branch.
Furthermore, observe (e.g., git show HEAD) how the merge commit contains the sum of changes done in commits m3, f1, and f2.
3 Add another commit to the feature1 branch.
Switch to the master branch and add one more commit.
gitGraph BT:
    %%{init: { 'theme': 'default', 'gitGraph': {'mainBranchName': 'master'}} }%%
    commit id: "m1"
    commit id: "m2"
    branch feature1
    commit id: "f1"
    commit id: "f2"
    checkout master
    commit id: "m3"
    checkout feature1
    merge master id: "mc1"
    commit id: "[feature1] f3"
    checkout master
    commit id: "[HEAD → master] m4"
4 Merge feature1 to the master branch, giving and end-result like this:
gitGraph BT:
    %%{init: { 'theme': 'default', 'gitGraph': {'mainBranchName': 'master'}} }%%
    commit id: "m1"
    commit id: "m2"
    branch feature1
    commit id: "f1"
    commit id: "f2"
    checkout master
    commit id: "m3"
    checkout feature1
    merge master id: "mc1"
    commit id: "[feature1] f3"
    checkout master
    commit id: "m4"
    merge feature1 id: "[HEAD → master] mc2"
git merge feature1
Right-click on the feature1 branch and choose Merge.... The resulting revision graph should look like this:
Now, any changes you did in feature1 branch are available in the master branch.
When the branch you're merging into hasn't diverged — meaning it hasn't had any new commits since the merge base — Git simply moves the branch pointer forward to include all the new commits, keeping the history clean and linear. This is called a fast-forward merge because Git simply "fast-forwards" the branch pointer to the tip of the other branch. The result looks as if all the changes had been made directly on one branch, without any branching at all.
gitGraph BT:
    %%{init: { 'theme': 'default', 'gitGraph': {'mainBranchName': 'master'}} }%%
    commit id: "m1"
    commit id: "[HEAD → master] m2"
    branch bug-fix
    commit id: "b1"
    commit id: "[bug-fix] b2"
    checkout master
→
[merge bug-fix]
gitGraph BT:
    %%{init: { 'theme': 'default', 'gitGraph': {'mainBranchName': 'master'}} }%%
    commit id: "m1"
    commit id: "m2"
    commit id: "b1"
    commit id: "[HEAD → master][bug-fix] b2"
    checkout master
In the example above, the master branch has not changed since the merge base (i.e., m2). Hence, merging the branch bug-fix onto master can be done by fast-forwarding the master branch ref to the tip of the bug-fix branch (i.e., b2).
Let's continue with the same samplerepo-things repo we used above, and do a fast-forward merge this time.
1 Create a new branch called add-countries, switch to it, and add some commits to it. You should have something like this now:
gitGraph BT:
    %%{init: { 'theme': 'default', 'gitGraph': {'mainBranchName': 'master'}} }%%
    commit id: "[master] mc2"
    branch add-countries
    commit id: "a1"
    commit id: "[HEAD → add-countries] a2"
2 Go back to the master branch.
gitGraph BT:
    %%{init: { 'theme': 'default', 'gitGraph': {'mainBranchName': 'master'}} }%%
    commit id: "[HEAD → master] mc2"
    branch add-countries
    commit id: "a1"
    commit id: "add-countries] a2"
3 Merge the add-countries branch onto the master branch. Observe there is no merge commit. The master branch ref (and the HEAD ref along with it) moved to the tip of the add-countries branch (i.e., a2) and both branches now points to a2.
gitGraph BT:
    %%{init: { 'theme': 'default', 'gitGraph': {'mainBranchName': 'master (and add-countries)'}} }%%
    commit id: "mc2"
    commit id: "a1"
    commit id: "[HEAD → master][add-countries] a2"
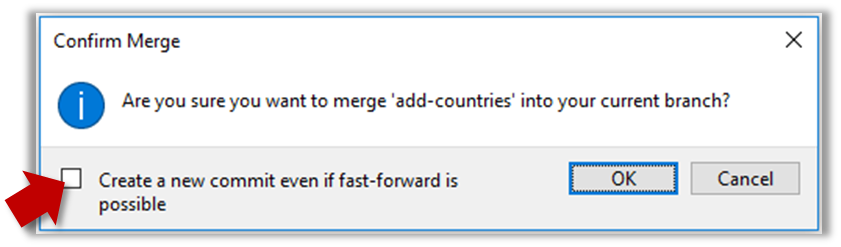
It is possible to force Git to create a merge commit even if fast forwarding is possible. This is useful if you wish the revision graph to visually show when each branch was merged to the main timeline.
To prevent Git from fast-forwarding, use the --no-ff switch when merging. Example:
git merge --no-ff add-countries
Windows: Tick the box shown below when you merge a branch:
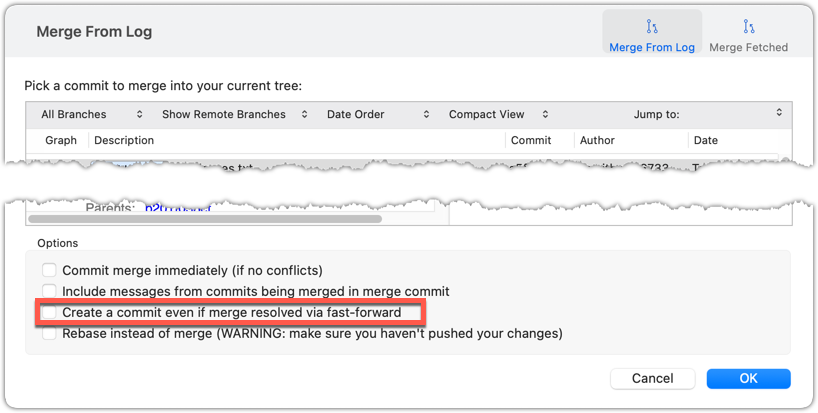
Mac:
Trigger the branch operation using the following menu button:

In the next dialog, tick the following option:
To permanently prevent fast-forwarding:
- Go to Sourcetree
Settings. - Navigate to the
Gitsection. - Tick the box
Do not fast-forward when merging, always create commit.
DETOUR: Undoing a Merge
- Ensure you are in the .
- Do a hard reset of that branch to the commit that would be the tip of that branch had you not done the offending merge i.e., rewind that branch to the state it was in before the merge.
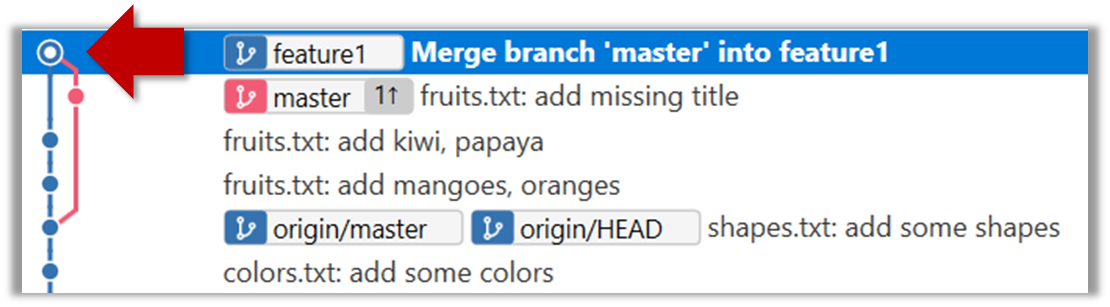
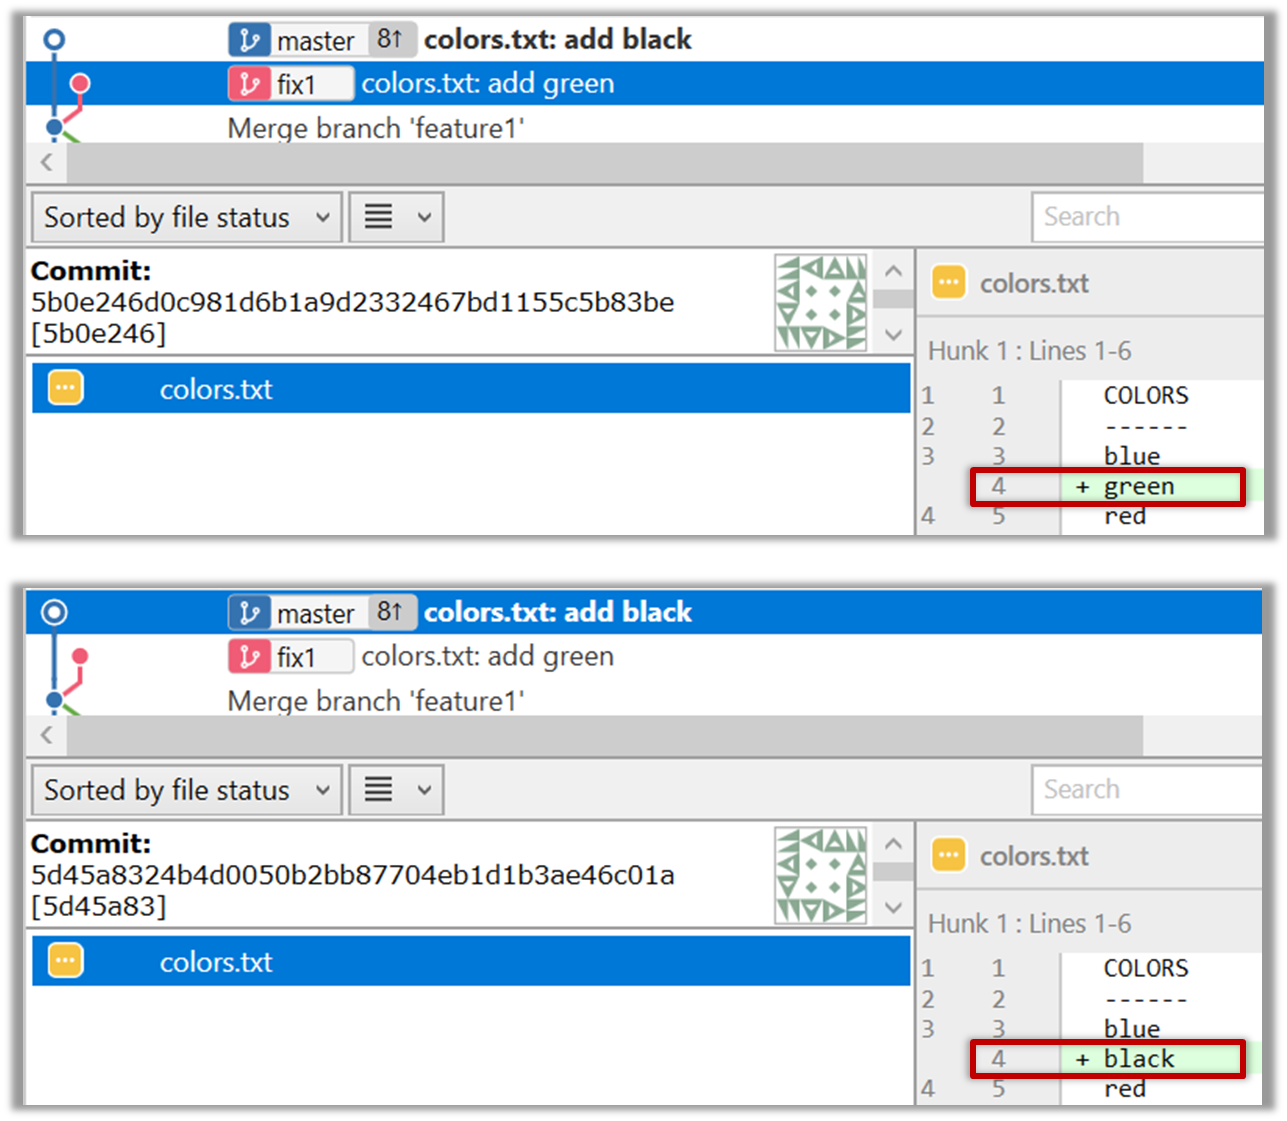
In the example below, you merged master to feature1.
If you want to undo that merge,
- Ensure you are in the
feature1branch (because that's the branch that received the merge). - Reset the
feature1branch to the commit highlighted (in yellow) in the screenshot above (because that was the tip of thefeature1branch before you merged themasterbranch to it.
When merging branches, you need to guide Git on how to resolve conflicting changes in different branches.
A merge conflict happens when Git can't automatically combine changes from two branches because the same parts of a file were modified differently in each branch. When this happens, Git pauses the merge and marks the conflicting sections in the affected files so you can resolve them yourself. Once you've reviewed and fixed the conflicts, you can tell Git they're resolved and complete the merge.
More generally, a conflict occurs when Git cannot automatically reconcile different changes made to the same part of a file -- branch merge conflicts is just one example.
In this hands-on practical, we simulate a merge conflict and use it to learn how to resolve merge conflicts. You can use any repo with at least one commit in the master branch for this.
1 Start a branch named fix1 in the repo. Create a commit that adds a line with some text to one of the files.
2 Switch back to master branch. Create a commit with a conflicting change i.e. it adds a line with some different text in the exact location the previous line was added.
3 Try to merge the fix1 branch onto the master branch. Git will pause mid-way during the merge and report a merge conflict. If you open the conflicted file, you will see something like this:
COLORS
------
blue
<<<<<< HEAD
black
=======
green
>>>>>> fix1
red
white
4 Observe how the conflicted part is marked between a line starting with <<<<<< and a line starting with >>>>>>, separated by another line starting with =======.
Highlighted below is the conflicting part that is coming from the master branch:
blue
<<<<<< HEAD
black
=======
green
>>>>>> fix1
red
This is the conflicting part that is coming from the fix1 branch:
blue
<<<<<< HEAD
black
=======
green
>>>>>> fix1
red
5 Resolve the conflict by editing the file. Let us assume you want to keep both lines in the merged version. You can modify the file to be like this:
COLORS
------
blue
black
green
red
white
6 Stage the changes, and commit. You have now successfully resolved the merge conflict.
Branches can be renamed, for example, to fix a mistake in the branch name.
Local branches can be renamed easily. Renaming a branch simply changes the branch reference (i.e., the name used to identify the branch) — it is just a cosmetic change.
First, create the repo samplerepo-books for this hands-on practical, by running the following commands in your terminal.
mkdir samplerepo-books
cd samplerepo-books
git init
echo "Horror Stories" >> horror.txt
git add .
git commit -m "Add horror.txt"
git switch -c textbooks
echo "Textbooks" >> textbooks.txt
git add .
git commit -m "Add textbooks.txt"
git switch -c fantasy master
echo "Fantasy Books" >> fantasy.txt
git add .
git commit -m "Add fantasy.txt"
git checkout master
git merge --no-ff -m "Merge branch textbooks" textbooks
The above should give you a repo similar to the revision graph given below, on the left.
gitGraph BT:
    %%{init: { 'theme': 'default', 'gitGraph': {'mainBranchName': 'master'}} }%%
    commit id: "m1"
    branch textbooks
    checkout textbooks
    commit id: "[textbooks] t1"
    checkout master
    branch fantasy
    checkout fantasy
    commit id: "[fantasy] f1"
    checkout master
    merge textbooks id: "[HEAD → master] mc1"
→
[rename branches]
gitGraph BT:
    %%{init: { 'theme': 'default', 'gitGraph': {'mainBranchName': 'master'}} }%%
    commit id: "m1"
    branch study-books
    checkout study-books
    commit id: "[study-books] t1"
    checkout master
    branch fantasy-books
    checkout fantasy-books
    commit id: "[fantasy-books] f1"
    checkout master
    merge study-books id: "[HEAD → master] mc1"
Now, rename the fantasy branch to fantasy-books. Similarly, rename textbooks branch to study-books. The outcome should be similar to the revision graph above, on the right.
To rename a branch, use the git branch -m <current-name> <new-name> command (-m stands for 'move'):
git branch -m fantasy fantasy-books
git branch -m textbooks study-books
git log --one-line --decorate --graph --all  # verify the changes
*   443132a (HEAD -> master) Merge branch textbooks
|\
| * 4969163 (study-books) Add textbooks.txt
|/
| * 0586ee1 (fantasy-books) Add fantasy.txt
|/
* 7f28f0e Add horror.txt
Note these additional switches to the log command:
--all: Shows all branches, not just the current branch.--graph: Shows a graph-like visualisation (notice how*is used to indicate a commit, and branches are indicated using vertical lines.
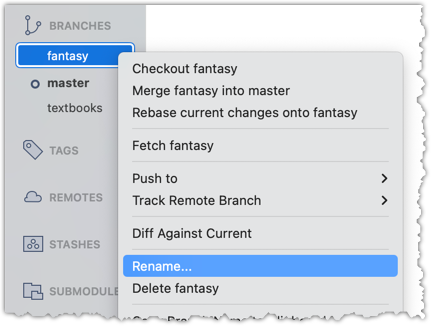
Right-click on the branch name and choose Rename.... Provide the new branch name in the next dialog.
Branches can be deleted, to get rid of them when they are no longer needed.
Deleting a branch deletes the corresponding branch ref from the revision history (it does not delete any commits). The impact of the loss of the branch ref depends on whether the branch has been merged.
When you delete a branch that has been merged, the commits of the branch will still exist in the history and will be safe. Only the branch ref is lost.
gitGraph BT:
    %%{init: { 'theme': 'default', 'gitGraph': {'mainBranchName': 'master'}} }%%
    commit id: "m1"
    branch bug-fix
    checkout bug-fix
    commit id: "[bug-fix] b1"
    checkout master
    merge bug-fix id: "[HEAD → master] mc1"
→
[delete branch bug-fix]
gitGraph BT:
    %%{init: { 'theme': 'default', 'gitGraph': {'mainBranchName': 'master'}} }%%
    commit id: "m1"
    branch bug-fix
    checkout bug-fix
    commit id: "b1"
    checkout master
    merge bug-fix id: "[HEAD → master] mc1"
In the above example, the only impact of the deletion is the loss of the branch ref bug-fix. All commits remain reachable (via the master branch), and there is no other impact on the revision history.
In fact, some prefer to delete the branch soon after merging it, to reduce branch references cluttering up the revision history.
When you delete a branch that has not been merged, the loss of the branch ref can render some commits unreachable (unless you know their commit IDs or they are reachable through other refs), putting them at risk of being lost eventually.
gitGraph BT:
    %%{init: { 'theme': 'default', 'gitGraph': {'mainBranchName': 'master'}} }%%
    commit id: "[HEAD → master] m1"
    branch bug-fix
    checkout bug-fix
    commit id: "[bug-fix] b1"
    checkout master
→
[delete branch bug-fix]
gitGraph BT:
    %%{init: { 'theme': 'default', 'gitGraph': {'mainBranchName': 'master'}} }%%
    commit id: "[HEAD → master] m1"
    branch _
    checkout _
    commit id: "b1"
    checkout master
In the above example, the commit b1 is no longer reachable, unless we know its commit ID (i.e., the SHA).
SIDEBAR: What makes a commit 'unreachable'?
Recall that a commit only has a pointer to its parent commit (not its descendent commits).
A commit is considered reachable if you can get to it by starting at a branch, tag, or other ref and walking backward through its parent commits. This is the normal state for commits — they are part of the visible history of a branch or tag.
When no branch, tag, or ref points to a commit (directly or indirectly), it becomes unreachable. This often happens when you delete a branch or rewrite history (e.g., with reset or rebase), leaving some commits "orphaned" without a name pointing to them.
In the example below, C4 is unreachable (i.e., cannot be reached by starting at any of the three refs: v1.0 or master or ←HEAD), but the other three are all reachable.
Unreachable commits are not deleted immediately — Git keeps them for a while before cleaning them up. By default, Git retains unreachable commits for at least 30 days, during which they can still be recovered if you know their SHA. After that, they will be garbage-collected, and will be lost for good.
0 First, create the repo samplerepo-books-2 for this hands-on practical, by running the following commands in your terminal.
mkdir samplerepo-books-2
cd samplerepo-books-2
git init
echo "Horror Stories" >> horror.txt
git add .
git commit -m "Add horror.txt"
git switch -c textbooks
echo "Textbooks" >> textbooks.txt
git add .
git commit -m "Add textbooks.txt"
git switch -c fantasy master
echo "Fantasy Books" >> fantasy.txt
git add .
git commit -m "Add fantasy.txt"
git checkout master
git merge --no-ff -m "Merge branch textbooks" textbooks
1 Delete the (the merged) textbooks branch.
Use the git branch -d <branch> command to delete a local branch 'safely' -- this command will fail if the branch has unmerged changes.
git branch -d textbooks
git log --oneline --decorate --graph --all  # check the current revision graph
*   443132a (HEAD -> master) Merge branch textbooks
|\
| * 4969163 Add textbooks.txt
|/
| * 0586ee1 (fantasy) Add fantasy.txt
|/
* 7f28f0e Add horror.txt
Right-click on the branch name and choose Delete <branch>:
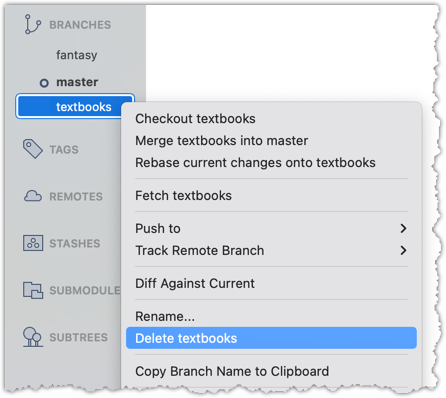
In the next dialog, click OK:
Observe that all commits remain. The only missing thing is the textbook ref.
2 Make a copy of the SHA of the tip of the (unmerged) fantasy branch.
3 Delete the fantasy branch..
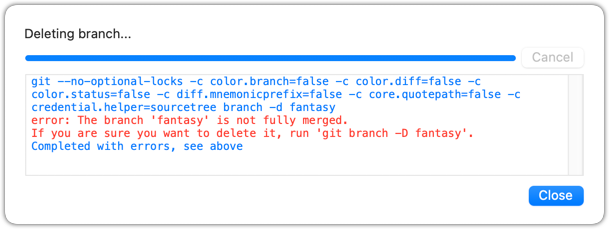
Attempt to delete the branch. It should fail, as shown below:
git branch -d fantasy
error: the branch 'fantasy' is not fully merged
hint: If you are sure you want to delete it, run 'git branch -D fantasy'
As also hinted by the error message, you can replace the -d with -D to 'force' the deletion.
git branch -D fantasy
Now, check the revision graph:
git log --oneline --decorate --graph --all
*   443132a (HEAD -> master) Merge branch textbooks
|\
| * 4969163 Add textbooks.txt
|/
* 7f28f0e Add horror.txt
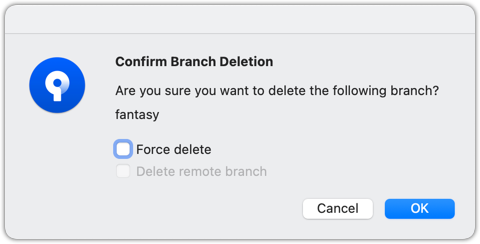
Attempt to delete the branch as you did before. It will fail because the branch has unmerged commits.
Try again but this time, tick the Force delete option, which will force Git to delete the unmerged branch:
Observe how the branch ref fantasy is gone, together with any unmerged commits on it.
4 Attempt to view the 'unreachable' commit whose SHA you noted in step 2.
e.g., git show 32b34fb (use the SHA you copied earlier)
Observe how the commit still exists and still reachable using the commit ID, although not reachable by other means, and not visible in the revision graph.
At this point: Now you can create, maintain, and merge multiple parallel branches in a local repo. This tour covered only the basic use of Git branches. More advanced usage will be covered in other tours.
What's next: Tour 7: Keeping Branches in Sync