Destination: To be able to maintain a clean and meaningful revision history.
Motivation: The usefulness of the revision history increases if it consisted of well-crafted and well-documented commits.
Lesson plan:
Lesson: Controlling What Goes Into a Commit covers that part.
Lesson: Writing Good Commit Messages covers that part.
Lesson: Reorganising Commits covers that part.
To create well-crafted commits, you need to know how to control which precise changes go into a commit.
Crafting a commit involves two aspects:
- What changes to include in it: deciding what changes belong together in a single commit — this is about commit granularity, ensuring each commit represents a meaningful, self-contained change.
- How to include those changes: carefully staging just those changes — this is about using Git’s tools to precisely control what ends up in the commit.
SIDEBAR: Guidelines on what to include in a commit
A good commit represents a single, logical unit of change — something that can be described clearly in one sentence. For example, fixing a specific bug, adding a specific feature, or refactoring a specific function. If each commit tells a clear story about why the change was made and what it achieves, your repository history becomes a valuable narrative of the project’s development. Here are some (non-exhaustive) guidelines:
- No more than one change per commit: Avoid lumping unrelated changes into one commit, as this makes the history harder to understand, review, or revert (if each commit contains one standalone change, to reverse that change can be done by deleting or reverting that specific commit entirely, without affecting any other changes).
- Make the commit standalone: Don’t split a single logical change across multiple commits unnecessarily, as this can clutter the history and make it harder to follow the evolution of an idea or feature.
- Small enough to review easily, but large enough to stand on its own: For example, fixing the same typo in five files can be one commit — splitting it into five separate commits is excessive. Conversely, implementing a big feature may be too much for one commit — instead, break it down into a series of commits, each containing a meaningful yet standalone step towards the final goal.
Git can let you choose not just which files, but which specific changes within those files, to include in a commit. Most Git tools — including the command line and many GUIs — let you interactively select which "hunks" or even individual lines of a file to stage. This allows you to separate unrelated changes and avoid committing unnecessary edits. If you make multiple changes in the same file, you can selectively stage only the parts that belong to the current logical change.
This level of control is particularly useful when:
- You noticed and fixed a small, unrelated issue while working on something else.
- You experimented with multiple approaches in the same file and now want to commit only the final, clean solution.
- You want your commit history to clearly separate concerns, even when the edits touch the same files.
You can use any repo for this.
1 Do several changes to some tracked files. Change multiple files. Also change multiple locations in the same file.
2 Stage some changes in some files while keeping other changes in the same files unstaged.
As you know, you can use git add <filename> to stage changes to an entire file.
To select which hunks to stage, you can use the git add -p command instead (-p stands for 'by patch'):
git add -p
This command will take you to an interactive mode in which you can go through each hunk and decide if you want to stage it. The video below has contains a demonstration of how this feature works:
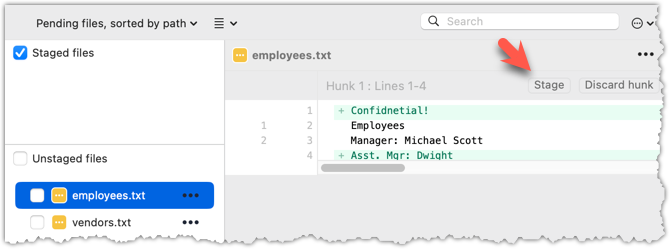
To stage a hunk, you can click the Stage button above the hunk in question:

 Unstaging can be done similarly:
Most git operations can be done faster through the CLI than equivalent Git GUI clients, once you are familiar enough with the CLI commands.
However, selective staging is one exception where a good GUI can do better than the CLI, if you need to do many fine-grained staging operations (e.g., frequently staging only parts of hunks).
Detailed and well-written commit messages can increase the value of Git revision history.
Every commit you make in Git also includes a commit message that explains the change. While one-line messages are fine for small or obvious changes, as your revision history grows, good commit messages become an important source of information — for example, to understand the rationale behind a specific change made in the past.
A commit message is meant to explain the intent behind the changes, not just what was changed. The code (or diff) already shows what changed. Well-written commit messages make collaboration, code reviews, debugging, and future maintenance easier by helping you and others quickly understand the project’s history without digging into the code of every commit.
A complete commit message can include a short summary line (the subject) followed by a more detailed body if needed. The subject line should be a concise description of the change, while the body can elaborate on the context, rationale, side effects, or other details if the change is more complex.
Here is an example commit message:
Find command: make matching case-insensitive

Find command is case-sensitive.

A case-insensitive find is more user-friendly because users cannot be
expected to remember the exact case of the keywords.

Let's,
* update the search algorithm to use case-insensitive matching
* add a script to migrate stress tests to the new format
Following a style guide makes your commit messages more consistent and fit-for-purpose. Many teams adopt established guidelines. These style guides typically contain common conventions that Git users follow when writing commit messages. For example:
- Keep the subject line (the first line) under 50–72 characters.
- Write the subject in the imperative mood (e.g.,
Fix typo in READMErather thanFixed typoorFixes typo). - Leave a blank line between the subject and the body, if you include a body.
- Wrap the body at around 72 characters per line for readability.
RESOURCES
- Recommended style guide for Git commit messages: Git Conventions @se-edu/guides
When the revision history get 'messy', Git has a way to 'tidy up' the recent commits.
Git has a powerful tool called interactive rebasing which lets you review and reorganise your recent commits. With it, you can reword commit messages, change their order, delete commits, combine several commits into one (squash), or split a commit into smaller pieces. This feature is useful for tidying up a commit history that has become messy — for example, when some commits are out of order, poorly described, or include changes that would be clearer if split up or combined.
Run the following commands to create a sample repo that we'll be using for this hands-on practical:
mkdir samplerepo-sitcom
cd samplerepo-sitcom
git init

echo "Aspiring actress" >> Penny.txt
git add .
git commit -m "C1: Add Penny.txt"

echo "Scientist" >> Sheldon.txt
git add .
git commit -m "C3: Add Sheldon.txt"

echo "Comic book store owner" >> Stuart.txt
git add .
git commit -m "C2: Add Stuart.txt"

echo "Engineer" >> Stuart.txt
git commit -am "X: Incorrectly update Stuart.txt"

echo "Engineer" >> Howard.txt
git add .
git commit -m "C4: Adddd Howard.txt"
Here are the commits that should be in the created repo, and how each commit needs to be 'tidied up'.
C4: Adddd Howard.txt-- Fix typo in the commit messageAdddd→Add.X: Incorrectly update Stuart.txt-- Drop this commit.C2: Add Stuart.txt-- Swap this commit with the one below.C3: Add Sheldon.txt-- Swap this commit with the one above.C1: Add Penny.txt-- No change required.
To start the interactive rebase, use the git rebase -i <start-commit> command. -i stands for 'interactive'. In this case, we want to modify the last four commits (hence, HEAD~4).
git rebase -i HEAD~4
pick 97a8c4a C3: Add Sheldon.txt
pick 60bd28d C2: Add Stuart.txt
pick 8b9a36f X: Incorrectly update Stuart.txt
pick 8ab6941 C4: Adddd Howard.txt

# Rebase ee04afe..8ab6941 onto ee04afe (4 commands)
#
# Commands:
# p, pick <commit> = use commit
# r, reword <commit> = use commit, but edit the commit message
# e, edit <commit> = use commit, but stop for amending
# s, squash <commit> = use commit, but meld into previous commit
# f, fixup [-C | -c] <commit> = like "squash" but keep only the previous
#                    commit's log message, unless -C is used, in which case
#                    keep only this commit's message; -c is same as -C but
#                    opens the editor
# x, exec <command> = run command (the rest of the line) using shell
# b, break = stop here (continue rebase later with 'git rebase --continue')
# d, drop <commit> = remove commit
# l, label <label> = label current HEAD with a name
# t, reset <label> = reset HEAD to a label
# m, merge [-C <commit> | -c <commit>] <label> [# <oneline>]
#         create a merge commit using the original merge commit's
#         message (or the oneline, if no original merge commit was
#         specified); use -c <commit> to reword the commit message
# u, update-ref <ref> = track a placeholder for the <ref> to be updated
#                       to this position in the new commits. The <ref> is
#                       updated at the end of the rebase
#
# These lines can be re-ordered; they are executed from top to bottom.
#
# If you remove a line here THAT COMMIT WILL BE LOST.
#
# However, if you remove everything, the rebase will be aborted.
#
The command will take you to the text editor, which will present you with a wall of text similar to the above. It has two parts:
- At the top, the list of commits and the action to take on each, oldest commit first, with the action
pickindicated by default (pickmeans 'use this commit in the result') for each. - At the bottom, instructions on how to edit those lines.
Edit the commit list to specify the rebase actions, as follows:
pick 60bd28d C2: Add Stuart.txt
pick 97a8c4a C3: Add Sheldon.txt
drop 8b9a36f X: Incorrectly update Stuart.txt
reword 8ab6941 C4: Addddd Howard.txt
Once you exit the text editor, Git will perform the rebase based on the actions you specified, from top to bottom.
At some steps, Git will pause the rebase and ask for your inputs. In this case, it will ask you to specify the new commit message when it is processing the following line.
reword 8ab6941 C4: Addddd Howard.txt
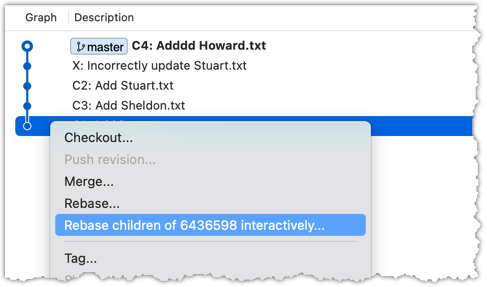
To go to the interactive rebase mode, right-click the parent commit of the earliest commit you want to reorganise (in this case, it is C1: Add Penny.txt) and choose Rebase children of <SHA> interactively...

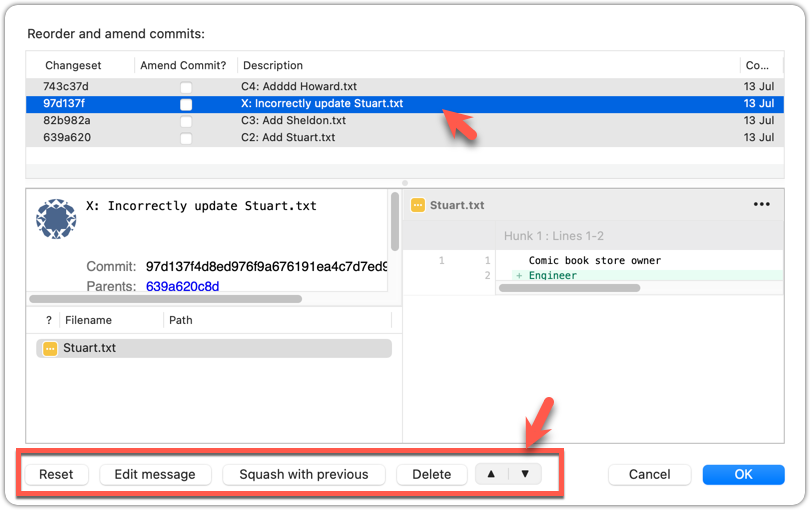
To indicate what action you want to perform on each commit, select the commit in the list and click on the button for the action you want to do on it:

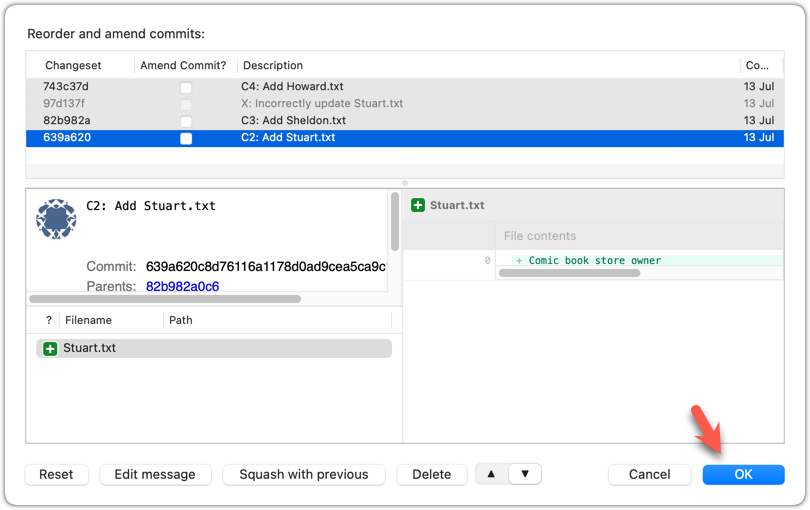
To execute the rebase, after indicating the action for all commits (the dialog will look like the below), click OK.

The final result should be something like the below, 'tidied up' exactly as we wanted:
* 727d877 C4: Add Howard.txt
* 764fc29 C3: Add Sheldon.txt
* 08a965a C2: Add Stuart.txt
* 6436598 C1: Add Penny.txt
Rebasing rewrites history. It is not recommended to rebase commits you have already shared with others.
At this point: You should now be able to not only create more meaningful commits to begin with, but also, to tidy them up further after the commits were created.
What's next: Tour 6: Branching Locally