Destination: To be able to use Git to systematically record the history of a folder in your own computer. More specifically, to use Git to save a snapshot of the folder at specific points of time.
Motivation: Recoding the history of files in a folder (e.g, code files of a software project, case notes, files related to an article/book that you are authoring) can be useful in case you need to refer to past versions.
Lesson plan:
Lesson: Introduction to Revision Control covers that part.
Lesson: Preparing to Use Git covers that part.
Lesson: Putting a Folder Under Git's Control covers that part.
Lesson: Specifying What to include in a Snapshot covers that part.
Lesson: Saving a Snapshot covers that part.
Before learning about Git, let us first understand what revision control is.
Given below is a general introduction to revision control, adapted from bryan-mercurial-guide:
Revision control is the process of managing multiple versions of a piece of information. In its simplest form, this is something that many people do by hand: every time you modify a file, save it under a new name that contains a number, each one higher than the number of the preceding version.
Manually managing multiple versions of even a single file is an error-prone task, though, so software tools to help automate this process have long been available. The earliest automated revision control tools were intended to help a single user to manage revisions of a single file. Over the past few decades, the scope of revision control tools has expanded greatly; they now manage multiple files, and help multiple people to work together. The best modern revision control tools have no problem coping with thousands of people working together on projects that consist of hundreds of thousands of files.
There are a number of reasons why you or your team might want to use an automated revision control tool for a project.
- It will track the history and evolution of your project, so you don't have to. For every change, you'll have a log of who made it; why they made it; when they made it; and what the change was.
- It makes it easier for you to collaborate when you're working with other people. For example, when people more or less simultaneously make potentially incompatible changes, the software will help you to identify and resolve those conflicts.
- It can help you to recover from mistakes. If you make a change that later turns out to be an error, you can revert to an earlier version of one or more files. In fact, a y good revision control tool will even help you to efficiently figure out exactly when a problem was introduced.
- It will help you to work simultaneously on, and manage the drift between, multiple versions of your project.
Most of these reasons are equally valid, at least in theory, whether you're working on a project by yourself, or with a hundred other people.
A revision is a state of a piece of information at a specific time that is a result of some changes to it e.g., if you modify the code and save the file, you have a new revision (or a new version) of that file. Some seem to use this term interchangeably with version while others seem to distinguish the two -- here, let us treat them as the same, for simplicity.
Revision Control Software (RCS) are the software tools that automate the process of Revision Control i.e. managing revisions of software artifacts. RCS are also known as Version Control Software (VCS), and by a few other names.
Git is the most widely used RCS today. Other RCS tools include Mercurial, Subversion (SVN), Perforce, CVS (Concurrent Versions System), Bazaar, TFS (Team Foundation Server), and Clearcase.
Github is a web-based project hosting platform for projects using Git for revision control. Other similar services include GitLab, BitBucket, and SourceForge.
Before you start learning Git, you need to install some tools in your computer.
Installing Git
Git is a free and open source software used for revision control. To use Git, you need to install Git on your computer.
PREPARATION: Install Git
Download the Git installer from the official Git website.
Run the installer and make sure to select the option to install Git Bash when prompted.
When running Git commands, we recommend Windows users to use the Git Bash terminal that comes with Git. To open Git Bash terminal, hit the key and type git bash.
SIDEBAR: Git Bash Terminal
Git Bash is a terminal application that lets you use Git from the command line on Windows. Since Git was originally developed for Unix-like systems (like Linux and macOS), Windows does not come with a native shell that supports all the commands and utilities commonly used with Git.

Git Bash provides a Unix-like command-line environment on Windows. It includes:
- A Bash shell (Bash stands for Bourne Again SHell), which is a widely used command-line interpreter on Linux and macOS.
- Common Unix tools and commands (like
ls,cat,ssh, etc.) that are useful when working with Git and scripting.
Use your Linux distribution's package manager to install Git. Examples:
Debian/Ubuntu, run
sudo apt-get updateand thensudo apt-get install git.Fedora: run
sudo dnf updateand thensudo dnf install git.
Verify Git is installed, by running the following command in a terminal.
git --version
git version 2._._
The output should spit out the version number.
Configuring user.name and user.email
Git needs to know who you are to record changes properly. When you save a snapshot of your work in Git, it records your name and email as the author of that change. This ensures everyone working on the project can see who made which changes. Accordingly, you should set the config settings user.name and user.email as before you start Git for revision control.
PREPARATION: Set user.name and user.email
To set the two config settings, run the following commands in your terminal window:
git config --global user.name "Your Name"
git config --global user.email "your_email@example.com"
To check if they are set as intended, you can use the following two commands:
git config --global user.name
git config --global user.email
Interacting with Git: CLI vs GUI
Git is fundamentally a command-line tool. You primarily interact with it through its by typing commands. This gives you full control over its features and helps you understand what’s really happening under the hood.
clients for Git also exist, such as Sourcetree, GitKraken, and the built-in Git support in editors like Intellij IDEA and VS Code. These tools provide a more visual way to perform some Git operations.
If you're new to Git, it's best to learn the CLI first. The CLI is universal, always available (even on servers), and helps you build a solid understanding of Git’s concepts. You can use GUI clients as a supplement — for example, to visualise complex history structures.
Mastering the CLI gives you confidence and flexibility, while GUI tools can serve as helpful companions.
PREPARATION: [Optional] Install a GUI client
Optionally, you can install a Git GUI client. e.g., Sourcetree (installation instructions).
Our Git lessons shows how to perform Git operations in Git CLI, and in Sourcetree -- the latter just to illustrate how Git GUIs work. It is perfectly fine for you to learn the CLI only.

[image credit: https://www.sourcetreeapp.com]
Installing the Git-Mastery App
In these lessons, we are piloting a new companion app called Git-Mastery that we have been developing to help Git learners. Specifically, it provides exercises that you can do to self-test your Git knowledge, and the app will also verify if your solution is correct.
If you are new to Git, we strongly recommend that you install and use the Git-Mastery app.
PREPARATION: [Recommended] Install and Configure the Git-Mastery App
1. Install the Git-Mastery App
brew tap git-mastery/gitmastery
brew install gitmastery
Ensure you are running libc version 2.38 or newer.
Then install the app by running the following commands:
sudo apt install software-properties-common
sudo add-apt-repository "deb https://git-mastery.github.io/gitmastery-apt-repo any main"
sudo apt update
sudo apt-get install gitmastery
Install using pacman:
sudo pacman -Syu gitmastery-bin
If you are using a Linux distribution that is not yet supported by Git-Mastery, please download the right binary for your architecture from the latest release.
Install it to /usr/bin to access the binary, the following using version 3.3.0 as an example.
install -D -m 0755 gitmastery-3.3.0-linux-arm64 /usr/bin/gitmastery
2. To verify the installation, run the gitmastery --help command from a couple of different folder locations.
gitmastery --help
cd ../my-projects  # cd into a different folder
gitmastery --help
The current version of the app takes about 3-5 seconds to respond to a command. This is because the app comes with a bundled Python runtime (so that users don't need to install Python first) which needs to load first before the command can be executed.
3. Trigger the initial setup by running the gitmastery setup command in a suitable folder (the app will create files/folders inside this folder).
mkdir gitmastery-home
cd gitmastery-home
gitmastery setup
The gitmastery setup command will perform the following tasks:
- a)Checks if Git is installed.
- b)Checks if
user.nameanduser.emailare set. - c)Prompts you to specify a name for the git-mastery exercises directory -- you can accept the default.
- d)Sets up a mechanism to locally track the progress of your exercises.
Notes:
- If the command failed due to checks (a) or (b) failing, you can rectify the problem and run the command again.
- If you wish to check the Git set up again at a later time, you can run the
gitmastery check gitcommand.
To be able to save snapshots of a folder using Git, you must first put the folder under Git's control by initialising a Git repository in that folder.
Normally, we use Git to manage a revision history of a specific folder, which gives us the ability to revision-control any file in that folder and its subfolders.
To put a folder under the control of Git, we initialise a repository (short name: repo) in that folder. This way, we can initialise repos in different folders, to revision-control different clusters of files independently of each other e.g., files belonging to different projects.
You can follow the hands-on practical below to learn how to initialise a repo in a folder.
What is this? HANDS-ON panels contain hands-on activities you can do as you learn Git. If you are new to Git, we strongly recommend that you do them yourself (even if they appear straightforward), as hands-on usage will help you internalise the concepts and operations better.
1 First, choose a folder. The folder may or may not have any files in it already. For this practical, let us create a folder named things for this purpose.
cd my-projects
mkdir things
2 Then CD into it.
cd things
3 Run the git status command to check the status of the folder.
git status
fatal: not a git repository (or any of the parent directories): .git
Don't panic. The error message is expected. It confirms that the folder currently does not have a Git repo.
4 Now, initialise a repository in that folder.
Use the command git init which should initialise the repo.
git init
Initialized empty Git repository in things/.git/
The output might also contain a hint about a name for an initial branch (e.g., hint: Using 'master' as the name for the initial branch ...). You can ignore that for now.
Note how the output mentions the repo being created in things/.git/ (not things/). More on that later.
-
Windows: Click
File→Clone/New…→ Click on+ Createbutton on the top menu bar.
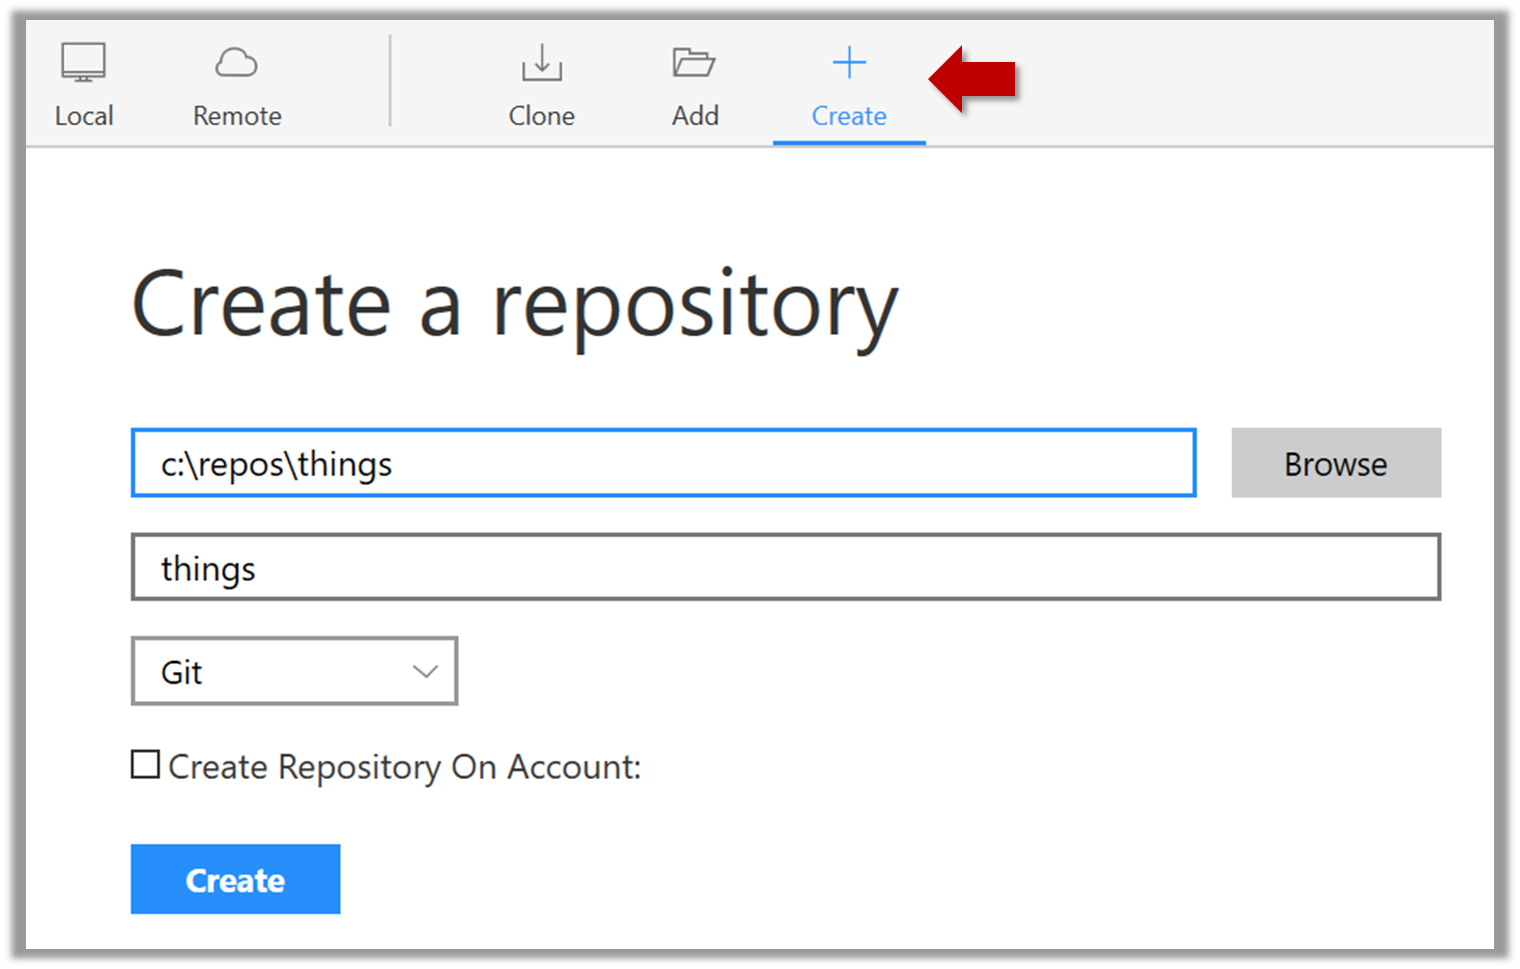
Enter the location of the directory and clickCreate. -
Mac:
New...→Create Local Repository(orCreate New Repository) → Click...button to select the folder location for the repository → click theCreatebutton.
Initialising a repo results in two things:
- a)First, Git now recognises this folder as a Git repository, which means it can now help you track the version history of files inside this folder.
To confirm, you can run the git status command. It should respond with something like the following:
git status
On branch master

No commits yet

nothing to commit (create/copy files and use "git add" to track)
Don't worry if you don't understand the output (we will learn about them later); what matters is that it no longer gives an error message as it did before.
- b)Second, Git created a hidden subfolder named
.gitinside thethingsfolder. This folder will be used by Git to store metadata about this repository.
What is this? UNDER-THE-HOOD panels explain how a certain Git feature works under the hood i.e., some implementation details.
They can be skipped the first time you are taking a tour. But we recommend that you delve into some of them at some point. Reason: While Git can be used without knowing much about its internal workings, knowing those details will allow you to be more confident when using Git, and harness more of its awesome power.
UNDER-THE-HOOD: How Git stores meta-data about the repository
A Git-controlled folder is divided into two main parts:
- The repository – stored in the hidden
.gitsubfolder, which contains all the metadata and history. - The working directory – everything else in that folder, where you create and edit files.
What is this? EXERCISE panels contain a Git-Mastery exercise that you can download using the Git-Mastery app, and you can use the same app to verify that your solution is correct.
EXERCISE: under-control
What is this? DETOUR panels contain related directions you can optionally explore. We recommend that you only skim them the first time you are going through a tour (i.e., just to know what each detour covers); you can revisit them later, to deepen your knowledge further, or when you encounter a use case related to the concepts covered by the detour.
DETOUR: Undoing a Repo Initialisation
When Git initialises a repo in a folder, it does not touch any files in the folder, other than create the .git folder its contents. So, reversing the operation is as simple as deleting the newly-created .git folder.
git status #run this to confirm a repo exists

rm -rf .git  #delete the .git folder

git status #this should give an error, as the repo no longer exists
To save a snapshot, you start by specifying what to include in it, also called staging.
Git considers new files that you add to the working directory as 'untracked' i.e., Git is aware of them, but they are not yet under Git's control. The same applies to files that existed in the working folder at the time you initialised the repo.
A Git repo has an internal space called the staging area which it uses to build the next snapshot. Another name for the staging area is the index).
We can stage) an untracked file to tell Git that we want its current version to be included in the next snapshot. Once you stage an untracked file, it becomes 'tracked' (i.e., under Git's control).
In the example below, you can see how staging files change the status of the repo as you from (a) to (c).
staging area
[empty]
other metadata ...
├─ fruits.txt (untracked!)
└─ colours.txt (untracked!)
(a) State of the repo, just after initialisation, and creating two files. Both are untracked.
staging area
└─ fruits.txt
other metadata ...
├─ fruits.txt (tracked)
└─ colours.txt (untracked!)
(b) State after staging
fruits.txt.staging area
├─ fruits.txt
└─ colours.txt
other metadata ...
├─ fruits.txt (tracked)
└─ colours.txt (tracked)
(c) State after staging
colours.txt.1 First, add a file (e.g., fruits.txt) to the things folder.
Here is an easy way to do that with a single terminal command.
echo "apples\nbananas\ncherries\n" > fruits.txt
apples
bananas
cherries
2 Stage the new file.
2.1 Check the status of the folder using the git status command.
git status
On branch master

No commits yet

Untracked files:
  (use "git add <file>..." to include in what will be committed)

  fruits.txt
nothing added to commit but untracked files present (use "git add" to track)
2.2 Use the add command stage the file.
git add fruits.txt
You can replace the add with stage (e.g., git stage fruits.txt) and the result is the same (they are synonyms).
2.3 Check the status again. You can see the file is no longer 'untracked'.
git status
On branch master

No commits yet

Changes to be committed:
  (use "git rm --cached <file>..." to unstage)

      new file:   fruits.txt
As before, don't worry if you don't understand the content of the output (we'll unpack it in a later lesson). The point to note is that the file is no longer listed as 'untracked'.
2.1 Note how the file is shown as ‘unstaged’. The question mark icon indicates the file is untracked.
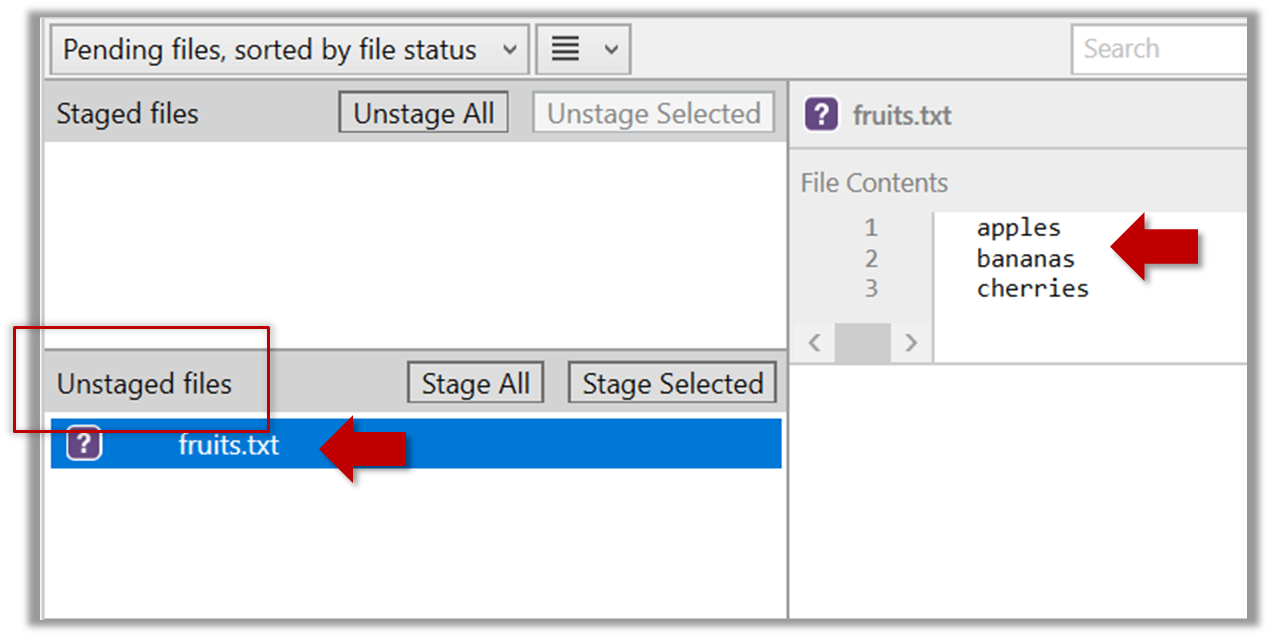
If the newly-added file does not show up in Sourcetree UI, refresh the UI (: F5
| ⌥+R)
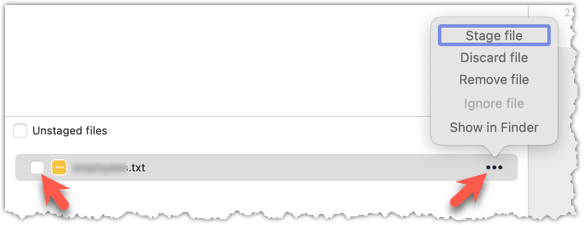
2.2 Stage the file:
Select the fruits.txt and click on the Stage Selected button.

Staging can be done using tick boxes or the ... menu in front of the file.
2.3 Note how the file is staged now i.e., fruits.txt appears in the Staged files panel now.
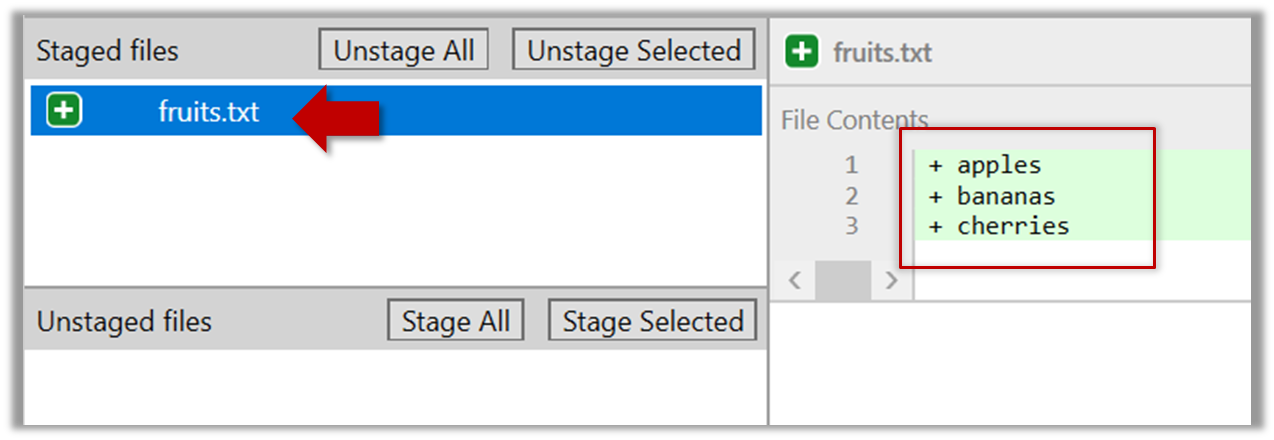
If Sourcetree shows a \ No newline at the end of the file message below the staged lines (i.e., below the cherries line in the above screenshot), that is because you did not hit enter after entering the last line of the file (hence, Git is not sure if that line is complete). To rectify, move the cursor to the end of the last line in that file and hit enter (like you are adding a blank line below it). This new change will now appear as an 'unstaged' change. Stage it as well.
If you modify a staged file, it goes into the 'modified' state i.e., the file contains modifications that are not present in the copy that is waiting (in the staging area) to be included in the next snapshot. If you wish to include these new changes in the next snapshot, you need to stage the file again, which will overwrite the copy of the file that was previously in the staging area.
The example below shows how the status of a file changes when it is modified after it was staged.
staging area
Alice
other metadata ...
Alice
(a) The file names.txt is staged. The copy in the staging area is an exact match to the one in the working directory.
staging area
Alice
other metadata ...
Alice
Bob
(b) State after adding a line to the file. Git indicates it as 'modified' because it now differs from the version in the staged area.
staging area
Alice
Bob
other metadata ...
Alice
Bob
(c) After staging the file again, the staging area is updated with the latest copy of the file, and it is no longer marked as 'modified'.
1 First, add another line to fruits.txt, to make it 'modified'.
Here is a way to do that with a single terminal command.
echo "dragon fruits" >> fruits.txt
apples
bananas
cherries
dragon fruits
2 Now, verify that Git sees that file as 'modified'.
Use the git status command to check the status of the working directory.
$ git status
On branch master

No commits yet

Changes to be committed:
(use "git rm --cached <file>..." to unstage)
new file:   fruits.txt

Changes not staged for commit:
(use "git add <file>..." to update what will be committed)
(use "git restore <file>..." to discard changes in working directory)
modified:   fruits.txt
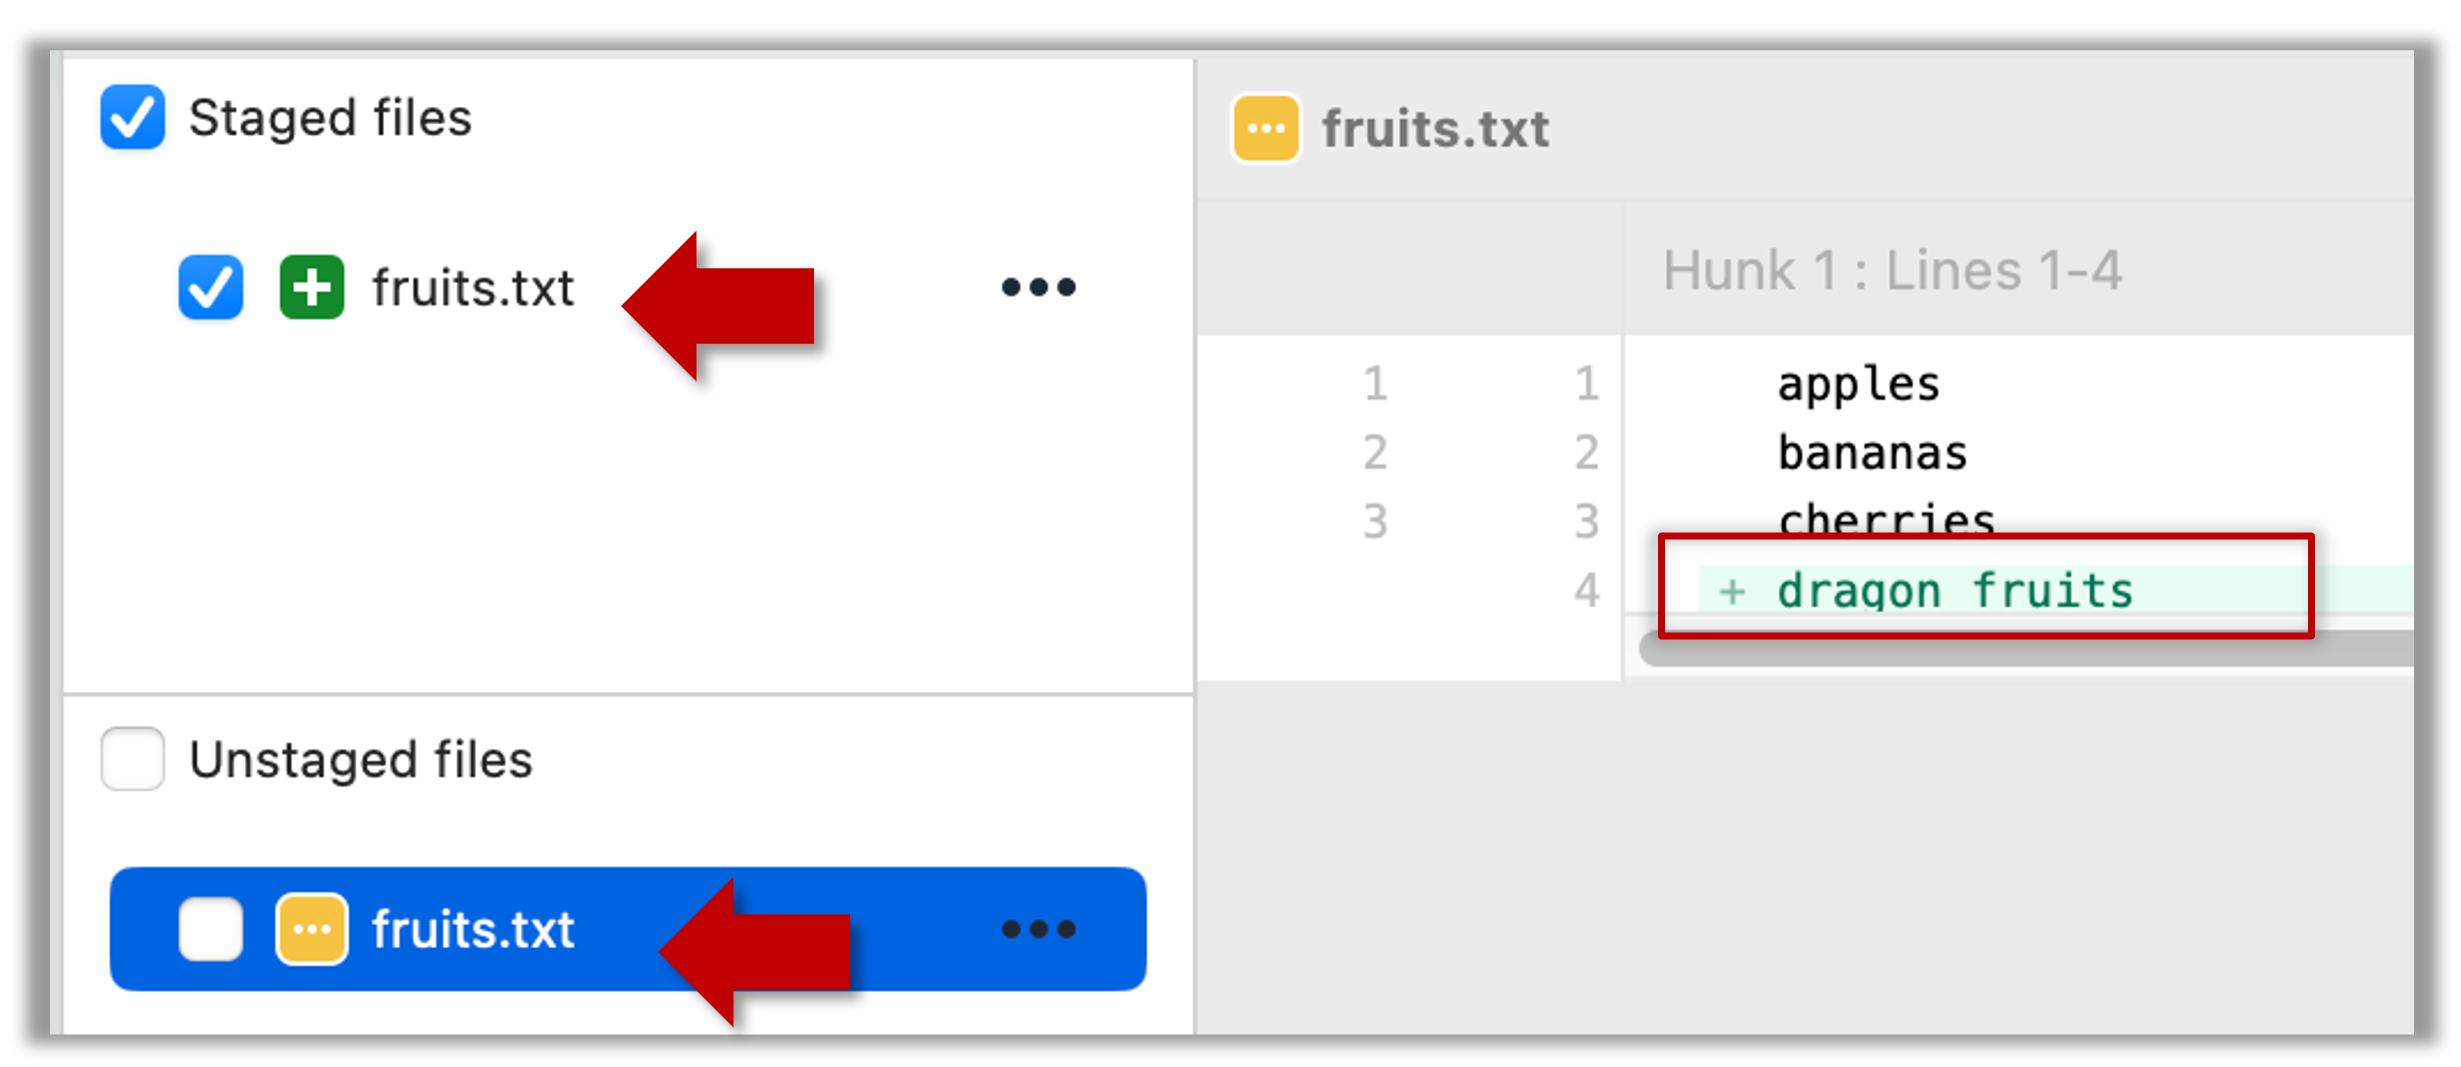
Note how fruits.txt now appears twice, once as new file: ... (representing the version of the file we staged earlier, which had only three lines) and once as modified: ... (representing the latest version of the file which now has a fourth line).
Note how fruits.txt appears in the Staged files panel as well as 'Unstaged files'.
3 Stage the file again, the same way you added/staged it earlier.
4 Verify that Git no longer sees it as 'modified', similar to step 2.
Git does not track empty folders. You can test this by adding an empty subfolder inside the things folder (e.g., things/more-things and checking if it shows up as 'untracked' (it will not). If you add a file to that folder (e.g., things/more-things/food.txt) and then staged that file (e.g., git add more-things/food.txt), the folder will now be included in the next snapshot.
EXERCISE: stage-fright
DETOUR: Staging File Deletions
When you delete a tracked file from your working directory, Git doesn’t automatically assume you want that change to be part of your next commit. To tell Git you intend to record a file deletion in the repository’s history, you need to stage the deletion explicitly.
When you stage a deleted file, you’re adding the removal of the file to the staging area, just like you’d stage a modified or newly created file. After staging, the next commit will reflect that the file was removed from the project.
To delete a file and stage the deletion in one go, you can use the git rm <file-name(s)> command. It removes the file from the working directory and stages the deletion at the same time.
git rm data/list.txt plan.txt
If you’ve already deleted the file manually (for example, using rm or deleting it in your file explorer), you can still stage the deletion using the git add <file-name(s)> command. Even though the file no longer exists, git add records its deletion into the staging area.
git add data/list.txt
Staging a file deletion is done similar to staging other changes.
DETOUR: Unstaging Changes
You can unstage a staged file, which simply removes it from the staging area but keeps the changes in your working directory. This is useful if you later realise that you don’t actually want to include a staged file in the next commit — perhaps you staged it by mistake, or you want to include that change in a later commit.
To unstage a file you added or modified, run
git restore --staged <file-name(s)>. This command removes the file from the staging area, leaving your working directory untouched.git restore --staged plan.txt budget.txt data/list.txtTo unstage a file deletion (staged using
git rm), use the same command as above. It will unstage the deletion and restore the file in the staging area.
If you also deleted the file from your working directory, you may need to recover it separately withgit restore <file-name(s)>git restore data/list.txt data/plan.txt
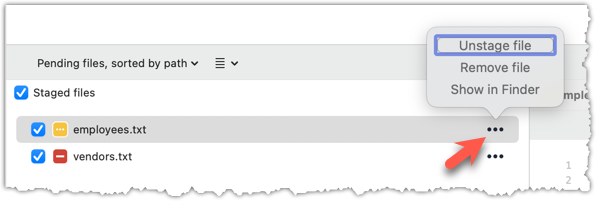
To unstage a file, locate the file among the staged files section, click the ... in front the file, and choose Unstage file:
EXERCISE: staging-intervention
after staging, you can now proceed to save the snapshot, aka creating a commit.
Saving a snapshot is called committing and a saved snapshot is called a commit.
A git commit is a full snapshot of your working directory based on the files you have staged, more precisely, a record of the exact state of all files in the staging area (index) at that moment -- even the files that have not changed since the last commit. This is in contrast to other revision control software that only store the in a commit. Consequently, a Git commit has all the information it needs to recreate the snapshot of working directory at the time the commit was created.
A commit also includes metadata such as the author, date, and an optional commit message describing the change.
A Git commit is a snapshot of all tracked files, not simply a delta of what changed since last commit.
Assuming you have previously staged changes to the fruits.txt, go ahead and create a commit.
1 First, let us do a sanity check using the git status command.
git status
On branch master

No commits yet

Changes to be committed:
(use "git rm --cached <file>..." to unstage)
  new file:   fruits.txt
2 Now, create a commit using the commit command. The -m switch is used to specify the commit message.
git commit -m "Add fruits.txt"
[master (root-commit) d5f91de] Add fruits.txt
 1 file changed, 5 insertions(+)
 create mode 100644 fruits.txt
3 Verify the staging area is empty using the git status command again.
git status
On branch master
nothing to commit, working tree clean
Note how the output says nothing to commit which means the staging area is now empty.
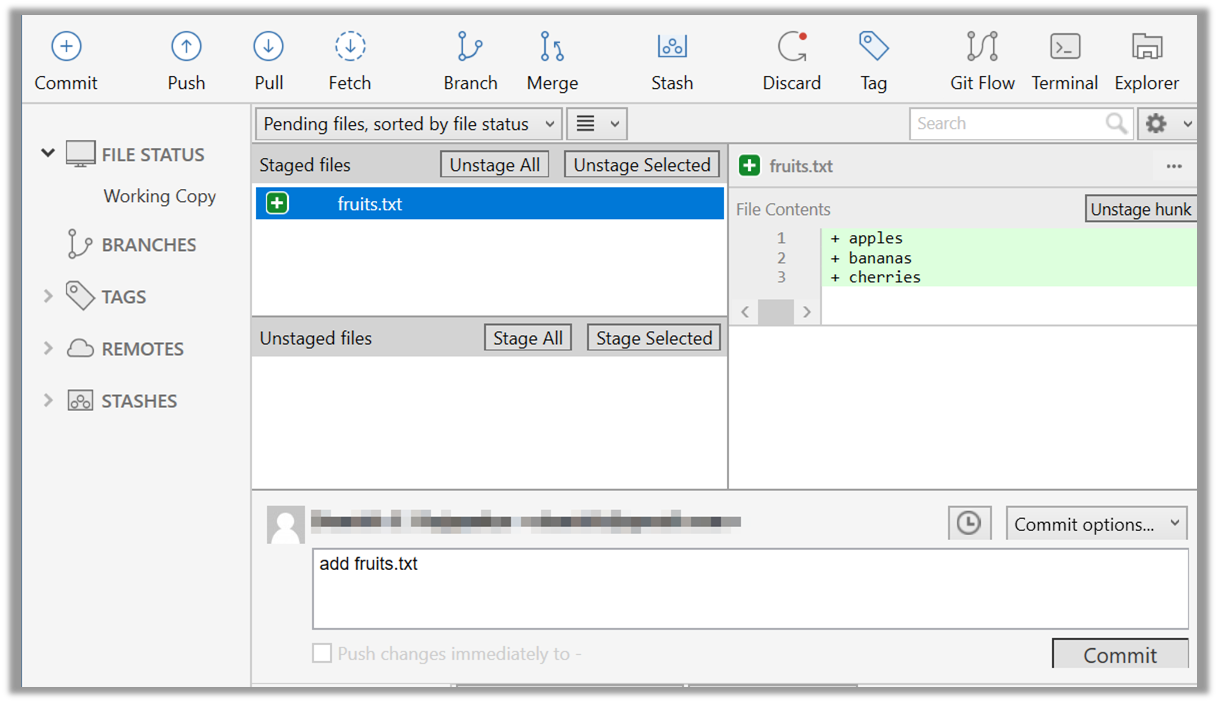
Click the Commit button, enter a commit message (e.g. add fruits.txt) into the text box, and click Commit.
Git commits form a timeline, as each corresponds to a point in time when you asked Git to take a snapshot of your working directory. Each commit links to at least one previous commit, forming a structure that we can traverse.
A timeline of commits is called a branch. By default, Git names the initial branch master -- though many now use main instead. You'll learn more about branches in future lessons. For now, just be aware that the commits you create in a new repo will be on a branch called master (or main) by default.
gitGraph
    %%{init: { 'theme': 'default', 'gitGraph': {'mainBranchName': 'master (or main)'}} }%%
    commit id: "Add fruits.txt"
    commit id: "Update fruits.txt"
    commit id: "Add colours.txt"
    commit id: "..."
Git can show you the list of commits in the Git history.
1 View the list of commits, which should show just the one commit you created just now.
You can use the git log command to see the commit history.
git log
commit d5f91de... (HEAD -> master)
Author: ... <...@...>
Date:   ...

Add fruits.txt
Use the Q key to exit the output screen of the git log command.
Note how the output has some details about the commit you just created. You can ignore most of it for now, but notice it also shows the commit message you provided.
Expand the BRANCHES menu and click on the master to view the history graph, which contains only one node at the moment, representing the commit you just added. For now, ignore the label master attached to the commit.

2 Create a few more commits (i.e., a few rounds of add/edit files -> stage -> commit), and observe how the list of commits grows.
Here is a example list of bash commands to add two commits while observing the list of commits
$ echo "figs" >> fruits.txt  # add another line to fruits.txt
$ git add fruits.txt  # stage the updated file
$ git commit -m "Insert figs into fruits.txt"  # commit the changes
$ git log  # check commits list

$ echo "a file for colours" >> colours.txt  # add a colours.txt file
$ echo "a file for shapes" >> shapes.txt  # add a shapes.txt file
$ git add colours.txt shapes.txt  # stage both files in one go
$ git commit -m "Add colours.txt, shapes.txt"  # commit the changes
$ git log  # check commits list
The output of the final git log should be something like this:
commit 18300... (HEAD -> master)
Author: ... <...@...>
Date:   ...

    Add colours.txt, shapes.txt

commit 2beda...
Author: ... <...@...>
Date:   ...

    Insert figs into fruits.txt

commit d5f91...
Author: ... <...@...>
Date:   ...

    Add colours.txt, shapes.txt
To see the list of commits, click on the History item (listed under the WORKSPACE section) on the menu on the right edge of Sourcetree.
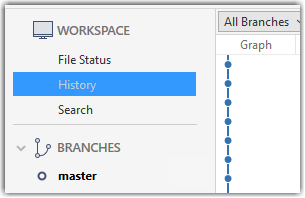
After adding two more commits, the list of commits should look something like this:

EXERCISE: grocery-shopping
Related DETOUR: Resetting Uncommitted Changes
At times, you might need to get rid of uncommitted changes so that you have a fresh start to the next commit.
That aspect is covered in a detour under the lesson Rewriting History to Start Over.
Related DETOUR: Undoing/Deleting Recent Commits
How you undo or delete the last few commits if you realise they were incorrect, unnecessary, or done too soon?.
That aspect is covered in a detour under the lesson Rewriting History to Start Over.
At this point: You should now be able to initialise a Git repository in a folder and commit snapshots of its files at times of your choice. So far, you did not learn how to actually make use of those snapshots (other than to show a list of them) -- we will do that in later tours.
What's next: Tour 2: Backing up a Repo on the Cloud